Southern Pacific Lines
Coast Line Division
“The Route of the Octopus”
Southern Pacific Lines
Coast Line Division
“The Route of the Octopus”
General Information
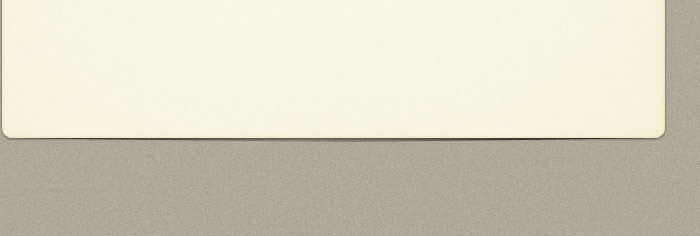
Streamlined Heavyweight Passenger Cars
The SP streamliner era really began in 1937 when the railroad received its first streamlined lightweight cars. There were two sets of twelve cars for the newly re-equipped Daylight. The cars were all fluted. It soon became apparent that the coffee shop/lounge cars were too congested. So in 1938 the SP replaced them with new two coffee shop cars and two new lounge cars. The 1937 coffee shop/lounge cars were withdrawn from regular service, becoming "protection" for the new cars; they were rebuilt into lounge cars after World War II. 1938 also saw the delivery of similar cars for the brand new Sunbeam, which ran in Texas under the T&NO.
Bruce Bloch
By 1954, many of SP's passenger trains were streamlined.
#5 & 6, the Argonaut, (secondary LA-New Orleans train) was heavyweight in the mid-1950s.
The Owl and West Coast would have been all or mostly heavyweight.
The mail train on the Shasta Route had nothing more than a rider coach by 1954.
The Golden State Route had a secondary train called at various times the Californian or Imperial that was probably still mainly heavyweight in the mid-1950s. The secondary Golden State Route train had a Memphis-LA heavyweight sleeper until the late 50s, as well as Chicago cars.
SP HW Passenger Car Name Changed for Numbers
When the SP changed their heavyweight Pullman passenger car names for numbers, one number assigned to a 74'6" Steel Sleeper 12S-1DR ('26), PMB A/C, Plan #3410a (5), was #8336. A few 3410Bs received numbers lower than the 3410As.
SPH&TS SP Car Roster as of 1/31/56 lists the car number (page 37 of 41). John Carroll's SP Heavyweight Sleepers list in Trainline #27, pages 9-15, does not contain a #8336. According to the Pullman Company, SP renumberings stopped at #8335.
None of these cars appear in the 1961 Pullman Company Descriptive List of Cars, and the Pullman records show all of them as having been scrapped, or sold for scrap, by July, 1962.
Car Designations
The Parlor-obs were designated PRO.
The O stands for Observation.
PR stands for parlor.
Arch Roofed Cars Nomenclature
Arch roofed cars were Common Standard steel cars to the SP. SP referred to the roof style as an arch roof in most cases. Clerestory roofs were referred to as Clere-Story on the SP. Pullman called the arch roof an oval roof. From an engineering standpoint, oval is more correct. The design is most certainly not a Roman arch.
Calling an arch roof steel car is much more appropriate that calling it a Harriman. Common Standard arch roof steel car is even more correct. No arch roofed cars were ever referred to as "Harriman cars" by SP or UP or by the builders Pullman, ACF, etc.
Jeff Cauthen
Determining Passenger Car Orientation
A definition is given on page 14 of the SPHTS Passenger Car Book Vol 1. A "compass" system was used by SP in internal documents, thus its use also in the book for the same purposes. In an unlabeled photo, you do NOT know which side is which, unless you are familiar with that car class and know where the restrooms are, etc. Underbody details also help, as they were applied consistently (the psgr. car book tries to present this info also). The inability to look at a photo and know which side you are looking at, without considerable additional info, is indeed a drawback to the "compass" system used by SP for passenger cars.
(Interestingly, the freight car system does not have this problem. Freight cars are defined entirely differently, being A and B ends plus left and right sides.)
It appears that, when viewing the south side of a car, the east end to your right (as in the compass), thus the front of the car is the "east" end. The works well with a combine where the baggage compartment is the "front.". The hand brake appears to be on the West end. Floor plans don't indicate the hand brake end.
Tony Thompson
Parlor
The straight parlor were run vestibule to the rear as the parlor-observation doesn't have it's own vestibule. So the parlor car should be turned so that its vestibule is next to the parlor observation.
Jeffrey Alan Cauthen
3 unit Diner
The 3-unit diner was generally operated coffee shop-kitchen-diner, in that order. The coffee shop is the car with ten pair of tables and ten large windows per side, split five and five. The diner has nine pair of tables and nine windows.
Jim Lancaster
Articulated Chair Cars
On the articulated chair cars, the women's car ran ahead of the men's.
Tavern
The Tavern typically ran between the single chair car and the straight parlor. As such, it conveniently separated the first class parlor cars from the rest of the train. From a safety standpoint, it's interesting that the cars on either side of the Tavern had their vestibule doors furthest away. This is necessary for the straight parlor doors to be adjacent to the PRO2 observation for loading and unloading. Having the single chair vestibule forward means one porter could handle the loading of it and the adjacent articulated chair, but in an emergency situation you'd think you'd want a loading door next to the Tavern. [which you'd have if an articulated car was adjacent to it].
Jim Gerstley
SP Passenger Car Finding List
A downloadable 1956 SP Passenger Car Finding List (PDF files) has been posted on the SP Historical & Technical Society web-site. This allows the user to cross reference the cars that are discussed in Volumes 1 thru 5 of the SP passenger car book series. The files are in the Resources section on the web-site sphts.org.
Jeff Cauthen http://sphts.org/resources/and
Harrimnan Information
SP re-built 79' Harriman car
No Harriman cars were 79 feet long. All the SP arch roof cars greater than 60' were built after the Harriman era ended and they were 73’ or 74’ over end posts. Maybe 79' if vestibules are included, but neither Harriman nor SP ever included the vestibules in the length. No Harriman cars ever had a fishbelly underframes.
Tony Thompson
Harriman Corner Steps
Modeling Harriman Corner Steps
Precision Scale Co.
Use # 33192 HO Harriman corner steps for SC&F cars or Harriman Head-End Cars. Part # 33192 are the narrow stirrup steps for the car ends and Part # 33188 are the wider steps under the baggage doors.
Tom Cockle
SP Harriman Era Cars
Harriman 60’ Underbody Details
The best documentation for 60 foot Harriman Car underbody detailing is Vol 1 side photos plus emails from 3 ESPEE participants containing photos of their modeling results.
Modeling Underbody Car Details
PSC
PSC has a kit for a "Harriman" coach. If you want the real deal, contact Ted Anderson at the Pullman Library located at the Illinois Railway Museum.
Paint
On paint layers up to the 1920s, on SP and late CP wooden passenger rolling stock, only the external frame, pedestals, journal boxes, journal lids, springs (leafs and coils) and their nests plus the equalizers were dark olive green. The central portion of the trucks seem to have been largely drop-black, as were air reservoirs and much of the frame.
Later steel cars such as Harriman 60-foot coaches got more dark green on the steel trucks including the bolsters, spring planks and so on. Also dark green the faces (but not the sides and rears) of equipment and/or battery boxes and sometimes reservoirs mounted nearest the outside walls. The backsides and sides of equipment and battery boxes got drop black or similar.
Kevin Bunker
The roofs and underframes were black but the trucks were Dark Olive, as were the battery box fronts.
Charles Givens
Not all painters followed it. It depends on your time period as I've seen color photos of Dark Olive Green cars with black trucks and battery boxes. These seem to appear after the TTG scheme was adopted, which specified black trucks and battery boxes. Also, the truck faces only were Dark Olive Green enamel. If your modeling period is 1952/53 my guess is that DOG is the color to use. After 1954 you'll find more black trucks and black battery boxes. See page 94 in Volume 1, SP #2697 definitely has black painted ice bunkers. Page 254 shows SP #1051 in color and it appears to have the proper DOG scheme.
Jeff Cauthen
New Sunset Harrimans
On cars purchased by the Associated (Harriman) Lines with arch (oval) roof, the center of the roof S/B (should be)14' from top of rail.
Jeff Cauthen
Details Information
SP Skirt Removal
There’s quite a bit of information in Vol. 2 of SP Passenger Cars: Sleepers & Bagg-Dorms on skirts.
1941-1947
SOUTHERN PACIFIC Lines on the letter board with skirts.
1946-1954
SOUTHERN PACIFIC on the letter board with skirts.
1949
SP wanted to revise the 1949 order to Pullman to delete the full center skirts. Pullman already had all the material in-hand and it was cheaper to complete the cars with full skirts.
1950-1960?
SOUTHERN PACIFIC on the letter board with no skirts, original Daylight emblem.
The 1950 orders from Pullman and Budd had skirts, but they were the "NYC" type (the small 3" center skirt).
1951
Something happened in 1950/1951 on the Coast line (we have not found a specific directive). The Coast Daylight got deskirted quit quickly. The Coast Daylight and Lark appear to have had their full center skirts modified early to the 3" center skirt. The Budd cars were specifically excluded from any skirt removal programs. The 1949 cars had stainless steel skirt hinges so they were excluded from any skirt removal, unless the hinge and skirt were damaged. This is why photos of some Shasta cars and some other 1949 cars show full skirts as late as 1961.
1953
By 1953/1954 you won’t find a Coast Daylight assigned car with skirts. Now, Shasta Daylight cars retained skirts much later as did some Overland/COSF and Golden State cars. We think the Coast Daylight cars and SJ Daylight got deskirted so early because they had steel skirts and hinges which were rusting out. The other mentioned cars had stainless steel hinges and skirts so it was not near the problem. And of course, the Coast and SJ Daylight cars had been built in the 1937 thru 1941 period.
Jeff Cauthen
1955
The 1955 Coast Daylight train featured a mixture of both skirted and de-skirted cars, along with some that still had full-width diaphragms, while others had already been removed.
1961
Later on, in 1961, it was directed that all skirting would be removed, including the 3" center skirt whether damaged or not. Again, the Budd cars were exempt from this directive.
Fluting Replaced by Stainless Steel Siding
The old fluting was removed and replaced by new flat stainless steel siding. This was discussed by Richard Wright in his Daylight book and by the SPH&TS in SP Passenger Cars Volume 1: Coaches and Chair Cars.
Jeff Cauthen
Full-Width Diaphragms
Full-width diaphragms were specified on cars delivered in 1954. But, when the dome-lounge cars were built in 1955, they did not have full-width diaphragms. The 1954 as-built Shasta/Coast Daylight big window chair cars had full-width diaphragms, but no skirts.
Jeff Cauthen
Diaphragms Removal from Passenger Cars
The full-width diaphragms began to be removed in 1954-55, not 1953-54.
John Thompson
By 1956/1957 no SP cars still had full-width diaphragms.
Jeff Cauthen
Diaphragms were never removed from passenger cars while in service, except when the cars were converted to SPMW service. The road never removed diaphragms from active-service passenger cars or baggage or baggage-postal cars, that's for sure. Most such cars converted to M of W service had at least the striker plates and bellows removed, and sometimes the buffer above the couplers (but not always), along with steam lines and air signal hoses.
Kevin Bunker
Head-End Cars Diaphragms
Raised top edge
For head-end cars, SP used a simpler design of diaphragm. A common pattern was a raised top edge, shown in a photo of a Class 70-B-5 car, SP 6488, taken at Oakland in 1951, by Wilbur C. Whittaker (Southern Pacific Passenger Cars, Vol 3: Head End Equipment). The diaphragm can be interpreted as having four main parts: two side folds, a top spring mount, and a striker plate. Note in this photo that the side “folds” are simple and do not reach to the top of the fixture, and that there is a spring mounting at the top.
Tony Thompson
Flat top edge
This is shown on SP 6188, a Class 60-B-2 car at Oakland on April 13, 1951, taken again by Will Whittaker, (Southern Pacific Passenger Cars, Vol 3: Head End Equipment).
Tony Thompson
Paint
Full-Width Diaphragms Paint
Full-width diaphragms, such as used on the Daylight and other SP trains, had the striking face painted. See page 13 in Tom Dill's San Joaquin Valley Line book. Also see SP Passenger Car books Volumes 1, 2 & 3 from the SPH&TS.
Jeff Cauthen
Note that there is a buffing surface roughly equal to the buffers on standard diaphragms that does not have paint in most of the pictures. The surface was probably painted when the car was first built so factory pictures will show it painted, but I would surmise that the paint was rubbed off by the end of their trip west. Painted buffers in Niles Canyon show how amazing fast that paint gets rubbed off in a normal operation.
Joe Mann
Reference
Southern Pacific Passenger Cars, Vol 3: Head End Equipment, pg.
Modeling Full-Width Diaphragms
American Limited Diaphragms
Use American Ltd diaphragms for all your passenger equipment. If you follow their instructions and set things for 36" between cars, they work and look wonderful. The only limitation is that they tend to be a bit unhappy with any radius below 36" and 42" is really preferred. For a smaller radius, the spacing between cars will need to be increased a bit and there will be a decrease in the appearance quality.
Pat LaTorres
Attaching On Athearn
With Athearn passenger cars, to add diaphragms to them use the American Limited diaphragms. They line up, work and look great and don't impede tracking of the car. The part number is #9100. They come in 1 of 3 colors.
Attaching on Brass heavy weight passenger cars
The recommended procedure would require disassembly of the sprung diaphragm plates on the cars. The paper diaphragms provided by the importer and are intended to be inserted between the plates and car body. It would not be wise to proceed as recommended.
Remove these and install American Limited plastic diaphragms.
The diaphragms you are describing, probably came with PSC Harrimans models. Throw them away! There are several really fine Harriman diaphragms on the market that can reasonably purchased as correct replacements.
The working diaphragms on the HO PSC cars are not that hard to replace.
1st Pull the whole assembly out of the car.
2nd If you don't like the three holes that are left
3rd Remove the outside plate from the assembly and solder back onto the car
4th Paint the car
5th Install anybody's diaphragms to the car that you like.
It would not only be wise to remove them but recommended. The PSC diaphragms do not flex well in curves if the cars are close coupled.
Several H0 brass Harriman heavy weights came separately equipped with folded u-shaped papers which are to be part of the diaphragms at each end of the cars. Lose these paper "diaphragms" and go with the American Limited plastic units. These are diaphragms in kit form which build up into exceptional looking and working pieces. They're easy to build and very inexpensive for the quality of part you end up with.
BLI Diaphragms
BLI Diaphragm #1018, Daylight paint with pre-war silver stripes. BLI Daylight full width diaphragms are available for purchase. As for the free replacement diaphragms with proof of purchase, can get either pre- or post-war versions, depending on the model you have. Also for purchase.
Jim Gerstley
This is for a single diaphragm to replace the non-flexible diaphragm that came with the first SP Daylight observations. The old plastic FWD is held in place with pins, and the new rubber one does not come with screws.
Jim Lancaster
You can order these from Factory Direct Trains with a 20% discount.
http://factorydirecttrains.com/12-1018SPDaylightStripedRubberDiaphragmsHO.aspx
Scott Inman
The BLI replacement diaphragm for the observation included four small self tapping screws, they look like they are 2mm. Try 1.7mm screws and tap the holes to get them started.
Ken Harrison
Or carefully drill out the holes to 2mm and used some 2mm x 3mm screws.
Brian Ehni
Coach Yard
Coach Yard is out of the diaphragm game.
Hi-Tech Details
They make about 20 different diaphragms. These are nice, but a little finicky.
For "Harriman" cars use Hi-Tech 9000 series CS diaphragms with the lower sides trimmed back. Note that some were without the point at the top. Also, some "Harriman" cars and more of the "non-Harrimans" appear to have had diaphragms similar to the 9600 series Western Short type with less of the point (but they are more rounded than the CS type).
For streamlined cars use his 9300 Western Tall and 9500 Bat Wing (with the wings trimmed off)for cars that had full width diaphragms originally. See photos of Daylight cars.
Some cars had diaphragms similar to the "Opera Window" style (many PS cars pre and post WWII), but note that some Daylight cars had compressed "windows", so these would need modification.
UP cars often had the CS Tall type style.
See photos of them at their site:
http://www.hitechdetails.com/Hi-Tech-P_Car_Diaphragms.html
Walther's
Good, 30” min., paint Daylight colors throughout.
Diaphragm Striker Plate
There’s an interesting striker plate design on SP passenger cars.
Tim O'Connor
That's the cutdown full-width diaphragm striker plate. Shown here is the Pullman-Standard version. The Budd version was markedly different.
Jeff Cauthen
Drumheads
Reference
SP Painting & Lettering Guide, pg. 94 - 95
Modeling Drumheads
Tomar
You will need a resistor between the power and bulbs, so be sure to get the right kit.
Tomar Drumheads Daylight (*see T-39/18-24)
Passenger Car Trucks
Note, passenger car trucks are not generic. The exact trucks that are correct for SP depend on the particular passenger car.
Heavyweight
Under the heavyweight Pullman cars that ran on the S.P., at least 8 different trucks could be used.
SP 2-car artic trucks, 1960
Pretty good bet that by 1960 the journals were RB equipped. A photo show the original plain bearings.The conversion to roller bearings was sometimes done without changing the plain - rectangular - bearing boxes. So model the set with plain journal bearings.
Daylight Trucks
The 4-TC-4, 4-TC- 5, 4-TC-6 trucks were used on the early Daylights.Drawings in Richard Wright's "SP Daylight Train 98-99 Vol 1" which does have photos and drawings of the 4-TC-4, 4-TC-5, 4- TC-6 trucks, but the drawings are not as clear.
Pullman Car Trucks
Car #1910, 1910A, 2410, 2410A, 2411, 2411A, 242, and 242A all have six wheels. The 242 and 242A are top equalized and the others are bottom equalized, and that some have a 10'6" wheelbase and others 11'0". No significant visual differences between these trucks, aside from the top or bottom equalization.
For details of Pullman trucks, see: http://prr.railfan.net/passenger/GSPEAR/GSPEAR_Pullman_Trucks.htm
Modeling Trucks
Cape Line Passenger Trucks
The cape line trucks are correct for SP Streamline Cars
Central Valley
Use for SP Streamline Passenger cars. See an old catalogue from about 1960 which has a page section on Central Valley and their product line. Contact coosbaylumberco@yahoo.com
Central Valley Trucks used to wrap the trucks in them when they were sold in the old cardboard boxes. Their rolling qualities aren't great, and many examples suffer from the "Zamac Disease". Their T-25 is passable under some older equipment. The T-31 was a generic truck for lightweight passenger cars and better trucks are available now.
Coach Yard Trucks
Coach Yard made brass trucks, such as item 523. This is a 41-N, SP Class 4-TC-8 truck for LW cars.
Jeff Cauthen
D&G Models
D & G Models has a line of HO streamline pre-war passenger trucks for the Daylight, Sunbeam, and pool chair cars. Also included are the U-43-R-11 trucks for the SP/UP '38 COLA/COSF trains. Use for Daylight trucks.
Best in the hobby. Web page is www.dandgmodels.com
e-mail dandgmodels@yahoo.com.
Tender used Buckeye 6-wheel trucks.
D&G Models (4-wheel trucks )
P11J - friction bearing with no bolster anchors used on '37, 38', 39' Daylight; Sunbeam; and chair cars for Challenger and Californian
P21J - friction bearing with bolster anchors used on '41 Daylight, Lark diner, and pool chair cars
P21R - SKF roller bearing with booster anchors
MRC
PSC
#33122 Harriman 4-wheel
#33100 Pullman 2426 commonwealth 4-wheel
Walthers
Walthers 933-1086 Trucks are the 2411 style truck used on their HW Diner, Coach and 8-1-2 Sleeper.
Jim Elliot
The new Walthers 6-wheel trucks used on their new Century postal car are pretty close, to make the Baggage RPO for the Sunset, if not the same. They S/B 11' 6" wheel-base and 36" wheels.
Jeff Cauthen
The Walthers 43-R is a better looking truck than the old MRC truck.
Articulated 1939 Daylight Cars Passenger Trucks
They had 6 wheel pax trucks.
Modeling Articulated Pax Car Trucks
Bethlehem Car Works
#1272 these trucks are the best that are currently on the market. Keeping in mind of course that these are not a match for the original trucks used by SP for these cars, given that they are metal.
See www.bethlemcarworks.com under Kit Bits, Trucks
Use Intermountain roller bearing wheel sets in these trucks or Bethlehem's #1263 "Challenger" trucks.
Branchline
Use #2410/2411 trucks on some of their heavyweight Pullmans. Just remember to be careful if you use their wheels as they are a bit too long. Use either the .990 or .995 Reboxx wheels instead.
To build up the bolster with Branchline Trains HW car kits, use AMB attachments kits for the trucks.
Jim Eaton
Central Valley
There trucks are for both the Lark and Daylight diners. They are not available now and are not just right for these six-wheel trucks. However they are very close to the prototype and if you look around at the different train shows they show up from time to time. The operating quality is well worth the trade off for just the right looking trucks.
D & G
They only offer the four-wheel trucks. There trucks are the only way to go both for looks and operating quality.
Model Die Casting
Outdated instructions recommend the Model Die Casting #2931 for the six-wheel articulation truck, but you can't find them anywhere.
Triple Bolster Trucks Passenger Car Trucks
On their prewar Daylight equipment, the SP used a triple-bolster design, which was quite distinctive.
Modeling Triple Bolster Trucks
D&G Models
D&G Models does however, make a very nice version of this truck (as well as other variants of this truck) which are truly fantastic trucks. The D&G trucks are also prototypically correct. The model trucks roll fantastically well, MUCH better than the Walthers. The D&G truck not only looks better but rolls They run $15.00 a pair. You can check the D&G website for more information.
Bill Daniels
Your best bet is a model of a triple bolster truck, made by D&G. They were used on many SP Daylight cars.
Tim O'Connor
MRC / Roundhouse
Roundhouse used to offer a plastic version of this truck, but it's not available any more.
Walthers
The SP triple-bolster truck in no way resembles the drop equalizer truck Walthers is selling. The Walthers version has electrical pickup, and use of wipers.
Observation Lounge Triple Bolster Trucks
The observation lounge came with triple bolster trucks.
Modeling Triple Bolster Trucks
Athearn
Athearn makes a triple bolster truck for the SP chair car they make--not sprung, not as good as D&G.
D& G Trucks
A pair of D&G Models trucks has 50-58 separate parts per pair.
The brass truck parts were[made for a Kumata Daylight. They would require some reaming to enlarge axle holes, flash removal, ideally parts should be [very carefully] soldered together--possible ACC would work.
Jim Gerstley
Walthers
Walthers does make a triple bolster 43-R truck for the '48 Century rebuilt 4-4-2.
Shasta Daylight 4 Wheel Trucks
Modeling 4 Wheel Trucks
IHC
The IHC are nice but the Kato are just a little better.
Kato
On the Shasta Daylight, replace the four wheel trucks on the diner with Kato trucks. Too bad Kato never did more of those trucks.
Shasta Daylight 6 wheel passenger trucks
Six wheel trucks for almost any streamline passenger car that had them have been hard, or expensive, to find.
Modeling 6 Wheel Trucks
Coach yards
They make the trucks for the articulated ends. The question was about the six-wheel trucks that were under the articulated sections of the three-unit diner/coffee shop/kitchen sets.
D&G Models
They make the necessary trucks for the ends. The D&G trucks are probably the best you can get, and are accurate to a fault.
Wasatch
They imported sprung brass trucks (61-N) that were very nice (and pricey) that were much better than the old SOHOs or early Coach Yard's for use under the articulated ends. The Wasatch trucks match the pictures of the trucks under the Shasta cars (PS#7572/3/4).
Passenger Wheels
Officially passenger cars are listed as having 36" diameter wheels. But the reason they are 36" diameter is that they have a thick tread that can be turned down to reprofile the wheel when it is worn. The wheels are actually 36 1/2" when new and can be turned down multiple times, usually in 1" increments, to a bottom limit of 33 1/2". So passenger cars can have 36 1/2, 35 1/2, 34 1/2 or 33 1/2" wheels (or numbers in between).
It is interesting to note that passenger cars have these reprofileable wheels where modern freight cars do not. When a freight car wheel is worn it is discarded instead of turned. Railroads used to have reprofileable wheels on freight cars but found it wasn't worth the extra expense since freight cars spend most of their life sitting around where passenger cars (and locomotives) are always on the move.
Typical wear on railroad wheels are sharp flanges which is caused by going through curves, dished (or hollow) tread caused by going long miles on relatively straight track or flat spots caused by dragging the car with locked brakes. For example the wheel wear on the Suburban Coaches I have inspected is mostly dished. This makes sense since there isn't many tight curves between San Jose and San Francisco. In Niles Canyon most of the wear we are seeing on new wheels we have installed is flange wear. We don't have very much straight track.
A good place to see dished wheels and how they can be turned on a locomotive is:
Joe Mann
Some Pullman specs call out 37", 38" and even 39" wheels. This was 100 years ago, but in the modern era 36", 36 1/2", or 37" seemed to be normal.
Jeff Cauthen
Suburban car wheels
The diameter of the wheels used on the SP Subs passenger cars, as delivered, were 36". As they rack up miles the tread and flange gets worn so that the tread is cupped and the flange gets sharp. These wheels are then be turned (recontoured) multiple times with the final allowable turning being 33 1/2". When the GGRM put roller bearings in the cars, they may have used 33" wheels.
Most freight cars were delivered with 33" wheels. These wheels are not designed to be turned when worn - they are one time use depending strongly on the era. When worn they are scrapped. Some modern freight cars have larger diameter wheels but they are still contoured for one time use.
There were plenty of double-wear or 2-W (re-contour once), as well as multiple-wear, wheels at one time. Most roads came to the conclusion by 1960 that single-wear was really more economical. But in the 1930-1950 era, many car ends were stenciled with the "2-W" or whatever was appropriate. It also means that if we are copying a paint job from a picture that we need to inspect the wheels to see if 2-W applies.
Tony Thompson
The reason for the difference is that freight cars spend most of their time sitting where passenger cars make their money by being on the move.
Not ALL passenger cars had 36" wheels. Many modern era cars did have the 36 1/2" wheels, but other had 37" and 38". All depends on the era.
The data in the SPH&TS 1933 SP passenger car specs book and the recent SP passenger car books shows that the wheels are 36" with either 5 x 9 or 5 1/2 x 10 axles. In 1985 the suburban coaches were retired.
Couplers
Modeling Couplers
Rivarossi
Rivarossi cars are 85' and can mount KD's in the Talgo truck arm. Use a high power magnifier to check this truck swing. Ask if the car ahead is pulling the car behind it off the track or is it the other way around? Go very slowly around the curve and check see what happens. They must be properly weighted also, about 4 oz. per car. This problem with heavy weight cars may show that the coupler was snagging the bottom of the car at the door sill during its return to the center position. It is a hard problem to see because the car has to be sitting on the track in the curve, and with tension on the draw bar. One way to fix the problem is by shaving away the bottom of the car until there is no obstruction. Better would be is to fix it by placing a piece of thin styrene on the car bottom to make a smooth surface.
MTH Daylight - Coupler Change
You may need to change the couplers on the MTH Daylight cars to couple the cars more closely, so the FWDiaphragms touch, and at the same time replace the supplied couplers with Kadees, the standard.
You will need #47 KD underset medium length couplers, as #5 will be too low. Remove the MTH draft box and use the standard KD draft box, as neither the #5 centering spring nor the whisker coupler are compatible with the MTH box.
How to get the closest coupling depends on your minimum radius. The car body has a second unthreaded set of holes for use with 43 inch or greater radius. These holes should give you diaphragm contact. Use 35 inch min and use a small round file to elongate the holes in the draft boxes slightly, which doesn't hurt function. You’ll have a slight gap on a straight, less than 1/16th inch.
With the diaphragms close, you may experience an elusive derailing problem, usually as cars leave a curve. A bellows can have a slight lip past the endplate which can catch on the other endplate. A little sanding will fix this.
If you get the chair car pairs, derailing can be because a door will end up next to the door on the adjacent car. The stirrups next to doors project beyond the car body, and can catch on each other thru curves. Move a stirrup pair slightly and it is noticeable unless you point it out.
Hal Greenlee
Replace the couplers with KD 5s on two adjacent car ends, and found they would not negotiate a 39" curves, so MTH's predicted minimum radius is correct. The existing box can be compatible with a KD 5 if you remove a small plastic tab inside the box at the rear, and enlarge the hole in the bronze spring a little.
The best solution will be to replace the existing draft gear with KD 5s in Darwin boxes. Darwins work for many cars with FWDs, and work well. It will be necessary to drill and tap for 0-80 or 1.4mm screws on each side, but that isn't too hard, just takes time. The setting that works best, is to insert a small plastic plug behind the screw to prevent the Darwins from slipping forward toward the ends of the cars and lengthening the spacing.
The underbody work on the MTH cars is quite good, including the steam lines and the coupler pin lifters. A suggestion would be to use two screws on either side of the draft gear gives more flexibility than the single screw in the middle.
Pete
On the articulated cars to couple more closely together, on the diaphragms between the cars that are not articulated it move every other coupler in to allow them to go around sharper curves while
still being coupled closer together. This arrangement will allow them to go around 26 degree curves.
Benjamin Tomimatsu
Passenger Side Markers
SP change over from individual markers at the corners of the car to the single red light on the tailgate was both "never" and "as needed." It depends on the train and the era. The 12/1/1951 rule book clearly illustrates how markers are to be displayed.
When the "Red light must be extinguished and the green light displayed when train has stopped clear of the main track to be met or passed by another train" actually ended.
From the Special Instructions No. 10 for the Sacramento Division dated March 3, 1963:
"Rule 19. Last sentence of Item (5) is cancelled."
So we can assume that green was no longer in effect at least as early as March 3, 1963.
The 1960 rule book shows the use of green in markers, but the 69' only requires red to the rear. By mid 60's green was no longer used and all the green lenses were removed from SP cabs and passenger cars. The 1960 book has a title page with four printed notations as to changed rules, all in October 1960 and none having to do with markers. At the bottom of the page there is a handwritten note to the effect that the book was revised 1-1-69. If both of these notations are definitive and there were no more changes before the revision, then the dates are narrowed to between Oct. 1, 1960, and Dec. 31, 1968.
The 1/1/1969 rulebook states that (on passenger trains) "a marker must be displayed," with no illustration. There are the usual caveats concerning the use of flags or red lanterns as an alternative.
In earlier times, the turning of markers was clearly indicated in the rule book, and the use of the green marker was to indicate to FOLLOWING trains that the main had been cleared. In those days, the green marker was used by a train in a siding on that side of the end of train that was toward the main. SP markers always showed a green aspect forward.
The SP probably did away with marker lamps for both passenger cars and cabooses at the same time, so the practice of using large, single red lights on passenger cars coincided with the introduction of frog eyes on cabooses.
At some point the longtime practice of having twin rear marker lamps on passenger cars at the end of a train was modified to a single red light on the tailgate.
Apparently sometime between Oct. 31, 1958 (see top photo on pg. 68 of "Diesels of the Espee Volume One: Alco PA's") and May 1959 (see bottom photo on pg. 115 of "Southern Pacific's Scenic Coast Line"). This was based on photos of passenger trains. Photos of cabooses on the back of freight trains could conceivably be used to further narrow this period down.
John Sweetser
Many trains with lightweight equipment lost their external markers in the 1950s, but other trains (such as Sad Sam) would probably never have had a tailgate light.
Passenger Rear Markers
At some point the longtime practice of having twin rear marker lamps on passenger cars at the end of a train was modified to a single red light on the tailgate. Many trains with lightweight equipment lost their external markers in the 1950s, but other trains (such as Sad Sam) would probably never have had a tailgate light.
So from the rule book perspective, it was sometime in that 17 year period. The change may have been established by bulletin, perhaps at the same time that train numbers disappeared (7/1/1967).
Ken Harrison
The 1960 rulebook allows the use of a single ELECTRIC red light to the rear as the train's markers on passenger cars and cabooses.
Please see page 344 in SP Passenger Cars, Vol. 2 for an explanation of these rear end light packages with the red and green lights. Passenger cars had two red lights and two green lights. I think that these appeared on passenger cars about 1945/1946.
Jeff Cauthen
The large, single red light became the standard on passenger cars was certainly well after the frog eyes.
Tony Thompson
The Coast Mail had a single red tailgate light at least as early as 1959. See photo on page 115 of Dill's "Southern Pacific's Scenic Coast Line." Similar tailgate lights were on the rider coaches on the Coast Mail's last run on May 14-15, 1965.
Even though a photograph can only show one example of a practice on a given date, several photographs showing examples of trains with a single red light on the tailgate within a certain year range can certainly indicate that this practice was the norm. An example of this is on the Coast Mail in SP Passenger trains Vol. 1 showing various rider coaches with red lights on the tailgate after 1960, on the bottom of pg. 160.
The uses of the red tail gate marker had to be allowed by the rules. When a new rule book issued during the 50s, it could have been authorized by special instruction before a new book of rules was issued. Not mentioned in the 1951 book, and permitted in the 1960 version.
Modeling Gyralite Talgate Markers
Owl Mt. Models
They have 'Gyralite' Tailgate markers for SP/UP passenger trains between 1953/54 and 1971. Go to:
The Gyralite markers were still used after Amtrak took over well into the 1980s on the inherited fleet of cars until replaced by built-in markers on Superliner, Amfleet, and Viewliner series cars.
Caboose Markers
The 1960 rulebook allows the use of a single ELECTRIC red light to the rear as the train's markers on passenger cars and cabooses.
The marker light fixture was two cylinders with different colored lens on each end so that red to the rear and green to the front could be shown no matter which way the caboose was turned. A switch lit a bulb in one cylinder or the other depending on which end of the caboose was forward so that a single green light shown forward and a red light shown to the rear.
Charlie Morrill
The SP probably did away with marker lamps for both passenger cars and cabooses at the same time, so the practice of using large, single red lights on passenger cars coincided with the introduction of frog eyes on cabooses.
Ladder Rest Grab Irons
Modeling Ladder Rest Grab Irons
Detail Associates
They make two different styles of HO ladder rest grab irons: 229-6603 Passenger Car Grab Irons.
Passenger Car Radio Standards
SP had no train radio in 1949.
Passenger Car Radio Antennas
Installed to pick up AM radio. Cars were also wired for on board train announcements. The 1937 observations were built for the Daylight and the Sunbeam. The Daylight (prewar and postwar) chair baggage, taverns, parlor observations and various chair cars, both single unit and articulated had radio antennas. That early date precluded TV reception. The 1938 tavern/lounge cars, the 1939 baggage/coach cars, the 1939 and 1941 observation cars, the 1939 tavern/lounge cars, and the 1941 club lounges, among others all had them.
Pictures and drawings of the Budd lounge and coffee shops cars show piping or cabling running the length of the roof. This was the Passenger Car Antenna which were connected to phones that riders and personnel could use. They were like phone antennas.
Chairs with antennas and radios are detailed in the Coach and Chair car book prepared by the Southern Pacific Historical and Technical Society.
Antennae’s weren't randomly placed on the cars. They were placed so that those cars could pickup radio signals. The cars were specifically placed in the train too. Antennas were on the cars so passengers could hear the train announcements.
Modeling Passenger Car Antennas
Check Details Associates or Details West for Antenna holders. Look up Cal Scale Parts, and buy piano wire of appropriate size, and glue it with CA adhesive.
Window Gaskets
Modeling Window Gaskets
Microscale
Microscale has a decal sheet for passenger car window gaskets in HO scale! They are available in both black and silver which is perfect for SP modelers. The decal sheet are split in half so the modeler can apply them to any size window within reason.
Passenger Car Paint
1930 Paint
SP didn't receive any Pullman or Pullman-Standard cars in the generic 30s. A few HW cars were received in 1930 and they were painted Dark Olive in most cases and a few others were painted Pearl Gray for the Daylight. One HW car received in 1930 was painted Aluminum.
1937 Paint
In 1937 the Red and Orange LW Daylight and Sunbeam cars were delivered. LW cars in Dark Olive were delivered in 1937 and 1941 for the Californian and Challenger.
1941 Paint
An original 1941 coach was still in daylight colors as late as 1966 on a slide of it at LAUPT. Another car was a smooth side coach, probably from the Shasta Daylight bunch in the train still in daylight colors.
The SP color, was merely DuPont "Socony Red," "Socony" is an acronym for "Standard Oil Company of New York" which evolved into Mobil Oil. The "Socony red" color originally was the red used for Socony's "Flying Red Horse" trademark, and the red which bedecked their red and white service stations nationwide and around the world. Socony had a large chemical and paint plant on Staten Island, Chicago, and San Leandro; paint for the Golden Gate Bridge was manufactured at the San Leandro plant for many years.
The SP name for this color was "Daylight Exterior Red," CS color no. 28, and it kept that name and number long after the Daylight trains and paint schemes were history.
Tony Thompson
More LW Daylight painted cars were received in 1938, 1939 and 1941. Two-Tone Gray LW cars were delivered in 1941 and 1942 for the Lark, San Francisco Overland Limited and the Golden State Limited. LW cars in Dark Olive were delivered in 1937 and 1941 for the Californian and Challenger.
pre-1954 Paint
Nearly all head-end cars were painted in the standard Dark Olive Green scheme. This was discontinued as standard in 1954.
Tony Thompson
Reference
SP Painting & Lettering Guide, pg. 89 - 138
Californian & Challenger Paint Schemes
Reference
SP Painting & Lettering Guide, pg. 104 - 105
Cascade Paint Scheme
Reference
SP Painting & Lettering Guide, pg. 122 -
SP Dark Olive Paint Scheme
Modeling SP Dark Olive
Scalecoat SC #45 is very close to their Pullman Green, and far too light to represent EB Green. But Scalecoat #25, GN Green, is a much darker green and seems to be closer to real (prototype) EB Green. Precision Scale and Coach Yard factory paint for SP heavyweights and Harrimans is very dark green, like SC #25, and not at all like most shades of "Pullman Green".
Scalecoat GN Empire Builder Green #45 is a very close match to SP Dark Olive. It varies a little in color but in general matches the Color Drift Panel. It's what I use.
Charles Givens
Dark Olive Green. Empire Builder green is pretty close to the SP color, and the old Accuflex version of EB Green was the best--comparing PROTOTYPE color chips.
Tony Thompson
“Dark Olive Green" vs. "pullman green"
They are quite distinct colors. The SP color does have olive tone to it, what you might call a hint of yellow and brown in the green. The Pullman green color, however, is a dead green and a hair darker. If you see them side by side, there is no question they are different, with the SP color looking much warmer. Pullman Green is distinctly different from either SP's Dark Olive or GN's Empire Builder color, having distinct brownish tones absent from any Pullman Green I've seen documented.
Tony Thompson
Reference
SP Painting & Lettering Guide, pg. 89
SP Daylight Paint Scheme
During the 2nd half of the 50’s the following heavyweight cars were painted and lettered for the Daylight:
Baggage6029, 6204, 6507
RPO 5070, 5218, 5219
Baggage-Chair 3176
Diner 10038, 10040
Lounge2980
Hamburger Grill10507, 10509
Reference
SP Painting & Lettering Guide, pg. 99 - 103
Golden State Paint Scheme
Reference
SP Painting & Lettering Guide, pg. 113 - 116
SP Lark Paint Scheme
Overland- two tone gray
Lark Stripe
The width of the light grey letterboard is indicated as being 20-15/16" on page 106 of the SPH&TS Southern Pacific Painting and Lettering Guide, but in Dennis Ryan's Southern Pacific Passenger Trains - Vol. 1 that measurement is 20-5/16". Yet another diagram from Southern Pacific shows the light grey portion of the letterboard on the Cascade as 17-1/4" (after the black edging was deleted from the silver grey striping). At some point (not sure when) the dimensions changed so that the dark grey window band and striping was raised to better accommodate the higher windows on the corrugated cars.
Warren Weiss
I never even noticed our typo in the 20-5/16" vs. 20-15/16". 20-5/16" is correct.
Jeffrey Alan Cauthen
Reference
SP Painting & Lettering Guide, pg. 106 - 109
Overland Paint Scheme
Overland- two tone gray
Reference
SP Painting & Lettering Guide, pg. 110 - 112
SP General Service Gray Paint Scheme
Reference
SP Painting & Lettering Guide, pg. 132 - 133
SP General Service simulated stainless steel Paint Scheme
Simulated stainless steel came with the red letterboard
1954 first application of simulated stainless steel paint scheme. There was no more Daylight colors and two tone gray.
SP cars were painted Simulated Stainless Steel, not aluminum. Stainless steel [Budd] cars were always in natural stainless steel finish. Early Daylight cars had the Red & Orange stripped off in most cases down to the natural stainless steel siding. Shasta Daylight aluminum built cars were repainted in Simulated Stainless Steel. The ends, and vestibule doors were painted Simulated Stainless Steel. The underbodies and trucks were painted Lark Dark Gray after early experiments with black paint.
Jeffrey Alan Cauthen
Silver heavyweight roof
SP Coast Lines, T&NO and SSW all had heavyweight business cars with aluminum roofs for paint jobs in the "silver" with scarlet letter board scheme. Only other passenger cars with aluminum roofs were the SSW Daylight cars. Side note: SSW painted the roofs of their two PA's in aluminum after receiving them from Alco.
The roofs were painted Simulated Stainless Steel.
Jeffrey Alan Cauthen
Reference
SP Painting & Lettering Guide, pg. 130 - 131
Sunbeam Paint Scheme
Reference
SP Painting & Lettering Guide, pg. 127 -
Sunset Limited Paint Scheme
Reference
SP Painting & Lettering Guide, pg. 124 - 126
City of San Francisco Paint Scheme
Reference
SP Painting & Lettering Guide, pg. 96 - 98
Interior Paint
Interior color for Harriman style baggage cars & RPOs
In the early 1950s, the interior wall color on the 60' & 70' Harriman style baggage & RPO's were most likely Sea Foam Green. Light Gray is also possible.
Jeff Cauthen
The USPO Railway Mail Service stipulated the interior paint colors for all RPOs inside the circa 1940s-1960s period, was a warm cream tone for the walls of the mail storage part of the car and a cool light green for the working mail "apartment"; white ceiling in both spaces. This standard was applied, according to Federal sources, to all US railroads. On checking the interior of the then-raw SP "shorty Harriman" RPO (ex-San Bruno Branch caboose) No.6008, the same interior colors were there in several good layers.
Kevin Bunker
This information will be in the Color and Lettering Guide that is in production.
Also, CSRM has a copy of SP LINES, COMMON STANDARD, SPECIFICATION C.S. 22, PAINT
CSRM will provide a copy for a reasonable fee.
Adopted May 16, 1914; revised December 2, 1929
Jeff Cauthen
References
Books
The following books (yes, two volumes) are a *must have* for modelers as they include plans and photos of the lightweight streamlined cars including interiors, underframes and lots lots more. Spiral bound with a hard red cover, they lie flat when opened and contain numerous foldouts. These also include lightweight Pullman-Standard passenger cars for Espee trains in addition to the Daylights, and include Daylight cars from all the various trainsets ever built! Both are long OOP but can sometimes be found on eBay or through used bookstores. Prices often (not always) range from $50 on up for each volume:
"The Official Pullman-Standard Library"
"Vol. 5 Southern Pacific Prewar Cars" (published 1988, 205 pages)
"Vol. 6 Southern Pacific Postwar Cars" (published 1988, 212 pages)
by W. David Randall & William M. Ross
Published by Railway Production Classics
P-S Library Vol 5 - SP Prewar Cars
Excellent book. Both Vol. 5 (Pre-War) and Vol. 6 (Post-War) on Southern Pacific's Pullman-Standard passenger cars, along with several other volumes in the P-S, Budd & ACF passenger car series are excellent resources for both the fan and modeler, contain numerous photos of not only the exteriors, but also interiors and many features of the cars. A real plus are the plans showing both sides (good for window arrangements etc.) along with top-down drawings of the interior arrangements.
The Official Pullman-Standard Library Volumes 5 & 6 make an excellent addition to the Southern Pacific Passenger Car book series available from the SPH&TS.
Rob Sarberenyi
SPH&TS book on passenger cars
SP Painting & Lettering Guide
Magazines
Railroad Model Craftsman
Ron Plies has a good article about making an HO scale Lark in the March 2004 issue.


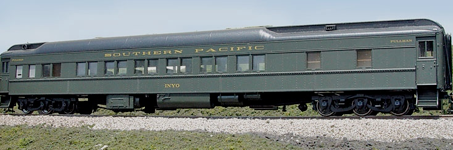
Photo courtesy of Jim Pattison