Southern Pacific Lines
Coast Line Division
“The Route of the Octopus”

Southern Pacific Lines
Coast Line Division
“The Route of the Octopus”
Specific Caboose Types
Class CS
References
Class CS cabooses built prior to 1905 (*see RMC 7/61)
(*see MR 10/86)
SP Cabooses converted from box cars (1885) Southern Pacific Freight Cars, Volume 2: Cabooses, pg. 36
Class CA
CS-15 Caboose
CS-15 cabooses photos in Thompson’s v2: show side doors only on left sides. Were they on both sides?
Dave Allen
References
Southern Pacific Freight Cars, Volume 2: Cabooses, pg. 35
Drawings
CS-15 Design Southern Pacific Freight Cars, Volume 2: Cabooses, pg. 35
CS-59 Caboose
References
Southern Pacific Freight Cars, Volume 2: Cabooses, pg. 56,-57
Drawings
CS-59 Design Southern Pacific Freight Cars, Volume 2: Cabooses, pg. 56, 57
SP #439-448
SP #449-455
SP #456-458 Andrew trucks.
SP #459-468
SP #576-580
References
Class CA cabooses built prior to 1910 Southern Pacific Freight Cars, Volume 2: Cabooses, pg. 29-69
Drawings
Wood Caboose (*see RMC, March 1939, pg. 14-15)
Wood Caboose Types
C-30-1
SP #259
SP #586
SP #626 - 640
SP #660
SP #697
SP #760
SP #899
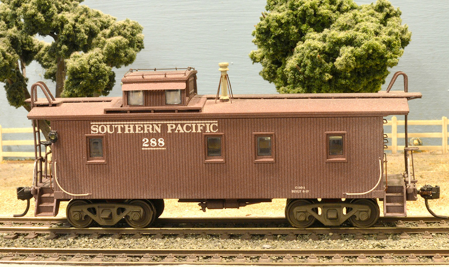
SP built well over 600 cars in the C-30-1 design. ALL the cars of Class C-30-1 were built between 1917 and 1928.
As originally built, the C-30-1 cars had a "narrow, slant-sided" cupola, with running boards all around. As the years went by, the cupolas were replaced with "full-width" slant-sided and straight- sided cupolas.
The replacement of cupolas was common but far from universal. No one should think that ALL cars of Class C-30-1 got new cupolas in later years. Many photos in my book prove otherwise.
Tony Thompson
Car Numbers
The Pacific Lines Class C-30-1 cars built during 1917-1924 were placed in the number series 586-899. Thereafter, lower numbers in the roster which had become vacant were applied to new C-30-1 cars, car numbers as low as the single digits. In all, there were 155 out of the 470 cars in this class which received re-used car numbers smaller than 586. (Incidentally, SP reserved the 900 series for inherited and non-standard cabooses. In the 1920s, it was nearly filled with former EP&SW and Arizona Eastern cars.)
Specified dimensions:
width of body 14.5', length 30'
length over running boards: 37'1"
length over platforms 35.5' - thus platform length calculates at 2'9"
height at smoke stack: 15'3"
Service
In the steam and transition eras, the C-30-1 was by far the most numerous caboose class on the SP.
You would see them on reefer blocks. You could run an Overnight with your C-30-1 in the time before the C-40-s went to the Coast and before Overnight service was canceled for "the duration".
C-30-1s were not used on SP's "Overnight" freight trains, well documented in Mr. Thompson's volume on cabooses.
Rebuilt C-30-1s with straight sided cupolas
There is probably no way to really know when the rebuilds occurred. The SP caboose cards (now at CSRM) do indicate for every car when cupolas were replaced but do NOT say anything about the style. The railroad, of course, did not care about that. Late in the
production of the C-30-1, the cupola with side walkways was replaced by a full-width but still slant-side cupola. A "narrow" slant-side cupola might be replaced with a wide one. Moreover, some cupolas were rebuilt in kind, that is, the existing cupola had extensive repairs but had the original style. The straight-side replacement cupola seems to be a later style. And once the first steel cabs were built in 1937, a steel replacement cupola was designed, and often used on wood cars after that date, most of which of course were C-30-1 cars. My IMPRESSION from photos is that most C-30-1 cars retained original cupolas all their lives, so in my opinion a straight-side cupola should be an exception on this class.
Tony Thompson
Drawings
C-30-1 Wood Caboose (*see RMC, July 1961)
C-30-1 Wood Caboose (*see How to Build Model Railroads and Equipment, by Davis Crown Publishers
Southern Pacific Freight Cars, Volume 2: Cabooses, pg. 96, 111
A full size copy of the C-30-1 drawing in Tony’s book has a drafting error. The error is in the dimension shown on the drawing for the roof walk. On the drawing, the running board overhang of the roof dimension is given as 15-1/4". However, the drafter drew it with about a scale 7" overhang. Using the roof dimension of 34'-61/4" plus two times 15-1/4" gives the 37'-3/4" dimension. Most of the photos show a running board overhang which looks like to be 15".
On the same drawing you see that the dimension over the platforms is 35' 5". If you scale the print you will find the correct dimension for the roof walk is 35' 8". A 1" scale general arrangement drawing from the Back Shop confirms the error.
Details
It had a wood running board and it had the high grab irons on the end walls.
Cupolas
Both the narrow and the succeeding wide cupolas had sloped sides. All photos of this caboose show the grab irons around the cupola.
Many of them received full-width cupolas as replacements in later years, whether slant-side, straight-side, or steel.
Tony Thompson
In a 1953 photo of SP #760, a C-30-1, there is what appears to be a grabiron/step (i.e. a grab oriented downwards, like a step) in the center-top of the cupola. This was someplace to put your foot when climbing onto the top of the cupola.
Tim O'Connor
This was essentially standard on steel cupola cabooses, especially after the running board segment was placed atop the cupola. Some wood cars got these grab iron/steps in the late 1950s also (there's a photo of one in the caboose book). When it was decided that getting onto the top of the cupola shouldn't be allowed, the legend "employes must not get on top of cupola" was stenciled at both ends of the cupola, and over time those grabs were cut off. In later years you can usually still see the bolt heads.
Tony Thompson
Toolbox
A toolbox is sometimes on with AB brakes. In Thompson's book, it appears that the toolbox was removed when AB brakes were installed. The toolbox removal and AB brake installation have no necessary connection, though in some cases they did happen to be done at the same time. There is ample evidence, comparing photos with car cards, that the two did NOT coincide in many cases.
Trucks
Truck types depends on the era. The cars were built with recycled archbars for which the original design was termed "Z-2" in 1891. The C-30-1 era, after about 1935, was totally dominated by 40 ton Vulcan trucks, most probably salvaged from the WW1 era. Archbar caboose trucks were proper for a SP C-30-1 caboose. Most archbars were gone by mid- WWII, but not all. A few wood cars lasted long enough to receive AAR cast sideframes or other variants, such as TEE section.
You gotta have leaf springs, very few SP cabooses had otherwise. There was a brief period around 1940-41 when several wood cars got steel wheels.
Wheels
It's easy to determine SP cabooses with steel or cast iron wheels: the wood cabs had iron wheels.
Marker lights positioning
The exact position of the marker lights on a C-30-1 would be midpoint level with top of side windows on car.
Tony Thompson
The marker light bracket is recessed into the corner at 45 degrees to the sides and ends.
Charlie Morrill
Special C-30-1’s
SP #259 was one of a kind. It was a rebuilt wood-sided C-30-1. #259 was converted in 1953 to a bay window caboose with removal of the cupola and fitted with a sheet metal bay window.
2 good Pictures of SP #259, in Oakland 1956. Southern Pacific Freight Cars, Volume 2: Cabooses, page 96.
There is a photograph of #259 on pg. 39 of the SPR 1981 taken in 1964 when it was all BCR. There is another photograph of it
on page 41 when it was all black.
Two other wooden C-30-1 (#660 and #697) were bay windowed but this included a rebuilding as steel-bodied cars.
Paint
The car was probably all BCR between 1953 and the 1956 photos in my Vol. 2.
Tony Thompson
The color appears to be a bit more toward Tuscan red than Boxcar red. The roof walk and cupola walls would be the oxide red/brown color of the body.
Ends
The orange ends came to many cars in 1956. The ends were orange as was the entire bay was painted orange.
Tony Thompson
Roof
Depending on era, C-30-1’s had some canvas roof coated with car cement or black sealer. The roofs were accordingly black until about the end of World War II. The bulk, if not all, of the cabooses painted with this 1946 to 1953 lettering style would have had black roofs. By the mid-1950s they were spray painting the entire car body boxcar red. This description of black caboose roofs applies only to wood cars.
Tony Thompson
A C-30-1 with a black roof did exist in a video by Don Olsen titled Volume 3 The San Joaquin Route. The original film was apparently shot in the early 1950's. There are plenty of photos of black roofs into the 1950s, though there had begun a practice of painting the entire body one color.
The cupola roof was also black, as it, like the body roof, was canvas covered and mopped with black roof cement. However, by 1930 it seems to me improbable that any of the C-30-1 cars would have received replacement full-width cupolas---the as-built design was a narrow cupola. Evidence is elusive, but it is POSSIBLE (certainly not documented) that some of the very last C-30-1 cars were built with a full-width cupola (and the succeeding C-30-2 cars were certainly so built). If so, it would be essential to use a C-30-1 car number from an extremely late constructed car. At the very least, use a 1927 built date (the list of cars KNOWN to have been built that year are on page 88 of my book),there is no actual evidence of any specific 1927 car which got a full-width cupola when new.
Tony Thompson
Hand rails
The curved side handrails and the body-mounted end handrails were painted white. The white handrails came in 1948. The standard was to paint the outer part of the handrail on the end or buffer beam, along with the curved side rail, white. This is the most common arrangement seen in photos after 1948 (when the white trim was introduced). Sometimes the outer part, and sometimes all, of that body-mounted end rail is white, but it’s unusual. And the end-beam rail is always white in every photo I’ve seen of a post-1948 caboose, up into the early 1960s.
Tony Thompson
The hand rails white (as a safety item) and a bit later added the silver, then red or orange ends again for safety.
Underbody
The underbody color was black before WW II.
Tony Thompson
Interior Color
Painting the interior was "varnished". Photos of several Pacific Lines C-30-1 interiors depict surfaces which are shiny, light-colored and show wood grain very plainly. Most interior photos look pretty dark, so use a dark wood color, at least prior to WW II. At some point they began to be green.
Tony Thompson
Lettering & Numbering
There were 3 different lettering versions of the C-30.
1-roman lettering with bars - Roman with bars continued to at least 1952 (when bars started to be discontinued on new paint jobs) but naturally survived several more years on some cars.
2- gothic lettering, orange ends - The Gothic lettering came in in the summer of 1955 and orange ends in the fall of the same year.
3- ide w/ radio equipped logo - The radio-equipped logo began around 1954 but was only applied to a minority of cabooses during the steam era, partly because on-board electrical power was normally also needed.
Tony Thompson
The original lettering layout was
____
SP
586
in middle of car, height wise. This lettering lasted into WWII time frame essentially the 1931-1946 paint scheme.
The lettering on these cabooses had the bar over the "Southern Pacific" versus when the bar was omitted. Cabooses with this pre-1946 lettering do show up in photos from the early 1950s.
1931-1946 was s.p. over numbers with bars, spelled out Southern Pacific with bars 1946-1953...1955 onward came the block lettering. source SP freight cars vol 2 by Anthony Thompson.
John Huey
More specifically, the spelled-out road name in Roman characters was shown in lettering drawings with the 1-inch stripes until early 1952. Thereafter the stripes were discontinued in drawings, so that in subsequent repaintings, they would have been omitted. But naturally it would have been a few years until some cabooses got new paint. Thus a 1950-1953 time interval is not a simple one, and certainly the two styles overlapped.
Tony Thompson
The "Gothic" or sans-serif lettering was first used in the second half of 1955 and was not widely applied until 1956.
Tony Thompson
The 1953 to 1956 lettering, without the lines above the road name and below the road number might be a better choice for no black roof. Post 1956 lettering would be without black roof for sure.
The stenciling on the side appears to be RUBBER DRAFT GEAR.
Diamond Stencil
When looking at pg. 83, Vol. 2, of Tony Thompson's SP Freight Car Book, there is a series of 10 C-30-1's with a small diamond on the side. The purpose of this marking had to do with the type of spark arrestor installed.
KWH
I have no other photo showing this diamond on SP cabooses (earlier or later than 1917), so don't know how widespread it was, nor how long it continued. Note that it is not present on the new 1917 caboose on p. 89.
Tony Thompson
Cupola Stencil
In the late 1950s, it was decided that getting onto the top of the cupola shouldn't be allowed. The legend "employes must not get on top of cupola" was stenciled at both ends of the cupola.
Renumbering
Renumbering 1917
This very numerous class of SP wood cabooses, Class C-30-1, was numbered in the 600s, 700s, and 800s. When SP began production of the C-30-1 cars at Los Angeles General Shop in 1917, there were already system cabooses numbered into the high 500s and even a few in the low 600s. So the first cars of C-30-1 were numbered 586–625 and 641-670 in 1917.
Renumbering 1917 - 1924
In the following six years, through 1924, car numbers continued from 671 up to 899. Since the 900 number series was reserved for various miscellaneous, inherited and converted cars in caboose service, the SP began to re-use lower car numbers that had been vacated through scrapping. During 1925 through 1927, 180 more Pacific Lines cars were built in Class C-30-1, all with numbers lower than 640.
Renumbering 1926
SP also finally used car numbers 626–640 in 1926. Thus there were a lot of C-30-1 cabooses with numbers lower than 586. The total number of cabooses of this class appears to be 620 cars, 158 of them for NWP, SD&A and T&NO, the balance for Pacific Lines. So with about 165 cars out of about 460 for Pacific Lines being numbered below 586.
Tony Thompson
References
Class C-30-1 built in 1925-27 (1919?). (*see MM 6/94)
Use this photograph Southern Pacific Review 198, pg 39.
Southern Pacific Freight Cars, Volume 2: Cabooses, pg. 79-141
Modeling C-30-1 Caboose
C-30-1 Model Dimensions
Most major dimensions are the same except that the AMB model is 6 inches taller than Walthers, and the AMB end platforms are 3 inches longer (down the car centerline) than the Walthers. Walthers platforms are too short.
Prototype vs models comparisons
PrototypeWalther's PSC
steps 1’ 6” 2’ 2”
tread width 25” 24”
length over platforms35’ 5”33’ 9”35’ 9”
length over platform w/ additions35’
roof length34’ 3”34’ 3”
running boards37’ 1”36’ 9”35’ 9”
body length30’ 0”30’ 0”
body width 9’ 7” 9’ 7” 9’ 7”
truck centers20’ 9”20’ 9”20’ 9”
truck wheelbase 5’ 6” 5’ 6”
cupola side platform 8’ 9” 8’ 0”
smokejack from cupola 3’ 0 2’ 6”
Caboose Trucks
The C-30-1 era, after about 1935, was totally dominated by Vulcan trucks. Kadee archbar freight trucks work if converted from coil to leaf springs. A source for leaf springs to replace the coil springs in Kadee trucks is unknown. You can use the old Kemtron, PSC phosphor bronze leaf springs, in Kadee Vulcan trucks for SP cabeese. They work in Central Valley trucks also. They are available from Precision Scale. The PSC part is #31968. On Caboose Hobbies web site enter 058531968 in the SKU search. They work well and install with moderate difficulty, but then so do the coil springs that were in the trucks to begin with. There are a couple versions of Kadee's that have a lip in front of where the coil springs fit and leaf springs will not fit in them.
Coat the PSC leaf springs with Liquid Electrical Tape (Home Depot) for a more realistic look. Operated for me much better than the PSC rigid trucks on their SP caboose models.
Kenneth R. Clark
Caboose Wheels
For modelers, "Cast Iron" implies ribbed back wheels, although not all casts iron wheels had ribbed backs (more appropriately called "brackets" in the trade). There’s only one manufacturer of ribbed back wheels in HO scale - Kadee. They now offer both the original (code 110) wheel (#523) and fine scale (Code 88) wheels (#533) in 33" diameter suitable for the C-30-1. We'll see how they fit in the Walther's Vulcan caboose trucks when they get here.
Arved G. Grass
AMB #853
The AMB C-30-1 is a laser cut wood kit. There are two available. The #853 provides an accurate model from the 1920s through the steam era and beyond. The kit uses a modified Athearn caboose underframe which has been modified to match. The kit has the slant-side cupola with outside walkways, which is the as-built appearance. By the 1950s, more and more of these cars had replacement cupolas, but the arrangement of kit 853 was still very much in evidence. They have NO SP trucks and also suffer from the steps and end platform being a little too short for the C-30-1.
AMB #876
The #876 kit has a far better underframe and for that alone, the meticulous modeler will want to do that version. It has a replacement type of cupola, full width and with straight sides. Such cupolas were applied as early as the late 1930s. The cupola also is intended to be modeled with a full grab iron ring around the cupola top, something which was replaced by four corner grabs after about 1950, so modelers of later eras should omit this feature. On the ends, the model is shown with the upper crossbar (about shoulder height) added after 1955 for safety. Modelers of earlier times can omit this feature. The model AS PRESENTED is an unlikely combination of features, but by selective omission as I've stated, can readily represent anything from World War II until the end of wood cabooses in the late 1960s.
Tony Thompson
Have both kits on hand is to use the new floor from the no. 876 with the sloped cupola of the no. 853 to get an accurate for Dec 1937 C-30-1.
Tom VanWormer
Wood cupola caboose T&NO #274 was modified with a side door in the center of the car.
The kit has been updated from their initial release of the slant-side cupola, perhaps one of the most important features being replacement of the underframe, which initially came from Athearn's steel cupola caboose (ATSF prototype), with a laser-cut underframe along with end platforms and cast resin stepwells for installation at the four corners. As many of you know the Athearn underframe features stepwells and an end platform that are a little too narrow for the Espee C-30-1. AMB's new steps are a scale two feet wide and match the prototype. They look real nice, too! For the curved side grabs there is a bending fixture with the kit. They can instead be bent using photos from Tony's caboose book as your guide.
Rob Sarberenyi
Trucks for AMB C-30-1 kits
Any C-30-1 wood cabooses you have from AMB and/or Walthers, don't have correct trucks unless you used Kadee's #515 Vulcan double truss trucks and changed out the coil springs to phosphor bronze leaf springs.
The best trucks to use with AMB C-30-1 kits should be preferably metal with the phosphor bronze leaf springs made by Clyde King (not coil). Use trucks from Tichy Trains, they have several versions of trucks that can be used for cabooses but they are plastic. They have coil, leaf and coil/leaf versions. PSC makes the best looking caboose trucks for SP but won’t sell them separately.
Brakes for AMB C-30-1 kits
The modeler will need to provide the AB brake set of their choice, using either Tichy, Detail Associates or similar parts.
PSC
For PSC's C-30-1 model, the cupolas are the same size on both models and the same distance from the ends. The platform boards on the roof next to the cupola are perpendicular to the center line on the Walther's model and parallel to the center line on the PSC model. The PSC #36 model has AB-type brakes. It has working marker lamps with Dave the conductor puffing his pipe on the platform.
Silver Streak
Correct, except end castings, cut out center of cupola, add 16” walkway along each side. They are 10% oversized. The cupola is too high and thus out of proportion, even at its OO-scale size.
Walther’s C-30-1
Walther's produced a C-30-1.Walther's RTR have some minor problems but still are the best ever offered in plastic. The Walthers height is too low, and the distance from body bottom to roof top is also too short. Walthers too short deck C-30-1 which is much more than a minor problem to repair (needs longer roof and frame). They are 6” too short.
Adding the end sills (parts to be added by the modeler) to the cars which will add about another 15" to the length over the platforms and likely help the appearance of the draft gear sticking out too far. The truck sideframes closely resemble the Vulcan trucks shown on page 18 of Tony Thompson's SP Freight Cars, Vol. 2: Cabooses book. The Walther’s leaf-spring trucks side-frame pattern is not typical on most SP C-30-1 cabooses. The Walther's' model has K-type air brakes.
I revisit the topic that the Walthers end platforms are too short. The end platforms certainly do look too short, and don't even extend as far as the end of the roof. The platform itself is indeed 24 inches, as it should be. The kit has a separate end beam, which is also the molding with the end railings and ladder on it, and it extends the totality of the car end to the correct length. With that end beam in place, the ladder does stand vertically and reaches the roof correctly. So I'm the one who was wrong about this model, and apologize for saying so on the basis of a misleading photograph which I hadn't checked against a model myself.
Tony Thompson
Length of model 30’ scale
Width of model 9'-8" scale
Height of side 88.8" from model 88.4"(from bottom of sheathing to bottom of fascia from drawing)
The SP prototype draft gear "pocket" only projects about 3 or 4 inches; on the Walthers model it's more like 6 or 7 inches. Walthers didn't help matters by making the pocket a simple, flattened rectangle. Had they more properly molded a striker and other pocket face details, things would be better. A standard Kadee No.5 knuckle hides some of the flaws; putting in a scale profile Kadee knuckle exacerbates the flaws. Cut the Walthers pocket away altogether and retrofit the ends with Kadee's scale draft gear and knuckles.
Kevin Bunker
Kit Info
There are 6 tabs holding the roof on, 3 per side. Use a razor blade to pry the side away from the roof and managed to free it without damaging either part. The interiors are indeed nicely detailed. Concerning the R-T-R. models, unfortunely all the hand rails and grab irons came in a plastic bag. The wire parts are hard and time consuming to do.
Caboose Disassembly
There are three latching tabs on each side of the roof piece. Start at the center of the roof. With the cupola to your right (tool box looking at you). Look at the right middle window. The vertical board line molding that runs along the left edge of this window is where the right side of the tab begins. The tab ends between the 5th and 6th lines (moving to your left). Use a blade to get the tab started and the roof lifted enough to get a small straight edge screwdriver in to press the tab loose. Then just worked the other two loose on the same side. It will came free.
There are three more short non latching tabs one each side you will have to work around. Two left of the center latching tab (between the left and middle latching tab) and one to the right. The two on the left are within 3/16 of an inch from a latching tab. The one on the right is just to the right of the right end of the cupola (under the first running board). Any missing won't be visible when it's back together.
Trucks come off with screws. The underframe is held by two more screws. The floor is part of the body - the underframe is just the steps, coupler pockets, center sill, and bolster. The underframe is captured by the toolbox, as well. The toolbox is held by a couple of pins that might break if you man-handle them too badly. Wiggle out the crossbearers and pull the sideframe.
Details
The steps are too narrow, they comes out to approx. 18" - should be more like 24". The end railings and ladder are plastic moldings and thicker in cross section than should be. Replace or file down before installing.
Widened steps by shaping the old ends to be an extension of the treads and then adding new ends from thinner material. Link to a photo that might help, the white styrene is the new ends, the old ends are now incorporated in the black treads. This method can increase the tread width by quite a bit if the old ends were molded thick.
Markers Lights
Use PSC markers lights.
Trucks for Walthers
Any C-30-1 wood cabooses you have from AMB and/or Walthers, don't have correct trucks unless you used Kadee's #515 Vulcan double truss trucks and changed out the coil springs to phosphor bronze leaf springs. Trucks come off with screws.
The Walther's 3 window-offset cupola caboose comes with archbar leaf spring trucks. Perhaps they are available separately. Walther's also used to market similar leaf springs. Old Walthers brass leaf springs are somewhat oversized, but don't look too bad. There set in some old Central Valley trucks.
Wheels
Cast ribbed back wheels (as offered on most of Kadee's trucks) were outlawed from interchange service by the early 1950s, a date modelers should take into consideration on their layouts.
Rob Sarberenyi
Whether Kadee trucks have smooth or ribbed back depends entirely on which truck you are referring to:
The Vulcans DO have the ribbed-back wheels, as do the other older frame styles (Arch Bar, Andrews, etc), while the more modern ones do not.
Brian Ehni
Paint
Walther’s C-30-1 color
It is distinctly too brown. If you weather extensively, and some cabooses were photographed in a pretty dirty condition . . . but if you want a reasonably clean and presentable car, you need something better. There is not a great match among the "usual suspect" paint brands. But P-B-L does have a fine paint, called "S.P./U.P. Freight Car Red," which was matched to the SP color drift.
If you are interested in this paint, go to this link: http://www.p-b-l.com/ and click on the "Online Catalog" tab at left. When that comes up, used the little white search box in the upper center of the page, pull down the menu in that box, and choose item 22 - Paints / Cements, then go to paint item 1-STR-30 (on page 3 of 4).
Tony Thompson
A good paint match for the body color is also Accu-paint AP12.
A proper color to use after some experimenting is Floquil (new) tuscan, pretty close. A simplified approach would be to model it splotchy boxcar red, grimy black, and some rust too. The real ones were always covered in soot and grime so either way you'd be correct, you'd have either a red roofed car with a sooty roof or a black roofed car with the paint rusting and peeling, that way no matter which tack the prototype police approached from you wouldn't have to listen to their complaining.
Tony Thompson
Another paint that would match the paint on the Walthers C-30-01 cabooses is Wal-Mart Apple Barrel # 20578 chocolate bar. It is a water based acrylic.
Richard Todd
Walther’s C-30-1 handrail & roof color
Correct the handrail colors on the Walthers C-30-1 car, and add a black roof to another car to improve the balance among roof colors. The exact matching paint to these Walthers cars is Polly Scale #4082 - Roof Red. Used it to paint the handrails and touch up any sprue cuts, and it dries to a perfect match.
Paint Stripping on Walther’s Caboose
Use 91% Isopropyl Alcohol.
Arved Grass
Paint Interior
Use P-B-L Star Brand Interior Green and Wood, with Tamiya Gloss Black for the upholstered cushions.
Arved Grass
Lettering & Numbering
For a mid 50's layout, is the "Modern Gothic" Version the best choice. If you model, say, 1954 to 1956, relatively few if any of the older cabooses would be in Gothic.
Tony Thompson
Walther’s Lettering & Numbering
There were 3 different versions of the c-30 from Walthers.
1-roman lettering with bars
2- gothic lettering, orange ends
3- ide w/ radio equipped logo
The Walthers model is of #586 which was done with the original lettering layout was in middle of car, height wise.
____
SP
586
Modeling a 1950-1953 time interval is not a simple one, and certainly the two styles overlapped. Incidentally, if you are planning to model "1950-1953" as an era, it was a time of considerable change on the SP, and to paraphrase Tony Koester, if you say you're modeling the SP during 1950-1953, what you're really doing is modeling 1953 badly.
Tony Thompson
Decals
There are no *perfect* SP caboose decals from any commercial maker. Choose and clip from a mixture of sources to get the best representation. It depends on how keen your eye is for exacting letter and numeral forms and far you want to go in your own modeling efforts.
Kevin Bunker
Microscale
There are numerous issues with Microscale's decal set #227 for SP cabooses. Historically the Microscale lettering has been anemically thin. Using Microscale's set #227 you’ll find errors in the lettering sizes, not only for steel cupola cabooses, but also bay window cabooses. Bottom line is Microscale's set is in need of revision, not to mention include the correct size white angled reflective stripes to go under the bay windows on more modern cabs --the current ones are way too small.
Rob Sarberenyi
Reference
See Photos in the Files area, folder called AMB C-30-1 caboose kit.
Rob Sarberenyi
http://modelingthesp.blogspot.com/2012/08/my-renumbered-sp-wood-caboose.html
SP C-30-2
#30
Drawings
C-30-2 Wood Caboose (*see Allen Models 5994 Cuesta Verde, Goleta, CA 93117 $9)
C-30-2 Wood Caboose Southern Pacific Freight Cars, Volume 2: Cabooses, pg. 111
Reference
Southern Pacific Freight Cars, Volume 2: Cabooses, pg. 143-148
Modeling C-30-2 Caboose
Precision Scale
Brass Caboose Number 15254, came unpainted.
SP C-30-3
Drawings
C-30-3 Wood Caboose Southern Pacific Freight Cars, Volume 2: Cabooses, pg. 111, 150
Reference
Southern Pacific Freight Cars, Volume 2: Cabooses, pg. 142-143, 149, 154-160
Steel Caboose Types
Details
Trucks
Some of the steel caboose had Allied full cushion trucks.
There were in total 21 Pacific Lines cabooses which were given Allied trucks when new and 2 T & NO.
SP #1094-1099, 1140-1144, 1190-1199
T&NO #425, 426
Jim Elliot courtesy of Vol 2 based on the actual caboose cards for each caboose
Here are some cabooses from the Coast Division that had Allied Cushion trucks:
SP #1144, SP #1094, SP #1192, SP #1190
All cars 1190-1199 had Allieds. They started to be replaced in early 1949. All Allied full cushion trucks were taken off not long after World War II, (mid-1950).
The T&NO cars with Allieds were 425 and 426, from both SP records and photographs. The 30 cars of Class C-40-3 for T&NO, cars 400-429, most certainly did NOT all have Allied trucks, just the two cars cited.
Tony Thompson
Wheels
It's easy to determine SP cabooses with steel or cast iron wheels: the wood cabs had iron wheels, while all the steel cabooses had steel wheels. Practically all surviving SP coaches by the 1950s had steel wheels, so they could fill in for a caboose.
Tony Thompson
COTS
To somewhat identify which caboose(s) are which:
1. A car with a single COTS panel, then it represents a car repainted in 1973 or 1974.
During that time period, the COTS panel was only mandatory for repainted cars.
2. The two-panel COTS appeared in 1975, and was mandatory for all cars unless they already had the one-panel COTS.
3. The three-panel COTS appeared in 1982.
Tim O'Connor
Bay Window Type
SP C-30-4
#1235-1269
The earlier 30-ton bay window cabooses C-30-4 dates from 1947. According to the information in Joe Strapac's "Southern Pacific Review 1981," the SP bought 35 AC&F bay window cabooses in 1947. These were the first 'bay window' types. These were 2' 3" longer than the C-40-3, 8' 8" wide over the body and 10' 8" wide over the bay-window. The inside length is about 32 feet and the inside width (excluding bays) is 8'-8".
The body showed exposed rivets, but the bay was flush. No other railroad purchased cabooses like the C-30-4 with its unusual smooth outer roof and some other details, it is a quite distinctive and probably unique car. Remember that AC&F was not that big a builder of cabooses after 1930.
The C-30-4 had a flat panel roof (smooth external roof surface).
C-30-4, -5 and -6 (135 Pacific Lines cars total) were prominent by 1953.
Details
Originally built with a small smokejack, roofwalks, end ladders, large toolbox under the bay, all these things changed over the years as they were overhauled and upgraded. Marker lights went through all the variations, some even got the marker light above the end doors. These had a much lower bay than the later C-40-4 class.
C-30-4 caboose trucks
The C-30-4's were fitted with Standard Car Truck Company Barber-Bettendorf trucks.
Paint
The C-30-4 bay window cabooses were NOT all boxcar red from the outset. All were delivered in all-over mineral red paint with 'vermillion' (bright red) ends in 1947. These received the Daylight orange end walls, for improved visibility, as per the 1955 specification and Daylight orange bay ends as per the 1961 spec. Orange step wells was a sign of a post 1980 overhaul.
The Southern Pacific caboose "mineral red” depends upon the era. In the immediate period after World War II, including 1947 when the C-30-4 cars were built, SP's mineral red color was somewhat in the direction of maroon. But in the late 1950s and thereafter, it seems to be more of a classic box car red.
Tony Thompson
The ends are a different color than the sides. In a couple of color video tapes, they existed that way from delivery until the very early 1950's. The color was approximately Daylight Red or SP Scarlet. So if you're modeling the 1947-1951 timeframe, your bay window cabooses should have Daylight Red ends (ends only, not the bays). Only later were they repainted to all boxcar red.
You would have to look at an individual caboose's car card (they are at CSRM) to be sure. It looks to me as though at least some, if not most, did survive until the new orange color was instituted in October, 1955.
Tony Thompson
C-30-4 #1257 had silver ends? (*see SP Bay Area Steam, Demoro, pg. 59)
Handrails
Note the caboose had white safety handrails (a 1948 paint standard).
Interior color
The 1947-built C-30-4 cars were delivered with varnished interiors.
Tony Thompson
Lettering & Numbering
In 1955, SP began applying "billboard style" lettering.
Drawings
C-30-4 Caboose Southern Pacific Freight Cars, Volume 2: Cabooses, pg. 111, 219, 226
Early Bay Window Caboose (*See Car Builders Encyclopedia 1953, pg. 298-299)
References
Don Mitchell. article November 1989, RMC "Chris Hollinshead's steel SP cabooses"
Southern Pacific Freight Cars, Volume 2: Cabooses, pg. 212-223
Modeling C-30-4
Athearn
Bay Window caboose might not be backdated to the earlier, lighter cars. I have seen a kitbash of the Athearn HO bay-window car to approximate Class C-30-4, with rearranged windows, lowered top of the bay section, and roof from an X29 box car kit. It looked pretty convincing but obviously was a fair amount of work.
Tony Thompson
They should upgrade their existing C-30-4 with separate grab irons and bring it out in the as-delivered paint scheme.
Challenger Imports
CIL #2401.1 Southern Pacific C-30-4 Bay Window Caboose No. 1264
Precision Scale Brass
PSC #15316 SP C-30-4 ACF Bay Window Caboose
Trains, Inc.
Trains did a C30-4-5-6 or all of the preceding.
C-30-4 caboose trucks
Standard Car Truck Company
The Standard Car Truck Company Barber-Bettendorf trucks on C-30-4's can be found through Eastern Car Works of Langhome, PA, a similar truck in injected molded styrene plastic.
Paint
If you're modeling the 1947-1951 timeframe, your bay window cabooses should have Daylight Red ends (ends only, not the bays). Only later were they repainted to all boxcar red.
Best non-water based paint available to match Southern Pacific caboose "mineral red” depends upon the era. Of course if you weather the cars even lightly, the exact shade becomes much less obvious. Use a box car red from a paint brand you like, weather it, and not worry. Only if you want to present a freshly painted car would the exact shade be important.
Tony Thompson
That said, use non-water base P-B-L's SP/PFE red. It's probably the best starting point for a caboose, and P-B-L/Accupaint colors are far easier to use than most other paints because they tend not to clog and never spoil in the bottle.
Or use Scalecoat Box Car Red. Use SP orange for the two narrow sides of the bay window. With a little weathering, it looks good.
The best Floquil paint match for SP caboose Mineral Red is Floquil Boxcar Red or Polly Scale Mineral Red, but don’t use these.
C-30-5
#1270-1319
C-30-5's were built by SP from parts supplied by AC&F, built in 1949. With the 1961 integration of T&NO, units were renumbered into vacant slots in the #420-464 series. See the C-30-5 Photo Collection for photos of 4xx series cabooses.
C-30-4, -5 and -6 (135 Pacific Lines cars total) were prominent by 1953.
Details
Caboose Stoves
Has a smoke jack.
Paint
Externally similar to the previous C-30-4 class, originally painted all over mineral red and were NOT all boxcar red from the outset. These were all painted mineral (box car) red like their other cabooses until 1955.
All were delivered with "vermillion" (bright red) ends. In a couple of color video tapes, so there's no doubt that they existed that way from delivery until the very early 1950's. The color was approximately Daylight Red or SP Scarlet. In the 1947-1951 timeframe, bay window cabooses would have Daylight Red ends (ends only, not the bays). Only later were they repainted to all boxcar red.
Daylight orange end walls were a 1955 specification and Daylight orange bay ends as per the 1961 spec. Orange step wells was a sign of a post 1980 overhaul.
Handrails
Note the caboose had white safety handrails (a 1948 paint standard).
Interior color
The C-30-5 cars built in 1949 had the interior as pale light gray, according to my information. It points to the 1947-1949 time as the introduction of caboose interior paint instead of varnish. How quickly older cars may have gotten paint, I don't know. Interior paint is not usually mentioned on caboose cards.
Tony Thompson
Lettering & Numbering
In 1955, SP began applying "billboard style" lettering.
Drawings
C-30-5 Caboose Southern Pacific Freight Cars, Volume 2: Cabooses, pg. 226
Early Bay Window Caboose (*See Car Builders Encyclopedia 1953, pg. 298-299)
References
Information in Joe Strapac's "Southern Pacific Review 1981", pg. 16-17
Southern Pacific Freight Cars, Volume 2: Cabooses, pg. 226-235
Modeling C-30-5 Caboose
Paint
If you're modeling the 1947-1951 timeframe, your bay window cabooses should have Daylight Red ends (ends only, not the bays).
Challenger Imports
CIL #2403.1 Southern Pacific C-30-5 Bay Window Caboose No. 1276
CIL #2403.1 Southern Pacific C-30-5 Bay Window Caboose No. 1291
CIL #2403.1 Southern Pacific C-30-5 Bay Window Caboose No. 1300
Precision Scale Brass
PSC #15318 SP C-30-5/6 Bay Window Caboose
C-30-6
#1320-1369
According to the information in Joe Strapac's "Southern Pacific Review 1981," the SP in 1951 built another 50, class C-30-6, the last cabooses built by SP L.A. shops for SP only. All orders after this were bought from outside suppliers.
The inside length is about 32 feet and the inside width (excluding bays) is 8'-8".
The C-30-6 had a diagonal panel roof.
C-30-4, -5 and -6 (135 Pacific Lines cars total) were prominent by 1953.
Details
#1324, in the early 50’s, had no frog eyes or wheel antenna.
Originally delivered with a large toolbox as per earlier classes, photo's show this replaced by a smaller battery box. These also received upgradings in marker lights and radio antenna over the years.
Paint
They were originally painted all over mineral red and were NOT all boxcar red from the outset. These were all painted mineral (box car) red like their other cabooses until 1955.
All were delivered with "vermillion" ends. In a couple of color video tapes, so there's no doubt that they existed that way from delivery until the very early 1950's. The color was approximately Daylight Red or SP Scarlet. In the 1947-1951 timeframe, bay window cabooses would have Daylight Red ends (ends only, not the bays). Only later were they repainted to all boxcar red.
In 1955 when SP began applying "billboard style" lettering and painting caboose ends with Daylight orange for improved visibility. The bays were painted all orange starting in 1961. Orange step wells was a sign of a post 1980 overhaul.
#1342 was still in mineral red and Daylight orange.
Overall color of the cabooses is Freight Car Red. Try using the paints from Star Brand Paint.
The paint colors you want are:
1-STR-30 S.P. / U.P. Freight Car Red Paint
1-STR-27 S.P. Daylight / P.F.E. Orange
interior colors
With C-30-6, SP went to a pale light gray.
Tony Thompson
It’s assumed the leather seats are brown as the bunkers tops, the stove is black.
Lettering & Numbering
In 1951, at the time these featured SOUTHERN PACIFIC lettering spelled out with the line above the roadname and below the car number (see photo of SP #1324 on page 242 of Tony Thompson's book "Southern Pacific Freight Cars Volume 2: Cabooses").
In 1955, SP began applying "billboard style" lettering.
By 1958 some cabooses began sporting the larger Gothic style SP lettering.
Rob Sarberenyi
SP C-30-6 class steel bay window caboose #1342 received "Trailer-Flatcar Service" lettering on it's traditional box car red scheme with orange ends and bays (see photo on page 240 of Tony's book, and the same image appears on page 21 in Joe Strapac's "Southern Pacific Review 1981").
Rob Sarberenyi
Drawings
C-30-6 Caboose Southern Pacific Freight Cars, Volume 2: Cabooses, pg. 241
Early Bay Window Caboose (*See Car Builders Encyclopedia 1953, pg. 298-299)
References
Information in Joe Strapac's "Southern Pacific Review 1981", pg. 16-17
Southern Pacific Freight Cars, Volume 2: Cabooses, pg. 241-244, 247-251
There's info in Richard Percy's website http://espee.railfan.net/sp_c-30-06.html
The SP Caboose index is here http://espee.railfan.net/caboose_steel.html
Modeling C-30-6 Caboose
Precision Scale Brass
PSC #15318 SP C-30-5/6 Bay Window Caboose
Walthers
Compared with the builders pictures from SP Freight Cars Vol. 2, it is very close. the only problem is that the body is mounted reversed to the floor/frame. The 3 windows should be on the tool box and battery box side, while the 4 windows side should be where the brake air tank is locate. On the model, it is reversed.
Cupola Type
C-40-1 Steel Cupola Caboose
SP #1000-1049
C-40-1 class was only 50 cars, probably a trial. Southern Pacific's C-40-1s of 1937 all were built in L.A. SP shops.
Those steel cars were also widely used behind steam. The steel cupola cabooses were used on the “Overnight”.
In 1954-55 C-40-1 #1031 caboose, was used on piggyback trains between Los Angeles and San Francisco and lasted into the 1960's.
Details
The Espee C-40-1 and C-40-3 were pretty much identical save for a few small details.
C-40-1 Brake wheel
The production steel cupola cabooses C-40-1 originally was built with the vertical brake shaft (#1000-1049). Some were modified later to have the horizontal shaft (geared hand brake) and later they come off the assembly line with the more modern brake stand. Photographs shows a production C-40-1, or -3 that has the vertical-axis brake wheel. If it has vertical-wheel handbrakes, its number would lie in (#1050-1234). In SP Freight Cars Vol. 2 there’s photos of six C-40-1's with vertical staffs.
Ernie Fisch
#11, the SP steel cupola caboose prototype, originally retained its vertical-axis brake wheel from its previous life as a steel underframe wood caboose.
Paint
Eight steel cupola cabooses were repainted in the Overnight scheme. They were: #1031, 1069, 1076, 1096, 1097, 1147, 1181 and 1201. There is no photographic evidence that show a bay-window car in the aluminum Overnight scheme applied to the eight cupola cars. No loco was ever given such a paint job!
Joe Strapac
The SP cupola caboose now at GGRM arrived in silver "Overnight" paint, but came from an estate in So. Cal., where that scheme might have been applied rather than received from S.P. The more traditional brown & orange have since been applied at the museum.
C-40- aluminum
C-40 cupola cabooses in the fifties were bright red on the ends with cupola used on piggyback service 1953-59. As with a paint scheme like the silver cupola cars, as used on the "Advance Overnight" which was all trailers, the silver scheme was intended to harmonize with the aluminum trailers and their lettering.
See the photo pg. 32 Southern Pacific in Color Vol. 1 as an example.
In 1954-55 #1301 caboose received the special 'Trailer Flatcar Service' scheme, of silver paint and red/black billboard lettering.
Lettering & Numbering
In 1955, SP began applying "billboard style" lettering.
#1301 received red/black 'Trailer-Flatcar Service' lettering.
SP 1000-1049 and SP 11 kept their numbers for their entire service careers. These would be appropriate number for a C-40-1 caboose in the postwar steam era.
See the following: http://www.railgoat.railfan.net/spcars/byclass/cabs/c040-01.htm
Lee A. Gautreaux
Lettering schemes did vary, as illustrated in my Caboose book.
Tony Thompson
“Local” Lettering
"LOCAL" service only, is painted beside the number on some units.
Drawings
C-40-1 Caboose Southern Pacific Freight Cars, Volume 2: Cabooses, pg. 111, 171
Steel Cupola Caboose (*See S.P. Review 1981, pg. 12 & 20, Joe Strapac)
References
Southern Pacific Freight Cars, Volume 2: Cabooses, pg. 169-179
Richard Percy has steel cabooses discussed and presented in photos on his site
http://espee.railfan.net/sp_c-40-01.html
Modeling C-40-1
You want an Espee steel Cupola or Bay Window C-40-x class caboose. All those classes share the diagonal panel roof.
Athearn
Now discontinued, ATH74177 (road #1031) or ATH74178 (road #1181) or both.
http://www.athearn.com/Products/Default.aspx?ProdID=ATH74177
http://www.athearn.com/Products/Default.aspx?ProdID=ATH74178
You can use the Athearn caboose, if you model Santa Fe, NOT at all the correct SP cars.
Tony Thompson
Kitbash a C-40-1 using ATSF cupola shells. It will came out close, but no cigar! The hard part is getting the window spacing right, putting the end wall windows to the left of the door, and the width of the cupola correct. Cut two cupolas in half but slightly offset to make up the needed extra width. Then sands down the bottom to get close to the right height.
Balboa
Brass models in the late 70s were not the greatest but better than nothing. It comes with the vertical shaft with the brake wheel on top. The Balboa Caboose was the T&NO #412
Model Die Casting /Roundhouse
The steel cupola caboose first offered by Model Die Castings many years ago was far too short to be correct for an SP C-40-1
4-window (steel) caboose has about the right window arrangement, but the cupola is too narrow compared to the body.
Precision Scale
Precision Scale C-40-1 is identical to a C-40-3 model. The early version came with the large toolboxes underneath.
Precision Scale #15298 SP C-40-1 unpainted (40's-50's detailing-no roof lights and all windows present)
Precision Scale #15298 SP C-40-1 unpainted (40's-50's detailing-no roof lights and all windows present)
WrightTrak Resin Caboose Kit
This resin model is very accurate, superb model. This is a MUCH- needed car for those who either can't afford brass, or want a model with BETTER details.
Tony Thompson
It includes the capability to model ALL variations of the car, from their as-built appearance in the late 1930s through the very end when side windows were being plated over in the late 1970s/early '80s. You'll still need to add your own frog eye marker lamps on the roof for later versions as appropriate. As Clyde King once said: "that's easy to make from wire stock and brass tubing".
The metal parts for the ladders, window plugs, roof walkways, etc., are done very well and the underbody and end pieces are on sprues that will have to be cut very carefully and are very well done. This will be a very nice addition to any SP train.
Jim Scott
Learn more about WrightTRAK's resin SP C-40-1/C-40-3 steel cupola caboose kit and see the instructions at their website http://www.wrighttrak.com/
Rob Sarberenyi
Trucks
Tahoe Model Works
It came with Tahoe Model Works Barber-Bettendorf Swing Motion Caboose Trucks with molded leaf springs. This is the wrong truck as SP Cabooses had Vulcan trucks with leaf springs (a Vulcan Truck with springs is made by TMW).
Jim Scott
Such trucks are not only correct for Espee's steel cupola cabooses so equipped, but also any C-30-1 wood cabooses you have from AMB and/or Walthers, which don't have correct trucks unless you used Kadee's #515 Vulcan double truss trucks and changed out the coil springs to phosphor bronze leaf springs. SP put Vulcans on many freight cars, notably stock cars, and the Kadee "extra skinny spring" version tends to look toy-like.
Paint
All the instructions are on a mini dvd and need to be reviewed and printed prior to starting assembly. You should also decide how you want to paint this caboose as some aspects should be painted prior to assembly. You could do one up for Trailer Train Service in aluminum.
Jim Scott
Consult photos of the caboose you're modeling or Tony Thompson's SP Freight Cars Vol. 2 book on cabooses,
Lettering & Numbering
If modeling in the 50's era you will need the Roman "Southern Pacific" lettering per Tony's book.
Mark Schutzer
Decals
Microscale
Use Microscale decal set MC-4136 http://tinyurl.com/ye5y35m
There are numerous issues with Microscale's decal set #227 for SP cabooses. Historically the Microscale lettering has been anemically thin. Using Microscale's set #227 you’ll find errors in the lettering sizes, not only for steel cupola cabooses, but also bay window cabooses. Bottom line is Microscale's set is in need of revision, not to mention the correct size white angled reflective stripes to go under the bay windows on more modern cabs, the current ones are way too small.
Rob Sarberenyi
Look again at the Microscale's set #1314 http://tinyurl.com/yc7jxj3
Microscale offers this HO scale mini-cal set for "Trailer-Flatcar Service" cabooses. http://tinyurl.com/c56a54
Reference
Learn more about WrightTRAK's resin SP C-40-1/C-40-3 steel cupola caboose kit and see the instructions at their website http://www.wrighttrak.com/
Rob Sarberenyi
C-40-3 Steel Cupola Caboose
SP #1050-1054
SP #1055-1099
SP #1100-1149
SP #1150-1234
The C-40-3 of 1940-1942 was the big class of steel cupola cabooses. All were built in L.A. SP shops.
Tony Thompson
There were 165 cars in C-40-3 steel cupola cabooses. C-40-3's were built by SP for SP and T&NO between 1940 and 1942. These were cupola types, numbered SP #1050-1234. They were 16" longer, 7" narrower and 4" lower than the C-40-1's. Some were also fitted with Allied Full-Cushion trucks for a supposedly better ride, SP #1094-1099, 1140-1143, 1190-1199 had these as built, but were removed 1949-50 as they were maintenance intensive.
In 1954-55 eight cabooses, 7 were C-40-3's #1069, 1076, 1096, 1097, 1147, 1181 and 1201, (the other was C-40-1 #1031) were used on the then new piggyback trains between Los Angeles and San Francisco and lasted into the 1960's.
C-40-3 #1192 was rebuilt with a bay-window in 2/1955 retaining its original number, another one-of-a-kind that was never repeated.
These were the last cupola type cars built or bought by SP or its subsidiary's.
Those steel cars were widely used behind steam.
Details
The Espee C-40-1 and C-40-3 were pretty much identical save for a few small details.
Caboose Stoves
Had a coal stove in the short end and a heating stove in the long end. All were removed in the early postwar era.
Lighting
The lights were powered by batteries and the batteries were charged by generator. Depends on era. Certainly as built, there were not batteries; the markers and interior lights were kerosene. The changeover to electricity is treated in my caboose book. Battery boxes were usually put in the location where toolboxes had previously been located.
Brake wheel
Photographs shows a production C-40-3 with the vertical-axis brake wheel. The -3's were built with the later vertical staff version.
Paint
The official color for SP cabooses painted prior to about 1946 or so, the standard SP caboose (and boxcar) mineral red was a variation on CS11, metallic paint. This is a very brown color, with very little red. The post 1946 (or so) color is a much redder shade (still a mineral red). CSRM had a drift card for the post 1946 shade dated 1963
The UPRR museum has a sample card for CS 11 dated 1913 "Freight car red," or metallic along with other SP freight cars.
Tony Thompson
SP1107 is a C-40-3 car. In Tony's book, you do not see SP1107 (nor 1089 nor 1145). However, there is a whole section on SP C-40-3 which is the class that SP #1107 is listed in. The closest color picture to this class (for the 50's) was on page 204 of SP1208 taken in 1958. Tony does state near the beginning that nearly all cabooses was CS11, "metallic" which was mineral or boxcar red.
In the steam version of "This is My Railroad," containing many scenes in which new and old paint on freight cars, and both prewar and postwar cars, can be seen together. There is far more difference with weathering and lighting than with era; and certainly there are some pretty red prewar cars in there. At the same time, the SP cars are distinctly browner than, for example, the more orange UP color.
The post-1946 color is somewhat more maroon, but that the difference is certainly not dramatic, and in my opinion certainly cannot be described as "very red" compared to a "very brown" color. Color perceptions are always subjective, but use of phrases like "very brown" overstate, in my opinion, what is involved in this case.
Tony Thompson
C-40-3 handrails in Tony Thompson's SP Caboose book appear that if we're going to date the #1107 to its 1942-era appearance, SP didn't paint any of the handrails white. White handrails came in early 1948. Photos of SP #1115 taken in 1947, SP #1190 taken in 1946 and SP #1210 taken in 1943 show solid Mineral red.
Tony Thompson
In 1954-55 eight cabooses received the special 'Trailer Flatcar Service' scheme, of aluminum paint and red/black billboard lettering. Of these eight, 7 were C-40-3's #1069, 1076, 1096, 1097, 1147, 1181 and 1201, (The other was C-40-1 #1031). These were used on the piggyback trains between LA and San Francisco.
Handrails
Note the caboose had white safety handrails (a 1948 paint standard).
Lettering & Numbering
SP relettered their C-40-3 cabooses into at least 2 different schemes with the larger block lettering. One scheme has the lettering going across the top and has 24" tall letters at the beginning of each word and 16" letters for the rest. Another scheme using the block letters has them stacked under the cupola and it appears they are the same size as later bay window paint schemes, all 16".
Lettering, paint and modifications are pretty well the same as for the C-40-1's. The full spelled out "SOUTHERN PACIFIC" lettering came in 1946. In 1954-55 eight cabooses, 7 were C-40-3's #1069, 1076, 1096, 1097, 1147, 1181 and 1201, (The other was C-40-1 #1031). received the special 'Trailer Flatcar Service' scheme, of red/black billboard lettering.
SP #1078 was lettered SOUTHERN PACIFIC without orange ends and no bars above the lettering or below the numbers like seen on page 193 in Tony Thompson's book "Southern Pacific Freight Cars, Volume 2: Cabooses."
Drawings
C-40-3 Caboose Southern Pacific Freight Cars, Volume 2: Cabooses, pg. 111, 185
C-40-3 Steel Caboose (*see Truson Buegel Box 624, Downey, CA 90241 catalog $10)
Steel Cupola Caboose (*See S.P. Review 1981, pg. 12 & 20, Joe Strapac)
Reference
Southern Pacific Freight Cars, Volume 2: Cabooses, pg. 181-211
Modeling C-40-3
Balboa
The C-40-3 cupola caboose was done many years ago in brass by Balboa, and more recently by Precision Scale.
Challenger
Challenger 2407.1 SP C-40-3 Steel Caboose 1069 Silver TTX Scheme
Challenger 2407.1 SP C-40-3 Steel Caboose 1076 Silver TTX Scheme
Model Die Casting /Roundhouse
The steel cupola caboose first offered by Model Die Castings many years ago was far too short to be correct for an SP C-40-3.
4-window (steel) caboose has about the right window arrangement, but the cupola is too narrow compared the body.
Precision Scale
Precision Scale C-40-1 is identical to a C-40-3 model.
Precision Scale #15300 SP C-40-3 unpainted (40's-50's detailing-no roof lights and all windows present)
Precision Scale #15300 SP C-40-3 unpainted (40's-50's detailing-no roof lights and all windows present)
Precision Scale #15300 SP C-40-3 unpainted (40's-50's detailing-no roof lights and all windows present)
Precision Scale #15300 SP C-40-3 unpainted (40's-50's detailing-no roof lights and all windows present)
Westside
Brass Caboose.
WrightTrak Resin Caboose Kit
This resin model is very accurate, superb model. This is a MUCH- needed car for those who either can't afford brass, or want a model with BETTER details.
Tony Thompson
It includes the capability to model ALL variations of the car, from their as-built appearance in the late 1930s through the very end when side windows were being plated over in the late 1970s/early '80s. You'll still need to add your own frog eye marker lamps on the roof for later versions as appropriate. As Clyde King once said: "that's easy to make from wire stock and brass tubing". The kit's roof is a tad narrow approximately .014 too narrow. There should be roughly a sheet metal's width overhang on both sides of the roof. This is absent on the model, where the roof is presently flush with the sides. The rivets along the roof line will be replaced with Archer rivets. The cupola will also need to be widened the same amount.
The metal parts for the ladders, window plugs, roof walkways, etc., are done very well and the underbody and end pieces are on sprues that will have to be cut very carefully and are very well done. This will be a very nice addition to any SP train.
Jim Scott
Learn more about WrightTRAK's resin SP C-40-1/C-40-3 steel cupola caboose kit and see the instructions at their website http://www.wrighttrak.com/
Rob Sarberenyi
Trucks
Tahoe Model Works
It came with Tahoe Model Works Barber-Bettendorf Swing Motion Caboose Trucks with molded lief springs. This is the wrong truck as SP Cabooses had Vulcan trucks with leaf springs (a Vulcan Truck with springs is made by TMW).
Jim Scott
Such trucks are not only correct for Espee's steel cupola cabooses so equipped, but also any C-30-1 wood cabooses you have from AMB and/or Walthers, which don't have correct trucks unless you used Kadee's #515 Vulcan double truss trucks and changed out the coil springs to phosphor bronze leaf springs. SP put Vulcans on many freight cars, notably stock cars, and the Kadee "extra skinny spring" version tends to look toy-like.
Paint
All the instructions are on a mini dvd and need to be reviewed and printed prior to starting assembly. You should also decide how you want to paint this caboose as some aspects should be painted prior to assembly. You could do one up for Trailer Train Service in aluminum.
Jim Scott
Consult photos of the caboose you're modeling or Tony Thompson's SP Freight Cars Vol. 2 book on cabooses,
Lettering & Numbering
If modeling in the 50's era you will need the Roman "Southern Pacific" lettering per Tony's book.
Mark Schutzer
Decals
Foothill Model Works
The correct small SP lettering on Foothill Model Works set FMW-600 (available now from San Juan Decals), in this instance the ones intended for small steam loco tenders. They are 8" or 9" letters. Works great! Alas, there is no small caboose class designation (C-40-1/-3).
Rob Sarberenyi
Herald King
For the late fifties large Gothic style lettering with orange painted ends, the Herald King boxcar set number B-601 may have perfect size lettering, but good luck finding one. Long out of print.
Tom Cockle
Microscale
Use Microscale decal set MC-4136 http://tinyurl.com/ye5y35m
There are numerous issues with Microscale's decal set #227 for SP cabooses. Historically the Microscale lettering has been anemically thin. Using Microscale's set #227 you’ll find errors in the lettering sizes, not only for steel cupola cabooses, but also bay window cabooses. Bottom line is Microscale's set is in need of revision, not to mention the correct size white angled reflective stripes to go under the bay windows on more modern cabs, the current ones are way too small.
Rob Sarberenyi
Microscale's SP Caboose decal set doesn't work because the lettering is the wrong size. The small caboose class designation on(C-40-1/-3) could probably be pieced together using other MS lettering sets.
Rob Sarberenyi
C-40-4
#1400-1599 14xx-15xx series were rebuilt becoming the 4000-4129 series
C-40-4's were built by Pacific Car & Foundry in 1961 for SP #1400-1599. These introduced a lot of new features, as well these had a taller bay than previous (C-30-x) units and exposed rivets on the bay. The C-40-4 were the last class with riveted construction.
Starting in 1973 one caboose from each class C-40-4, C40-5, C-40-6, C-40-7 and C-50-3 was rebuilt and renumbered. Most changes were internal, chemical retention toilets (no more sewer chute), roof walks and end ladders were deleted and electrical and radio equipment was upgraded. Starting in 1974 thru early 1975, 123 14xx-15xx series were rebuilt becoming the 4000-4129 series class, the 4120-4121 and 4123-27 numbers were not used. As with the loco rebuilding programs, cabooses were given the next number out, so they were not renumbered sequentially with their old numbers.
Details
roof walks and end ladders as built
partial endplate on the roof ends
smoke jack
square cornered bay windows
side and end windows have square corners
three windows on the fuel tank side
two windows the other side
notched sill no axle-hung generator
external fuel tank, most lost the square fuel tank (the underhanging box on the right side) by the early '70s there should be a battery box on both sides
Frog Eyes
The first SP cabooses delivered new with the roof mounted "frog eye" lights were the C-40-4's in 1961. That was the beginning of the end of marker lamps.
The double 'frog-eye' roof mounted marker lights, was introduced (with the C-40-4 caboose, in 1961, along with retrofitting other cabooses at the time, as documented in the caption to a photo on p.210 of Tony Thompson's "Southern Pacific Freight Cars Vol. 2: Cabooses"), when transition started to the single marker (called "Cyclops" mounted to the roof (1978- early 1980) and when this marker started being relocated to the end, above the door (late 1980) (last two dates given from caboose section of Joseph Strapac's "1981 Motive Power Annual").
The "Frog Eye" started out with a red lens on the left, and a green lens on the right, with the red light illuminating toward the rear, and the green lens illuminating towards the front. At some point, this seems to have changed to double red lenses on both sides, both illuminated.
Bay window caboose rooftop lights
Red/green lights (two lenses facing both fore and aft) were mounted on a tripod to about the same height as the smokejack. They are caboose electric marker lights. They took the place of the corner mounted markers. Rule 19 handled these differently in that green was not displayed to the front or side. Red was displayed to the rear until the caboose was clear of the main track for a meet or pass then green was displayed to the rear. Eventually they morphed into a single red safety light, which subsequently went and hid itself under the roof overhang.
Tony Thompson
Trucks
Roller bearing trucks.
Paint
These came with mineral red with orange bays and end walls when new.
Tony Thompson
Step Wells
The C-40-4's with orange step wells were: #1424 (1983), #1510 (1985), #1563 (1983), and #411 (1987).
The C-40-4's with brown step wells were: #4038 (1975) and #4119 (1975.
Tim O'Connor
Interior color
I have been told by employees that it was the C-40-4 of 1963 when SP went to the pale green.
Tony Thompson
Bay Window caboose colors
One significant thing about the C-40-4 class is they were the only cabs delivered with the entire bay window painted orange. None of the bay windows cars were painted silver (aluminum), though on page 226 of the caboose book there is reproduced the lettering diagram for such a car--certainly an indication that it was planned. The ends of these b/w caboose's became "orange" in 1956.
Tony Thompson
Lettering & Numbering
Starting in 1973 one caboose from class C-40-4, was rebuilt and renumbered. As with the loco rebuilding programs, cabooses were given the next number out, so they were not renumbered sequentially with their old numbers.
For a lettering diagram see: Southern Pacific Freight Cars, Volume 4: Box Cars, pg. 457
Rebuilt cabooses carried a rose to signify they were done in Roseville.
Southern Pacific Freight Cars, Volume 2: Cabooses, pg. 344
Reference
Southern Pacific Freight Cars, Volume 2: Cabooses, pg. 287-298
http://espee.railfan.net/picindex/c-40-4_photos/4119_sp-c-40-4r-caboose-bob_dengler.jpg
http://espee.railfan.net/sp_c-40-04.html
Modeling C-40-4 Bay Window Caboose
Athearn
The "Blue Box" Athearn (now RTR line) C-40-4 can be reworked to represent most cars up to the C-50-4 with varying degrees of difficulty. The Athearn cab is indeed a very close model to the C-40-4 class, as built. The 1960s-era SP cabooses are relatively easily kitbashed from Athearn, though none is exactly right. And there are many other deficiencies in the old tooling, so fixing the problems might be almost the same cost as simply retooling it correctly.
The Athearn caboose is okay for a C-40-4 with the rivets removed.
The main mistake is that the markers and antenna should be on opposite sides of the roof from where they are.
Add some decent end ladders. Shave off the cast on molded grabs (at least the curved ones) and replace with wire (especially around the end windows). Install wire end railings and etched running board. The model comes with a proper smoke jack.
The new RTR versions have a better brake set up than the blue box as their brake gear was also vastly simplified.
Roof
The roof of the C-40-4 is too short (should line up with the end sills). Just extending the porch roof until it is even with the end of the platform helps a whole bunch. The roof needs some details added, and but the basic model is pretty close. While, at least all those classes share the diagonal panel roof. Between plugging the roofwalk holes (even if you're going to replace the roofwalk with etched brass)
Modeling References
The November 1989 Railroad Model Craftsman had an article (pgs. 63-65) about kitbashing an Athearn bay window caboose into an "older" SP bay window caboose and a "newer" SP bay window caboose (the author generally avoided the use of class designations except for one photo caption that referred to the older bay window caboose as class C-30-4).
Photocopies of the article probably can be obtained from the Calif. State Railroad Museum Library. There were no plans with the article and the models probably were not constructed with the accuracy many modelers expect today. As the author stated, the model cabooses "were built to be visually close to the prototypes, if not exact in all measurements").
Read Scott Chatfield's modeling comments at the bottom of this page
If you scroll down, near the bottom of this link are a few descriptions regarding modifications to make the Athearn car more accurate.
You'll find helpful information on (of course) Richard Percy's website.
Look at the caboose info and photos here http://espee.railfan.net/caboose_steel.html.
Athearn Rebuild
The following links are of an Athearn RTR C-40-4 representing a rebuild; model construction by Mark Ala.
http://mancosbob.rrpicturearchives.net/showPicture.aspx?id=2737493
http://mancosbob.rrpicturearchives.net/showPicture.aspx?id=2737490
as a qualifier, my equipment cutoff is around 1977 or so,
http://mancosbob.rrpicturearchives.net/showPicture.aspx?id=2737511
http://mancosbob.rrpicturearchives.net/showPicture.aspx?id=2737510
The roof ends were extended (muy importante), windows plated, proper details built for the car, or added as needed. Cars were not repainted either, just touched up with Polly S and a paint brush. Overall, a nice general representation which fits nicely into my "close enough" modeling format. General qualification: I only went with the single roof light C-50's because of the "Over Scale" sized bugeye roof markers on the C-50 cars; not an issue by your stated time period, as I'm thinking the doubles were mostly history by then.
John Huey
Modified Athearn car for comparison:
http://mancosbob.rrpicturearchives.net/pictures%5C63434%5CIMG_20101204_150310.jpg
Centralia Shops
They are beautiful. They don’t have working lights like Athearn. One feature that really stands out, in contrast to Athearn's otherwise fantastic model, is SCALE DRAFT GEAR! This is possible for Intermountain because they use Kadee whisker couplers, while Athearn continues to use crappy plastic couplers on all of their models including Genesis locos! They used a flat paint for the lights, and incorrectly painted the frog lights all red (should be red-green). But this is easily fixed with Tamiya transparent paints over a base coat of silver.
Tim O'Connor
They are underweight. Popping the roof is not hard, it was thought out and you pull the ladders free and lever it up popping the few glue spots. It wasn't slobbered with glue so it comes free. The full interior makes it a little tough to add lead but I have sheet lead so can form it as I want. Watch the little glued on parts.
One other thing; they put all kinds of brake gear rods across the floor and the trucks Will not work without taking them off and cutting or removing the rods. There is no way around this and I don't know why they did this as it is pretty bad. I don't think the caboose would go around a 48" radius curve; in one direction; without removing or somehow getting these out of the way. I cut mine back and was able to glue them into places out of the way after doing that to retain some of the flavor. But be sure to look at this before you use the caboose. The trucks themselves were also unimpressive. And no genny.
Jon Cure
Intermountain C-40-4 Caboose
If you model the 1961 thru the mid 1980s, the C-40-4 Bay Window Cabooses rebuilds will work for that era. It will be supplanting the old Athearn bay window caboose. It comes in four different versions. Intermountain also included a very nice little bag of etched parts, including window rock screens, and steps. And they even painted the steps when appropriate. The red frog eye lenses are just painted on the casting. Repaint with Tamiya transparent colors.
Tim O'Connor http://www.intermountainrailway.com/reservationflyers/RF1211HOCCSCabooses.htm
As an alternative you can always use M.V. Lenses for the red frog eye.
Ed Hall
The detailing on the CCS car is very nice, the roof is the proper length, the car "looks" right when compared to photos, even the solid orange bay version seems in great proportion to the photo's I have. The "porches" seem a bit wider, and this too looks better. All windows and details line up with photos. The roofwalk on the all orange bay version is excellent, the details and the way it's mounted look quite natural. Compared to my brass offerings, the CCS car has better detailing here as well. The antennae on the CCS car is the best I have seen yet.
http://www.intermountain-railway.com/distrib/ccs/images/CCS1302a-left-side-awl.jpg
http://www.intermountain-railway.com/distrib/ccs/images/CCS1302a-left-side-awl.jpg
John Huey
Intermountain vs. Athearn
You will note than when compared to the Athearn C-40-4, the angles on the bay-window are noticeably different. Athearn's ancient bay-window is wider, as when looking at the car broadside. Without major work the Athearn car is more of a toy.
John Huey
Model Die Casting
They offer an HO scale steel cupola caboose (their #3480 series) loosely patterned after Espee's C-40-1 and -3, however, the model is several feet too short and has numerous other compromises, notably in the cupola and windows. Currently no other cabooses are available as ready-to-run or as kits for this type of SP caboose.
Walthers
Walthers' HO scale bay window caboose released in the 1990s was primarily based on International Car Co. cabooses built in 1974 for the Milwaukee Road as #992215-992229. An OMI brass Milwaukee Road caboose of this class and when compared to the Walthers model, they're almost dead ringers. Although more recent releases of Walthers' bay window cabooses (2005 to present) include window variations among other details and options, they still aren't 100% representations of any Espee classes of bay window cabooses. You could use one as a stand-in, but for now, the only option for more accurate representation of Espee cabooses are brass imports.
Modeling Details
Platform Tread
Detail Associates
Use their platform tread kits.
Coupler Pockets
Details West
Replace the coupler pockets with scale draft gear.
Wheels
NWSL
Use their Code 88 wheels.
Frog Eye Light
Details West
Details West has made a proper metal casting for the "bug eye markers".
Frog Eyes Scratchbuild
The Athearn part (discontinued at least as of 2000, with Athearn no longer having the moulds) was undersize. Tony Thompson's volume doesn't have drawings for the "Frog Eye" (only the "Cyclops" as part of the drawing of C- 50-9 on p.361, reprinted from Mainline Modeler, although the diagram on pg. 331 does give the top of this assembly mounted 14' 4-13/16" above the rails. There are differences in how the lamps were assembled for the "Frog Eye" assembly.
Clyde King builds his own "Frog Eye" marker light housings from brass tubing and wire. These look *much* better than Athearn's old white metal casting, which is no longer available. Clyde uses .060" brass tubing and etched brass legs from the Detail Associates dish type caboose antenna. Sorry, they're C-40-6 with diagonal panel roof.
In the files area in a folder called Caboose tops, there’s some rooftop photos of SP cabeese, including a close up of a frogeye tripod.
Go to http://finance.groups.yahoo.com/group/Espee/files/Caboose%20tops/
To fashion your own rooftop "frog eye" marker lights, use an LED pair. That will give you three "legs" if you make one of them a common. It will also give you reversing markers on the roof of your cab. It *can* be made to look correct, just takes a little grief. The hard thing is the marker lights on the roof top, you gotta build‘em still.
Use an axial LED (the leads coming out of each end) and file down the LED to simulate the housing, bend the leads down and add the third leg to make the tripod. All you need it a power source and paint. Coat the rear part of the LED a few extra coats to eliminate light bleed through. It's not a "perfect" reproduction but it makes up for that fact by lighting up. I always tell people...."you never see the imperfections when the train is moving".
Ed Hall
C-40-5
C-40-5's were built by Whitehead and Kales in 1963-64 SP #1600-1699. Differences between these and the C-40-4's was mainly a cylindrical underframe mounted fuel tank, a good shot of which appears on #1776 on the C-40-7 page. The Whitehead & Kales C-40-5 have a much bigger, tubular fuel tank under the right side bay window, but their markers and antenna are mounted in a mirror image of the C-40-4's. The opposite side has a battery box about the same size and shape as the C-40-4 fuel tank.
Photos in Strapac's 1981 SP Annual, the C-40-5's have that flat (non-diagonal) panel where the smokejack sits.
Starting in 1973 one caboose from class C-40-5, was rebuilt and renumbered. Most changes were internal, chemical retention toilets (no more sewer chute), roofwalks and end ladders were deleted and electrical and radio equipment was upgraded. Starting in 1974 thru early 1975, 123 14xx-15xx series were rebuilt becoming the 4000-4129 series class, the 4120-4121 and 4123-27 numbers were not used. As with the loco rebuilding programs, cabooses were given the next number out, so they were not renumbered sequentially with their old numbers.
The C-40-5 differed in several regards from the -4, most notably the circular tank on the underframe.
Details
double 'frog-eye' roof mounted marker lights
external fuel tank
roofwalks and end ladders as built
smoke jack
partial endplate on the roof ends
square cornered bay windows
side and end windows have square corners
three windows on the fuel tank side
two windows the other side
notched sill no axle-hung generator
Trucks
Roller bearing trucks
References
Southern Pacific Freight Cars, Volume 2: Cabooses, pg. 299-303, 305
In Tony Thompson's book on SP cabooses, there are numerous great photos of C-40-5s, both interior and exterior views, plus an excellent photo showing the underframe turned upside down allowing you to see the brake rigging, not to mention the cushioned sliding center sill -- see page 301.
Paint
Delivered as mineral red with orange bays and end walls.
1/56 - date for painting cabooses Daylight Orange applied to end and bays of road cabooses except those specially painted colors for merchandise trains. (*see S.P. Steam Locomotives, Dunscomb, pg. 488.)
Originally the entire bay was painted orange. Later date changed to only angled part of the bay.
SP 1235-1319 (former T&NO #500-544) were bay-window cabooses painted in vermilion (bright red) colors on the bulkhead ends and stayed that way until 1955 when they were painted Daylight orange.
Tuscan Red. Their side marker lamps are black.
Some Post ‘55 cabooses had orange ends
Silver Paint
Used on the Coast Merchandise between LA and SF during mid and late 50’s. (*see Trains Magazine, 7/60) has several photos of the Coast Merchandise. At least 8 C-40 cupola cabooses were painted solid between 1953-1955 to match the new 89’ TOFC trailers.
The cupola and caboose roof and running boards are. The side marker lamps are black on both sides.
Cabooses /56aluminum
steel, w/ cupola, #1031, 1069, 1076, 1096, 1097, 1147, 1181, & 1201 all painted aluminum from 1953-55.
Roof
The Class C-40-5 cars, built by Whitehead & Kales in 1963-64, had unpainted galvanized roofs (not silver painted).
Tony Thompson
Lettering & Numbering
C-40 cabooses #1031, 1069, 1076,1096, 1097, 1147, 1181 and 1201 were painted with black lettering except the S and P were red.
References
(*see S.P. Steam Locomotives, Dunscomb, pg. 488.)
Modeling C-40-5
Athearn
With some modifications, this can be the starting point for the C-40-5 classes.
To make a C-40-5 out of the Athearn C-40-4
Start with shaving the rivets. The C-40-5 cabooses most definitely had rivets!
The Athearn roof is still incorrect. Between plugging the roofwalk holes (even if you're going to replace the roofwalk with etched brass) and replacing all the molded on grabs with wire (especially around the end windows), there's plenty to do.
The new RTR versions have a better brake set up than the blue box. Athearn's brake gear was vastly simplified.
Remove the square fuel tank on the right side (the box without the louver and hinges)
Add a tubular fuel tank under the right side bay window (it's about 20" wide by the length of the bay, and is held by three straps)
move the air tank out closer to the side sill or replace both the tank & control valve with better parts
Replace the side sill tabs at the bolsters with rectangular pieces the same length as the top of the existing tabs
Add cushion draft gear.
The Whitehead & Kales C-40-5 have a much bigger, tubular fuel tank under the right side bay window, but their markers and antenna are mounted in a mirror image of the C-40-4's (in other words, they match the way the Athearn cab has them). The -5 and -6 are very similar, except the -5 is riveted while the -6 is welded.
Red Caboose
Athearn Clyde King Kitbash
Clyde King kitbashed a Southern Pacific C-40-5 caboose using an Athearn HO scale bay window caboose See a few photos of the unpainted car along with Clyde's two previously completed C-40-5s
To see the large size photos select "original". Just shows what can be done when starting with the old Athearn Blue Box line steel bay window caboose kit. It has replacement platforms and steps. They are from Detail Associates:
The Moloco set don't look as good as the ones on Clydes Cabooses. Neither the Details Associates or Moloco set is exactly correct for the C-40-4 per the photos in Tony's book. They are not the same size either Compared side by side the Moloco set looks better from above. The Details Assiciates parts are a little thinner from the side. The patterns are a little different as well.
Details
There should be a battery box on both sides.
Detail Associates
Use their platform tread kits.
Details West
Replace the coupler pockets with scale draft gear.
NWSL
Use their Code 88 wheels.
Lettering & Numbering
Decals
Champs
BRH-212 caboose set
References
C-40-6
C-40-6's were built by International Car for both SP and Cotton Belt in 1965-66, SP #1700-1749 were built to the same specs as the C-40-5's except the first class of all-welded cabooses. SP cabs when new had sliding aluminum screens on the bay windows.
The International C-40-6 have a much bigger, tubular fuel tank under the right side bay window, but their markers and antenna are mounted in a mirror image of the C-40-4's.
#1741 The running boards and ladder tops removed and the windows plated over at the time when it received the cherry red, pearl-gray roof and Lark Gray paint job in 1972. Some time between 1978 and 1983, the smoke jack changed to the "T" type.
John Huey
A photo in SP Caboose CD, vol 1; taken in July 1973 show #1741 with no roof walk.
Peter Arnold
In a 1972 SP shop photo of this car upon conversion, shown in my caboose book, also appears to have no running board.
Tony Thompson
Details
double 'frog-eye' roof mounted marker lights
external fuel tank
roofwalks and end ladders as built
smoke jack
partial endplate on the roof ends
square cornered bay windows
side and end windows have square corners
three windows on the fuel tank side
two windows the other side
notched sill no axle-hung generator
diagonal panel roof
If you look at a photo, you'll notice that the C-40-6, like all other contemporary ICC cabs, had an overhanging roof and was welded. This is NOT minor, and hence, they were NOT identical. You can't tell from the photos in Strapac's 1981 SP Annual if the C-40-5's have that flat (non-diagonal) panel where the smokejack sits, the overhanging roof of the C-40-6's and C-40-7's does have that flat panel.
Trucks
Roller bearing trucks.
Starting in 1973 one caboose from class C-40-6, was rebuilt and renumbered. Most changes were internal, chemical retention toilets (no more sewer chute), roofwalks and end ladders were deleted and electrical and radio equipment was upgraded. As with the loco rebuilding programs, cabooses were given the next number out, so they were not renumbered sequentially with their old numbers.
Paint
Delivered with mineral red with orange bays and end walls.
#1741 received a one-off cherry red paint scheme, the ends were painted a light reflecting red, dark grey underframe and a light gray roof. The end paint difference was only visible at night, when light hit it.
#1776 from the original number series was painted in the Bicentennial scheme.
References
http://espee.railfan.net/sp_c-40-06.html
Southern Pacific Freight Cars, Volume 2: Cabooses, pg. 306-316
On page 312 of the ultimate caboose tome (SPFC Vol. 2), a SP company photo shows the car resplendent in fresh red paint, with no roofwalk apparent.
http://mancosbob.rrpicturearchives.net/pictures%5C32954%5Csp_1741.jpg
http://site.rrimages.net/SP-CAB1.html
Modeling C-40-6
Athearn
With some modifications, it can be the starting point for the C-40 -6 class. The International C-40-6 have a much bigger, tubular fuel tank under the right side bay window, but their markers and antenna are mounted in a mirror image of the C-40-4's (in other words, they match the way the Athearn cab has them).
Details
Working frog-eyes are all that's missing.
Reference
http://mancosbob.rrpicturearchives.net/pictures%5C63434%5CSP_1741b.jpg
http://mancosbob.rrpicturearchives.net/pictures%5C63434%5CSP_1741a.jpg
C-40-7
SP #1750-1768
#1769-1799
The later International C-40-7 and early C-50 classes had fewer windows when built and a host of other minor differences.
C-40-7's were built as per the C-40-6's by International Car in 1966-67, except that the fuel tank side had only one window.
Details
double 'frog-eye' roof mounted marker lights
external fuel tank
roofwalks and end ladders as built,
smoke jack
partial endplate on the roof ends,
square cornered bay windows,
side and end windows have square corners,
three windows on the fuel tank side
two windows the other side,
notched sill no axle-hung generator,
Trucks
Roller bearing trucks
Starting in 1973 one caboose from class C-40-7 was rebuilt and renumbered. Most changes were internal, chemical retention toilets (no more sewer chute), roofwalks and end ladders were deleted and electrical and radio equipment was upgraded. As with the loco rebuilding programs, cabooses were given the next number out, so they were not renumbered sequentially with their old numbers.
Paint
Delivered as mineral red with orange bays and end walls.
Reference
Southern Pacific Freight Cars, Volume 2: Cabooses, pg. 288, 318-319
Modeling C-40-7
C-40-8
SSW #1-25
This was the first order of two from International Car Co. received by Cotton Belt for Wide-Vision cabooses. The first order was numbered 1 to 25 and delivered in 1959. SP wasn't buying any cabooses at the time.
In 1968 #1 to #25 were reclassified by SP as C-40-8.
Details
side sill extensions are slightly different patterns
brakestand a more vertical type,
Stanray diagonal panel roofs,
very few lost their roofwalks and/or ladders
marker lights were initially 'Frog-eyes' mounted in the center of the cupola roof, later some, all? received 'Bug-eye' markers
Trucks
Hyatt roller-bearing equipped trucks
Paint
The C-40-8's were delivered painted overall red with yellow handrails and grabs. These cars had galvanized steel roofs (may explain the white or gray look in some photo's). In the book "Cabins, Crummies & Hacks Vol. 4, (pages 68-70) from H&M Productions, it is interesting that #45 has trucks, underframe, step wells and end railings in freight car red...meanwhile #40 has frame, step wells and end railings in bright red, trucks are black. It's possible some received black roofs, though most had the unpainted steel roofs (weathered they look grayish).
By 1981 all remaining caboose had been repainted to standard SP colors, #19 had been previously retired.
Lettering & Numbering
Lettering is white on both.
References
Southern Pacific Freight Cars, Volume 2: Cabooses, pg. 324
Model Railroader Jun. 1974 Page 35 - International Car Co. - Wide Vision (WV) caboose Plans, inc. interior plans/drawings
RailModel Journal Oct. 1995 Page 27 - International Car WV Caboose article
Cabins, Crummies & Hacks" Vol. 4, (pages 68-70) from H&M Productions
http://www.railgoat.railfan.net/spcars/byclass/cabs/c040-08.htm
Modeling C-40-8
C-40-9
SSW #25-45
These were the second order of Wide Vision cabooses Cotton Belt received from International Car Co. Numbered 26 to 45 and delivered in 1963.
In 1968 they were reclassified by SP as C-40-9 for #26 to #45.
Details
side sill extensions are slightly different patterns
brakestand on the C-40-9's was an offset style,
overhanging diagonal panel roof
very few lost their roofwalks and/or ladders, #39, #40 and #45 did for sure
marker lights were initially 'Frog-eyes' mounted in the center of the cupola roof, later some, all? received 'Bug-eye' markers
Trucks
Timken roller-bearing equipped trucks
Paint
Painted the same as the C-40-8's, ie. bright red.
By 1981 all remaining caboose had been repainted to standard SP colors. However, #32 seems to have slipped by.
References
Southern Pacific Freight Cars, Volume 2: Cabooses, pg. 323-324
Model Railroader Jun. 1974 Page 35 - International Car Co. - WV caboose Plans, inc. interior plans/drawings
RailModel Journal Oct. 1995 Page 27 - International Car WV Caboose article
http://www.railgoat.railfan.net/spcars/byclass/cabs/c040-09.htm
Modeling C-40-9
C-50-3 Bay Window Caboose
SP #1800-1874
The C-50-3's were built by International Car in 1970 for SP #1800-1874, these were the first cabooses delivered with no roofwalks and end ladders, as the ICC had decreed they be removed for safety reasons. As they had no reason to support anything heavy, metal rods were sufficient to support the roof, and hang any safety appliances from. This order also heralded the reduction in side windows, and the introduction of the heavy collision posts around the end doors.
Starting with this class (C-50-3) the bay is narrower than preceding classes, looking at photo's they are visually smaller.
Starting in 1973 one caboose from class C-50-3 was rebuilt and renumbered. Most changes were internal, chemical retention toilets (no more sewer chute), and electrical and radio equipment was upgraded. As with the loco rebuilding programs, cabooses were given the next number out, so they were not renumbered sequentially with their old numbers.
Details
no roofwalks, end ladders as built
diagonally braced smoke jack
partial endplate on the roof ends
square cornered bay windows
side and end windows have square corners
two windows one side, one window the other
internal fuel tank with high end filler
notched sill no axle-hung generator
double 'frog-eye' marker lights
aluminum-framed windows screens
Paint
Delivered in mineral red with orange bay ends and end walls.
Roof
C-50-3 also appear to have come from the factory with unpainted galvanized roofs. But when SP repainted any of those cars, the roofs became body color.
Tony Thompson
References
Mainline Modeler vol 2;
Southern Pacific Freight Cars, Volume 2: Cabooses, pg. 332-336
Modeling C-50-3
Modeling Details
Model Railroad Warehouse
Etched brass caboose railings http://www.mrrwarehouse.com/
#772-1702 SP BAY WINDOW CABOOSE END RAILINGS for SP C-50-3 through C-50-9 class project using Athearn plastic caboose.
References
Mainline Modeler Sep. 1986 on pg. 22 has plans for the C-50-9, and the dimension for the bay is less than the Athearn C-40-x model.
C-50-4 Bay Window Caboose
#1875-1929
C-50-4's were International Car built in 1972 for SP, identical to the C-50-3's except for axle mounted generators and rounded corners on the Thermopane end bay windows. Also under the bay in the above photo, is the large battery box. One of the distinguishing spotting features is its diagonal-panel roof, in contrast to the X-Panel roof found on the later classes.
In the mid 70s, they were plating over windows.
Wesley Fox
Details
no roofwalks, end ladders as built
no endplate on the roof ends
rounded corner bay windows
air receiver under bay, one window this side
four battery box doors, two windows this side
notched side sill and axle-hung generator
diagonally braced smoke jack
side and end windows have square corners
two windows one side, one window the other
internal fuel tank with high end filler
aluminum-framed windows screens
single 'bug-eye' FRA marker lights
The C-50-4 was delivered with the dual marker set up on the roof.
Chris Z.
On page 24 of Joe Strapac's 1981 SP Review there is a photo of brand new C-50-4. #1659 with dual "frog lights."
Photos of C-50-4s in later years without the rear marker moved to the spot over the door show a single, offset light on the roof, giving the impression that one of the pair had simply been removed. Seems unlikely that SP would have ordered a single light on this class, only to return to the pair on subsequent classes.
Elizabeth Allen
Paint
Delivered in mineral red with orange bay ends and end walls.
Roof
C-50-4 also appear to have come from the factory with unpainted galvanized roofs. But when SP repainted any of those cars, the roofs became body color.
Tony Thompson
References
Mainline Modeler vol 2;
Southern Pacific Freight Cars, Volume 2: Cabooses, pg. 337, 340-341
http://www.railgoat.railfan.net/spcars/byclass/cabs/index.htm
On there is a photo of brand new C-50-4. Joe Strapac's 1981 SP Review, page 24
http://espee.railfan.net/picindex/c-50-04_photos/1875_sp-c-50-4-caboose-ed_cooper.jpg
Modeling C-50-4
Athearn
While the Athearn C-40-4 can be reworked to represent most cars up to the C-50-4 with varying degrees of difficulty, at least all those classes share the diagonal panel roof.
Athearn Genesis C-50-4 caboose
One of the distinguishing spotting features is its diagonal-panel roof, in contrast to the X-Panel roof found on the later classes.
Walthers
The Walthers model was available with at least 3 bay styles, but none of them looked right for SP exactly. Although the C-50-9 was built by PACCAR (formerly Pacific Car & Foundry), and somewhat closely follows the C-50-4, and -5 built by ICC, with a few differences including the x-panel roof.
Here's the Walthers car. http://www.walthers.com/exec/productinfo/932-4360
Modeling Details
Model Railroad Warehouse
Etched brass caboose railings http://www.mrrwarehouse.com/
#772-1702 SP BAY WINDOW CABOOSE END RAILINGS for SP C-50-3 through C-50-9 class project using Athearn plastic caboose.
C-50-5 Bay Window Caboose
C-50-5's built by International Car in 1974 for SP #1930-1980.
The side sill is segmented on the C-50-5.
Lee A. Gautreaux
On the side of the car with the brake reservoir, to the left on the C-50-5 (above the journal of the left truck) is a bracket with a valve (perhaps a brake release?) and immediately to the right is the AB valve and then the water fill.
Details
no roofwalks, end ladders as built
no endplate on the roof ends
side, door and end windows have square corners,
internal fuel tank with filler mounted lower on the end wall
four? battery box doors, axle-hung generator and two windows this side
air receiver under bay, no louvered vent for the lav. only one window this side
rounded oval corner bay windows
notched side sill and axle-hung generator
single 'bug-eye' marker lights
diagonally braced smoke jack
two windows one side, one window the other
aluminum-framed windows screens are inset
C-50-5 was delivered with dual frog eye markers...like the C-50-3 and C-50-4 before them.
Chris Z.
Paint
Delivered in mineral red with orange bay ends and end walls.
Roof
C-50-5 also appear to have come from the factory with unpainted galvanized roofs. But when SP repainted any of those cars, the roofs became body color.
Tony Thompson
References
Southern Pacific Freight Cars, Volume 2: Cabooses, pg. 342-345
Modeling C-50-5
To make a -5 from a -7 just modify the side sill just below the body.
John
Athearn
Here are the SP and SSW numbers in the first run:
Southern Pacific http://www.athearn.com/newsletter/022112/09_GEN_BW_SP_Caboose_022112.pdf
Cotton Belt http://www.athearn.com/newsletter/022112/08_GEN_BW_SSW_Caboose_022112.pdf
ExactRail
Walther's
It's closest to the C-50-5, but there are a number of minor differences between this Milwaukee Road prototype and any SP class, so at best it's a stand-in.
Modeling Details
Model Railroad Warehouse
Etched brass caboose railings http://www.mrrwarehouse.com/
#772-1702 SP BAY WINDOW CABOOSE END RAILINGS for SP C-50-3 through C-50-9 class project using Athearn plastic caboose.
Reference
Here's a C-50-5 that I made from an Overland C-50-7 about twenty years ago.
http://www.pbase.com/rxr/image/128055998
C-50-7 Bay Window Caboose
C-50-7's were delivered 1978 from Pacific Car & Foundry only for SP #4600-4649, the first to be fitted with the single 'bug-eye' marker light, but basically the same as the C-50-5. Espee's C-50-7 and C-50-8 class cars did feature side windows, so really aren't what one would consider "Urban Guerillas".
These could be seen operating into the 1980s and '90s, some even surviving later.
Details
no roofwalks, end ladders as built
internal fuel tank with filler mounted lower on the end wall
full endplate on the roof ends
side and end windows have square corners
full length straight sill with cutout for the axle-hung generator
four? battery box doors, axle-hung generator and two windows this side
air receiver under bay, no louvered vent for the lav. only one window this side
rounded corner bay windows
single 'bug-eye' marker lights
diagonally braced smoke jack
aluminum-framed windows screens
side sill is continuous on the -7 with only a slight cutout for the generator.
small windows on the bays are oval on the -7.
water fill is near a valve
AB valve has moved further right, almost underneath the bay window.
the valve bracket is moved to the right
The C-50-7 came with screens attached to the outside of the car (with the frame for the screen protruding a bit from the car side).
The C-50-7 was the first car with the vents on the doors and a fuel filler only on one end.
The axle generator is a belt drive and is quite different than the C-50-5.
Frog Eyes
The frog eyes initially were intended to replace marker lamps.
1957
Rule 19 for 1957, which said, in part: "Permanently installed electric marker lights located on top of cabooses must be lighted by day as well as by night . . . within block system limits will display only one red light to rear, except when train is turned out or running against the current of traffic on double track, one red light and one green light to the rear will be displayed. Outside of block system limits one red light to the rear will be displayed, except when train is clear of of main track . . . one green light to the rear will be displayed."
Tony Thompson
1960
The practice circa 1960 was to display GREEN to the rear when a train was clear and in a siding, and RED otherwise. J.D. Huey posted that the frog eyes were initially red-green and later all red.
Tim O’Conner
1969
A 1969 photo, shows double red frog eyes on a cab in the siding meeting 98 at Sacate on the Coast.
Wesley Fox
1970s
Certainly by the early 1970s, frog-eyes universally had one lens painted car body color, with the other one red. I strongly suspect this was a disabling of the green lens. After about 1975, color photos clearly show both frog-eye elements red. Soon after, SP adopted a single-lens red marker. One lens in frog-eye markers was green.
Tony Thompson
Paint
Delivered in mineral red with orange bay ends and end walls.
The proper colors is boxcar red, as always. The post-1960 color is a bit more maroon than earlier. They had "Daylight Orange" ends and bay window ends. Also, those neat little white "hash" marks on the bay window ends. They were "Scotchlite" strips on most if not all classes. Visibility was doubtless the purpose.
Tony Thompson
Lettering & Numbering
SP C-50-7 class cabooses #4600-4630 feature san serif "Gothic style" block lettering, while #4631-4649 have the more commonly used Espee serif "Roman style" lettering.
Rick Watson
References
Additional photos and info on Richard Percy's web site at the following:
Mainline Modeler vol 2;
Southern Pacific Freight Cars, Volume 2: Cabooses, pg. 328-330, 346-350
D.A. Waggoner pic of C-50-7 #4611 in Modesto in January 1988 is in the files directory called "Wag's Espee". It looks like it belongs with the centered on sheet panel group making it 4600-4611.
Joe Strapac's feature on SP steel cabooses appearing in the "Southern Pacific Review 1981" issue
Modeling C-50-7
Modeling Details
Model Railroad Warehouse
Etched brass caboose railings http://www.mrrwarehouse.com
#772-1702 SP BAY WINDOW CABOOSE END RAILINGS for SP C-50-3 through C-50-9 class project using Athearn plastic caboose.
Athearn Genesis
The new models are a correct rendition of this class of car. Great for the 70’s era and beyond. These cabooses can be equipped with a new LED light decoder from Soundtraxx. The Athearn C-50-7 PDF showed two red leds in one direction. The caboose class that Athearn is modeling falls into the later period, it should have double-red frog eyes as delivered
(builder photos clearly show it that way).
Athearn should use WIRE for handrails.
4600, 4604, 4609 - http://athearn.com/Products/Default.aspx?ProdID=ATHG63001
4612, 4617, 4623 - http://athearn.com/Products/Default.aspx?ProdID=ATHG63004
4635, 4641, 4646 - http://athearn.com/Products/Default.aspx?ProdID=ATHG63007
Lettering & Numbering
This is SP 4600, with its distinctive "gothic" lettering for the reporting marks and road number, unique to a few members of the C-50-7 class.
Paint
These will have steps painted oxide rather than the orange.
Blaine Hadfield, VP of Operations, ExactRail
Putting Scale Couplers On Athearn's SP C-50-7
You can install Kadee's scale couplers in Athearn's new SP C-50-7 without disturbing the coupler release lever that is installed (glued) on the coupler cover.
Robert Richardson
Simply gently popped off the draft gear box and replaced with a Sergent Engineering coupler. Rescrewed closed. Pity the draft gear is too wide. You can put MOLOCO pockets on the cabooses.
Chris Z.
Use the Moloco #414 or #415 draft gear, which are non-cushioned designs. Other near scale pockets are the new Kadee #262 style and the Accurail "scale" pockets which use the "scale" Accumates.
Tim O'Connor
Athearn Genesis References
Here is a PDF scan of Athearn's C-50-7 caboose instructions. These come with ALL of the C-50-x series cabooses Athearn is releasing. You may access, read and/or download the document here, which includes info on the DCC and lighting effects.
Rob Sarberenyi https://docs.google.com/open?id=0B_g_BVrtHQWsdnd3THYzOXltMXc
Electrical
Decoder
The Genesis cabooses come with decoders already in them. On the decoder light board, it not only has connections for the roof lighting, as well as internal LED's, but also, connections for additional marker lights.
But for other brands, try this decoder:
http://www.soundtraxx.com/accessorydecoders/accessorydecoders.php
Lighting
It had the LED's installed in the frog-eye lights.
OMI brass C-50-7
C-50-8 Bay Window Caboose
SP #4650-4699
The C-50-8's were delivered in 1979 from PACCAR. Prints show several steel bay window cabooses under construction in a factory. The C-50-7/8/9 all had a Stanray "X" panel roofs rather than the diagonal panel roof the cars in these photos have. Espee's C-50-8 class cars did feature side windows, so really aren't what one would consider "Urban Guerillas".
Details
diagonally braced smoke jack
no endplate on the roof ends
square cornered bay windows
side and end windows have square corners
two battery box doors, two windows this side
air receiver under bay, two louvered vents for the lav. only one window this side
full length straight sill with cutout for the axle-hung generator
aluminum-framed windows screens
C-50-8 class was the first to arrive from the builder with single 'bug-eye' light markers.
Paint
Mineral red with orange bay ends and end walls, those upgraded after 1980 received orange step wells.
References
Mainline Modeler vol 2;
Southern Pacific Freight Cars, Volume 2: Cabooses, pg. 352-355
http://www.railgoat.railfan.net/spcars/byclass/cabs/c050-08.htm
Modeling C-50-8
Modeling Details
Model Railroad Warehouse
Etched brass caboose railings http://www.mrrwarehouse.com
#772-1702 SP BAY WINDOW CABOOSE END RAILINGS for SP C-50-3 through C-50-9 class project using Athearn plastic caboose.
Athearn
OMI brass C-50-8
C-50-9 Bay Window Caboose
SP #4700-4774
The C-50-9's were the last cabooses to be delivered to the SP in 1980 from PACCAR. SP purchased only 75 of these cars in 1980 and within a decade, cabeese were on their way out.
Visibly different to preceding classes, they have no side windows at all. This Caboose was the first of the series to be delivered without a roofwalk or side windows, other than those on the side-hung Cupolas. The initial series was first introduced in 1970 and featured a Stanray X Panel Roof.
The "Urban Guerilla" nickname was applied to Southern Pacific cabooses from the C-50-9 class of cars delivered in 1980. These lacked side windows, except for those found on the bay window structures.
"Urban Guerilla" was coined for the C-50-9s in Joe Strapac's "Southern Pacific Motive Power Annual 1981", which featured an article on SP steel cabooses -- see photo caption pg. 33. The nickname was again used in an article about C-50-9 cabooses in the September 1986 issue of Mainline Modeler. "Urban Guerilla" refers to the cars construction, for having to travel through tough urban environments, i.e. Los Angeles and other similar locales.
C-50-9 Plans
Seek a copy of the Mainline Modeler Sep. 1986 C-50-9 Plans. One photo in the article that shows any hint of the roof ribs seems to indicate that the drawing of the roof in the article is incorrect and needs clarification. The drawing has each X-brace bracketed by main straight braces and, in between each set of main braces is a thinner bracing line, which is centered between two main braces.
This minor brace is actually off to one side, very close to one of the main braces. The model is exactly that way too. It appears that #4734 doesn't have any smaller bracing other than the "main" lateral and smaller X braces.
If you look very closely near the left-most leg of the antennae, you can see the minor rib very, very faintly. It's actually so close to the major rib that it's tough to delineate. And you can see that pattern throughout the roof once you know where to look. The drawings are wrong (unless there were variations on the Stanray X-panel roof) and Walthers (oddly) is right.
Details
diagonally braced smoke jack,
minimal endplate on the roof ends,
square cornered bay and end windows,
rounded corner end door windows,
side windows are replaced by small rectangular vents,
two battery box doors and axle-hung generator this side,
air receiver under bay, no window(s), two louvered vents high up this side,
full length straight sill with cutout for the axle-hung generator,
delivered with single 'bug-eye' marker lights
On the roof is the raised ground plane for the VHF whip antenna.
Frog-eye
The red warning light housing, which when turned on to the rearward facing direction, acted as the rear-end warning light. These were used before advent of the FRED (Flashing Rear End Device) that is used today. The rear-end red light Espee used on cabooses did not flash, rather it was a constant burning red light to warn following trains. Espee often (though not always) opted to mount their warning light (unlike most other railroads) on top of the caboose rather than on the ends above the doors or fascia of the roof. This certainly provided good visibility to any trains that may be following.
Here's a view that may prove helpful, though the light isn't lit, you still get the idea: http://makeashorterlink.com/?N2AF42DE3
During the 1980s, many of the rooftop lights got moved to the car end. All late-model SP cabooses were built NEW with rooftop lights, but they did get moved in later years.
Tony Thompson
The "frog eye" is the way to describe the twin lights on the top of SP cabooses. SP changed from using two lanterns, to the frog eye on the rear of the cabooses. The change over began in 1978 and was spotty at first, but early in 1979 took off with a vengeance. The C-50-7 was the last batch of crummies to have the dual bug eyes from the factory.
There are indeed variations of the double and single frog-eye marker lights used on SP cabooses. Call the single light a "signal light" or "emergency light".
John Huey
Paint
Aluminum-framed windows screens.
Mineral red with orange bay ends and end walls, those upgraded after 1980 received orange step wells,
Quite a number of these received special paint schemes, the thumbnails will show a few that were assigned to the Railroad Police, and one was the only caboose to be painted for the 1983-85 ill-fated non-merger with the ATSF.
References
Southern Pacific Freight Cars, Volume 2: Cabooses, pg. 356-361
Here are some photos of frog eyes (lenses are missing) taken recently at the "Caboose Motel":
http://mancosbob.rrpicturearchives.net/showPicture.aspx?id=1174867
http://finance.groups.yahoo.com/group/Espee/files/Caboose%20tops/
The first photos of cabooses with a single light (not on the rear, but just a single light replacing the dual light on the roof) are from 1980. In 1978 photos, none of them have the single light on top or on the rear.
Tim O'Connor
See: Joe Strapac's SP Review 1981 feature on SP cabooses.
This class was had an article appearing in Mainline Modeler's September 1986 issue: "The Urban Guerrilla Caboose".
Modeling C-50-9
HO Scale Drawing
Southern Pacific Freight Cars, Volume 2: Cabooses, pg. 361
Modeling Details
VHF whip antenna
On the roof is the raised ground plane for the VHF whip antenna. Athearn once offered a white metal casting of this part, but no longer has them available. You're best to leave it alone (rather crude by today's standards). Detail Associates offers a very nice part for this in etched brass, #6501 at $2.50 for two.
Caboose Railings
Model Railroad Warehouse
Etched brass caboose railings http://www.mrrwarehouse.com/
#772-1702 SP BAY WINDOW CABOOSE END RAILINGS for SP C-50-3 through C-50-9 class project using Athearn plastic caboose.
Trucks
MDC Trucks
Here is the part number for the MDC convertible trucks. Dunno if it is correct as part of Athearn, but shops may still have the old ones anyway. The part number does not show on the packaging anywhere except as the last 4 digits in the bar code.
2921 Freight Car Trucks - 2 Pair -- Convertible Bettendorf - Friction or Roller Bearing HO 4.95 Y
Modeling Frog-Eyes
No one offers such a part commercially for these cars for 60's era modeling. There were several of both double and single barrel of Espee roof-mounted warning lights not available.
We are lucky that the answer is, "no one," since the old Athearn white metal part was pretty bad. They aren't hard to scratch build and you’ll make a good-looking part. You're pretty much on your own to construct this part.
Tony Thompson
Here's a view that may prove helpful, though the light isn't lit, you still get the idea: http://makeashorterlink.com/?N2AF42DE3
Clyde King makes his own frog-eye markers from small brass tubing and wire soldered together. Take a look at his kitbashed C-40-5s on my website
Rob Sarberenyi
PSC #31923, Beacon, SP Caboose work for this? It may be a slightly older model (for an earlier caboose), and probably difficult to make functional, but it would set on the roof well, pointing a red jewel or use red MV lenses toward the rear. PSC's does represent the single-style marker light and not the double "frog eyes", which is not available by anyone right now, but was used on some classes of Espee cabooses. It's only slightly nicer than OMI's rendition, which is a bit chunky.
Here part #110 Light Emitting Diodes from Oregon Supply. The leads came out each side, the "lens" was off the front, (if you call it that). Simply bent both leads down, to make the tripod and add another leg. Power is routed to the two legs through the roof. Sanding the body of the LED to give it the frog-eye shape, and maybe adding a little plastic to get the shape correct. Gave it a couple of GOOD coats of paint to seal the light in.
Ed Hall
Jim from Richmond Controls in Bakersfield is working on a frog eye that uses LEDs.
Athearn Genesis
See their website for more info http://www.athearn.com
Athearn Kitbash
Clyde modeled a few later Espee class cabooses by starting with Athearn bay window cabooses, made numerous modifications, fashioned the large cylindrical tanks slung underneath, rebuilt the ends and stepwells, not to mention fashioned his own bug eye marker light housings from brass tube and wire for the "feet".
Rob Sarberenyi
C-50-9 Athearn conversion article
Athearn shell and Detail Associates underframe
1. Construction
This project starts with an undecorated Athearn bay window caboose, a Detail Associates cushion under frame kit, and other assorted detail parts from Detail Associates and other companies.
The Athearn caboose frame and body were constructed using various commercial parts (Grab Irons, Platform steps, train line hoses, window glazing and hand brakes). Details were fabricated from brass wire (end platform railings, train lines) plastic (plastic edge for bottom step, plugs for caboose floor, collision posts, gussets for hand brake, backing plate for hand brake, window plugs, roof walk plugs and battery box body) brass sheet (end railing safety plates)
2. Detail
The body consists of the stock Athearn body with two types of Detail Associates Caboose grabs added to the ends, sides and on both sides of the coupler. All the body plugs were made from various sizes of Plastruct plastic attached with liquid cement. The caboose platforms were reworked using a Photo Etched Caboose platform kit from Detail Associates. The end railings are hand-formed from various pieces of Detail Associates 3⁄4" brass wire. The hand railings were soldered together on the caboose to ensure an exact fit. Added to the stock frame was a Details West Cushioned Under Frame Kit. Kadee # 5’s couplers were added to each end.
3. Conformity
The C-50-9 Caboose, also known as the 'Urban Guerilla' were built for the Southern Pacific by PACCAR from March to May of 1980. These cabooses were numbered in the #4700-4774 series. This class of caboose was the last of the C-50 series purchased new by the Southern Pacific. After building, most cabooses of this series were placed in storage to await an upswing in business.
4. Finishing and lettering
The caboose is finished to resemble a Southern Pacific C-50-8 caboose. The exterior is finished using Floquil primer mixed 50/50 with thinner. After drying the ends were sprayed a mixture of Floquil SP Daylight Orange and thinner. After drying the ends were masked the body was painted a mixture of Floquil Tucson Red and thinner. The frame and floor were sprayed with a 50/50 mixture of Floquil Engine Black and Thinner. Herald King decals were used for all decaling requirements and they were sealed with a mixture of flat finish and thinner.
Once the shell had dried I detail painted the grab irons, these were painted with Floquil Reefer White. The weathering was done with a mixture of weathering chalk and an airbrush using Floquil Grimy black, dust and mud. All weathering was again sealed with Floquil Flat Finish. After the last coat of flat finish had dried for a couple of days the windows were added.
5. Scratchbuilding
Parts of the caboose body, frame and end railings are scratchbuilt. A summary list of exempt, scratchbuilt and commercial components used in the model’s construction is attached. The caboose is composed of 65 scratchbuilt parts and 36 commercial parts, and overall it is 64% scratchbuilt.
Overland Models (Brass)
OMI makes a brass Espee C-50-9 class "Urban Guerilla" bay window caboose. The Overland Models (OMI) is an HO scale brass Milwaukee Road caboose representing that same class does feature the interesting roof-mounted generator. The OMI cabooses, they have a few errors which can be corrected. The "major" problem is with the air vents at the ends of the bays. OMI placed them too low. These have to be ground off and replaced higher with an equivalent part from Details West or better yet, if you have some extra vents from Cannon kits, use those. Reason for this correction is because the reflective tape, i.e., white decal strips you need to place under the vent The current price is in the low to mid $200 range.
D.A. Waggoner
More information on these cabooses is found in Chapter 4, "The Internationals", in the booklet "Milwaukee Road's Steel Cabooses, Special Publication No.2", by Jeff Kehoe, available from the Milwaukee Road Historical Society
(see Pg. 356 of Tony Thomspon's Southern Pacific Freight Cars Vol. 2).
Lettering & Numbering
Decals
Microscale
Take the correct size staggered gothic Southern Pacific lettering from the MS set for SP box cars.
Walthers
The Walthers model was available with at least 3 bay styles, but none of them looked right for SP exactly. Although the C-50-9 was built by PACCAR (formerly Pacific Car & Foundry), and somewhat closely follows the C-50-2, -3, -4, and -5 built by ICC, with a few differences including the x-panel roof.
Compare your model to photos in Tony Thompson's book and "The Espee Modeler's Home Page. The link for C-50-9 cabooses is
The site also has an Andrew Hauser article on building a C-50-9 "from an Athearn Bay Window Caboose body and Detail Associates underframe," http://espee.railfan.net/caboose_steel_c-50-9-kb.html,
but there are no pictures, and no mention of correcting the roof from Athearn's diagonal panel construction to the prototype's X-panel type.
There's also the article in Mainline Modeler's September 1986 issue on Southern Pacific's C-50-9. That article references the C-50-9 being nicknamed "The Urban Guerilla", in deference to the lack of side windows, thus not becoming target for broken windows thanks to errant and misguided youth. The C-50-9s are probably my favorite class of bay window cars based on that nickname.
"Parts of the caboose body, frame and end railings are scratchbuilt. A summary list of exempt, scratchbuilt and commercial components used in the model's construction is attached. The caboose is composed of 65 scratchbuilt parts and 36 commercial parts, and overall it is 64% scratchbuilt. "
Depending on what level of accuracy you're seeking, the Walthers model will either suit your needs just fine, or represent a mere "stand-in" until such time we get really good and accurate plastic Espee caboose kits.
That's a nice looking model, and does show some potential for conversion to a later SP Bay Window Car.
The prototype for Walthers' HO scale bay window caboose is based on fifteen (15) cars built by International Car Company (ICC) in 1973 for the Milwaukee Road as series 992215-992229. Here's a photo of one, however, Walthers' model does not offer the roof-mounted propane driven thermo-electric generator.
Lettering & Numbering
Decals
Microscale
Microscale Decals has released a sheet #87-??? that has decals for the #4726 SPSF Merger scheme.
References
Mainline Modeler vol 2;
SP Review 1981 page 33
Class C-50-9 (*see MM 9/86, pg. 22)
Contains an article on the C-50-9 complete with HO scale plans and plenty of good photos.
Images of SP C-50-9s can also be found at http://espee.railfan.net/sp_c-50-09.html.
C-50-10
The C-50-10 caboose, was NOT a transfer hack! It was a full-fledged road caboose, just like the MoPac SBW cars that inspired it with directional marker lights on each end.
Caboose Length
SP calculated the length over end sills, and since those are under the end doors on cabooses, that "official" length is different from the gross length. That is relevant because the C-50-10 was rebuilt from SP #4401, Class C-50-3. I seriously doubt that they cut down the frame length. The original length was 40’ 8” over strikers. The strikers are the ends of the draft gear which stick out a few inches from the end of the car.
Tony Thompson
Reference
Southern Pacific Freight Cars, Volume 2: Cabooses, pg. 362-364
Modeling C-50-10


Photo courtesy of Brian Moore


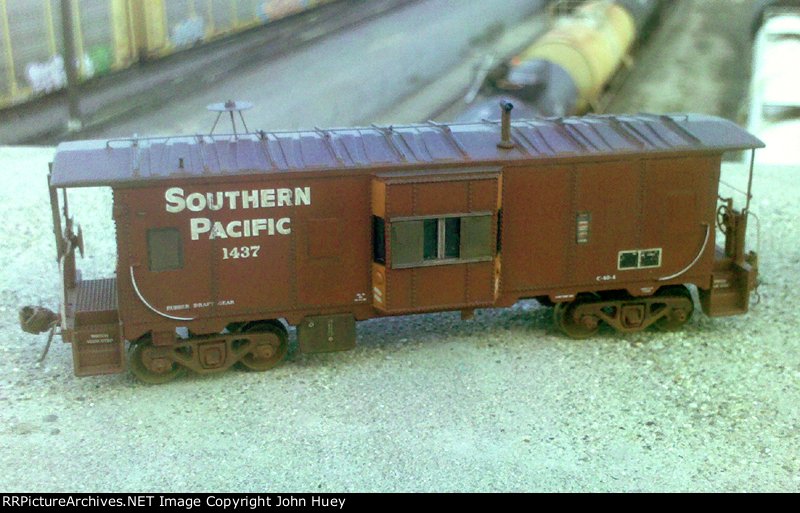
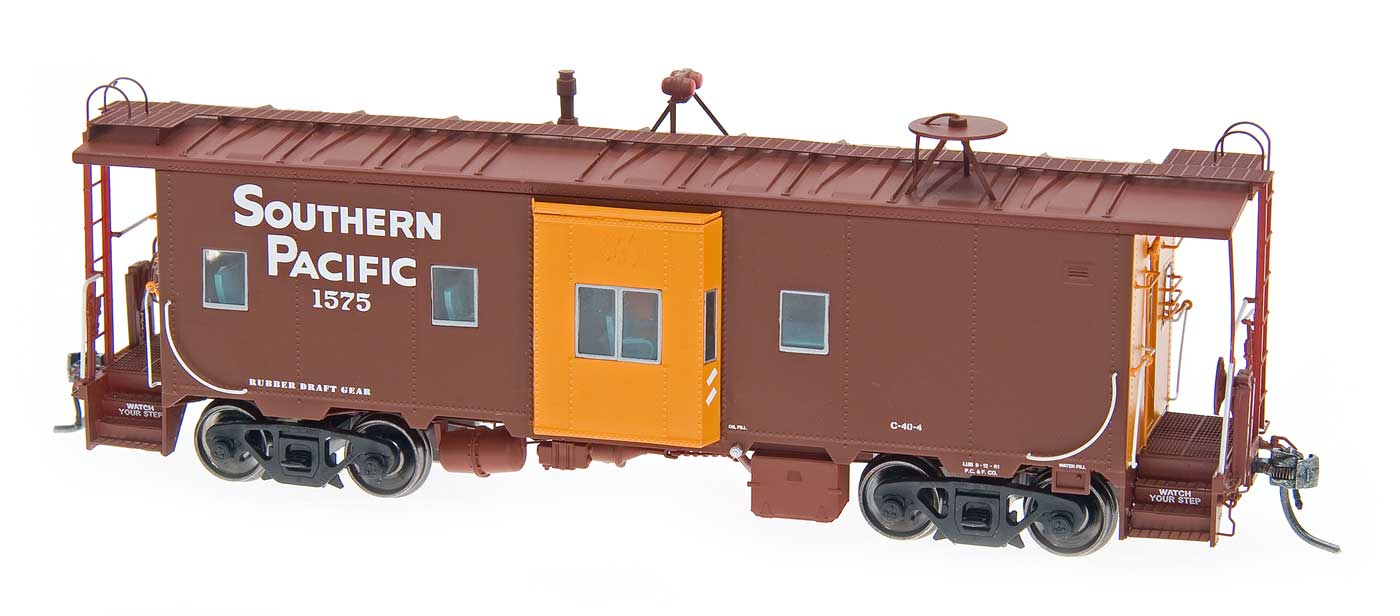
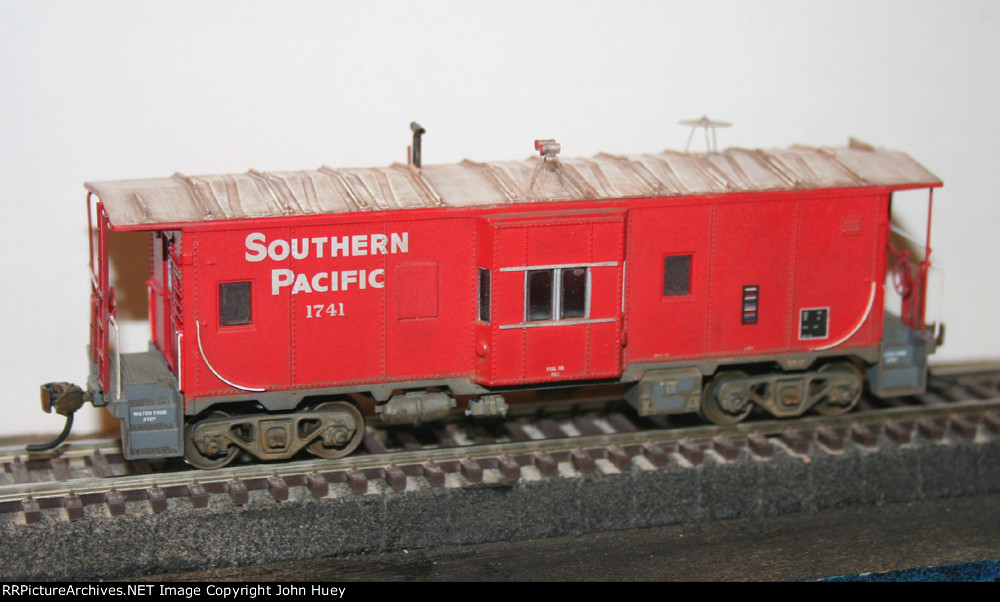
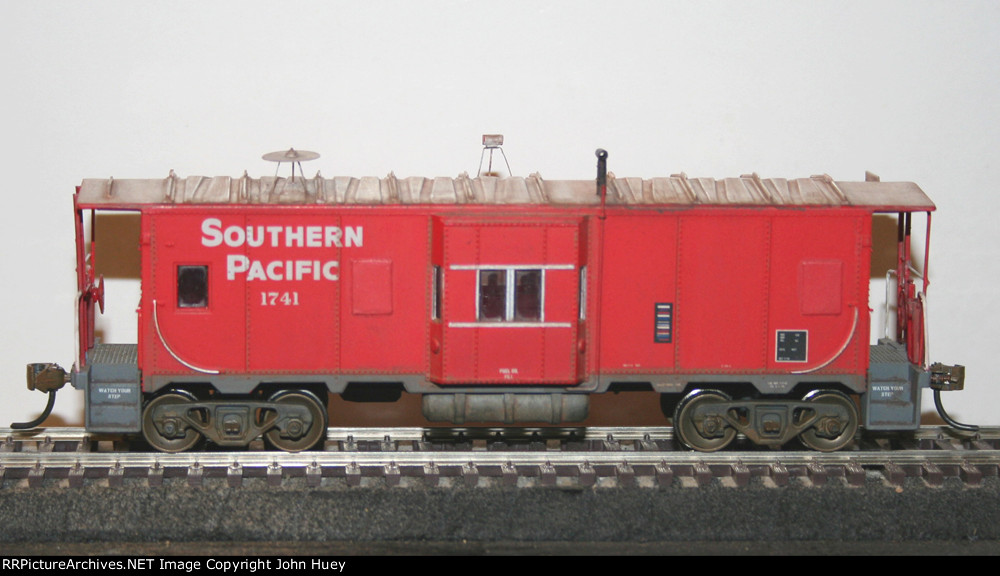