Southern Pacific Lines
Coast Line Division
“The Route of the Octopus”
Southern Pacific Lines
Coast Line Division
“The Route of the Octopus”


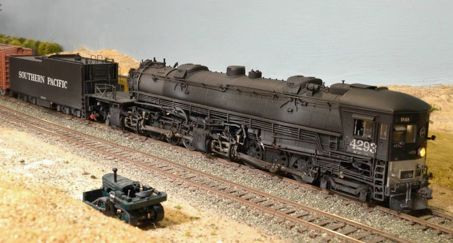
Photo courtesy of Brian Moore
![General Info
This goes back to the basic S.P. adage, when modeling a specific locomotive it is always safer to model from a photograph. Even into the diesel age, the S.P. had this wonderful habit of switching details and paint jobs around. It's generally safer to pick a fairly narrow time band and then start finding photos from that period for reference.
Pat LaTorres
Appliances
Air Compressors
dual cross-compound air compressors
Blower Valve
Modeling Blower Valve
Peterbuilt Locomotive (PBL)
They made Southern Pacific steam loco castings years ago. ]Blower Valve w/elbow was part number BV-103.
PSC
PBL part BV-103 Espee Blower Valve Assembly looks identical to PSC part HO-3426. PSC part HO-3428 could be modified by clipping off the fourth valve stem if you need the elbow.
Kenneth R. Clark
Booster
Franklin Booster
Booster information seems difficult to come by. On locos equipped with a booster, there is a large pipe that runs aft from the top of the cylinder on both sides. The large pipe running back to the Franklin Booster Engine on the left (or fireman's side) is the steam supply line from one or both of the cylinders. This line, at least on the fireman's side, is a steam feed to the booster on the trailing truck, sometimes hard to see. On the line is what appears to be some sort of large valve or appliance, controlling the flow of steam. The appliance on the left side is the "Booster Throttle Valve and Operating Cylinder" (per Franklin Railway Supply). Just call it the booster "starter control". It is the primary steam supply control for the booster engine on the trailing truck. It is larger in diameter than the line, somewhat T-shaped (upside down), and has other details attached to it. On some locos this appliance is under the running board on the fireman's side, on some it is outside the firebox.
Remember that that trailing truck swiveled and the steam piping connected to it, therefore, had to move also. It is more likely a (Barco) Rotary Pressure Joint. Pressures and temperatures would have been too high for hose. Articulated engines had to have them for steam to the cylinders
The large pipe on the right (engineer's side) is the exhaust from the booster, which runs back up to the rear of the cylinders and into a separate exhaust nozzle in the smokebox. On some smaller engines, it runs to a separate exhaust stack near the main stack. The steam supply line can come from one or both cylinders. No consistency here. If you look at pictures of some P-4s you can see that the steam supply comes from the top of the boiler. There is a fitting there which looks like it might be some sort of control valve as there is nothing else in the steam line.
Clam Shell Deflectors
They were only applied to locomotives assigned to division with tunnels, until late steam, when locomotives were sent all over to fill gaps.
Tony Thompson
Modeling Clam Shell Deflectors
They were produced as after market parts and were on some imported engines also. With the clam shell castings, you must completely remove the old stack. The castings set includes the stack base that supports the clam shells. It's an easy change to make a flat lands engine into a 'mountain' engine. Snowplow pilots and firehose boxes were more of a challenge. Of course I bought the clamshell versions of the 2-10-2s when Sunset imported them.
Ken Clark
Custom Finishing Models
P/N 150: "Operating Clamshell Steam Loco Stack (Kit)
http://www.customfinishingmodels.com/DetailParts.pdf
Arved Grass
Drivers
Boxpok drivers
Feedwater Pump
Two-stage Elesco feedwater pump
This pump both drew water from the tender and forced it through the feedwater heater and into the boiler. The Elesco system was a "closed" type, with exhaust steam passing through tubular heating elements inside the heater tank and not coming in direct contact with the water.
Feedwater Heater
On steam locomotives, a device called a feedwater heater used exhaust steam to preheat water from the tender before it was injected into the boiler. There were two basic types of feedwater heaters; open and closed. In the open type, feedwater was sprayed directly into a mixing chamber containing exhaust steam, condensing the steam and raising the water temperature. Feedwater heaters made by Worthington were of the open type.
In a closed type, heater water was fed through an array of pipes inside a large chamber filled with exhaust steam. The feedwater and steam did not come into direct contact. Both Elesco (Figure 2) and Coffin (Figure 3) manufactured closed feedwater heaters.
Feedwater heaters use the heat in exhaust steam improving efficiency.
Richard Bale
Feedwater heaters used only a small amount of exhaust steam before mixing with flue gasses.
Coffin feedwater heater
The most unusual looking feedwater heater was the Coffin, which used a semicircular closed heating tank that was sometimes hung in front of the smokebox.
Elesco feedwater heater
Few SP locomotives were equipped with an Elesco feedwater system which does return water to the tender. SP experimented with the Elesco system but favored the Worthington design.
Worthington model BL feedwater heater
This feedwater system was contained in a single unit including both a reciprocating pump and an open heater chamber where cold water from the tender sprayed into the exhaust steam. This Worthington feedwater was used almost as widely as the Elesco, but as engines got larger it became harder to fit within most railroads' clearance diagrams.
Injector
lifting injector
Piping
Super Heated Steam Engine
A super heated engine was one were the steam was headed a second time.
Engine has a vertical piston with pipe coming out on front of engine, this is a key identifier.
Modeling Piping
Locomotive detailing tips, scale pipe sizes, etc.: (*see MR 7/83, pg. 76)
Valve Gear
Baker Valve Gear
The second most widely used type after Walschaerts in the late steam era.
Stephenson Valve Gear
The Stephenson gear was inboard of the wheels, but there should be something connecting to the valve area of the steam box. The entire gear is rather more complex than Walschaerts valve gear. Stephenson valve gear used 4 eccentrics. Two for each side, one was a forward and one was reverse.
You'ld be very surprised to see a US loco with power reverse and Stephenson valve gear. It wouldn't be normally visible on a US loco, since the valve motion is mounted entirely between the frames. "Harriman" style 2-8-0s at work on the SP were unique in that they combined Stephenson gear with spool type valves. (Spool type valves were required if the engine was superheated, regardless of the valve gear type). Probably this was the last large scale application of Stephenson gear in American railroading.
Reference for Stephenson Valve Gear
There's a good diagram of the Stephenson valve gear on page 24 of MR Cyclopedia Volume 1 - Steam Locomotives.
MRs latest information station 'pdf' download - "Steam Locomotive details and weathering" is full of very interesting information on a lot of steam engine detail, including various types of valve gear, however it didn't show the Stephenson gear on an actual locomotive.
Stephenson valve gear on a 2-8-0 would look something like this:
http://www.bcarchives.gov.bc.ca/cgibin/www2i/.visual/img_med/dir_100/a_08654.gif
...and not like this: http://www.northeast.railfan.net/images/nyc1115.jpg
Modeling Stephenson Valve Gear
Models didn’t have a working Stephenson. You couldn’t really see it in HO or smaller, so modeling it accurately is a job for only the most severely-afflicted rivet counter.
Walschaerts valve gear
Wheels
Modeling Wheels
Greenway Products
If you need spoked wheels, get them aftermarket if you need heavy counterweight, or light counterweights wheels.
www.GreenWayproducts.com
Wheel Arrangement
Go to: http://www.steamlocomotive.com
Click on "Wheel Arrangements", then "train type". You'll find all the technical data for SP and other owners.
Wheels Type Name
0-6-0 S type Switcher
0-6-0 various Shop Switchers
0-8-0 SE type Switcher
2-4-2 Co type Columbia
2-6-0 M type Mogul or Valley Malleys
2-6-2 Pr type Prairie
2-6-2 Ts type Suburban Prairie tank
2-8-0 C type Consolidation
2-8-2 Mk type Mikado
2-8-4 B type Berkshire
2-10-0 D type Decapod
2-10-2 F type Santa Fe or Decks
4-4-0 E type Eight Wheel
4-4-2 A type Atlantic
4-6-0 T type Ten Wheel
4-6-2 P type Pacific
4-8-0 TW type Twelve Wheel
4-8-2 Mt type Mountain
4-8-4 GS type General Service or Golden State
4-10-0 El Gobernador
4-10-2 SP type Southern Pacific or Stuttering Decks
2-6-6-2 various Articulateds
2-8-8-2 various Articulateds
2-8-8-4 various Articulateds
4-6-6-2 various Articulateds
4-8-8-2 various Articulateds or Malleys, back-up malleys, Cab -aheads
Details
Cab Shades
The awnings over steam locomotives were a raw roll-up, oiled canvas light gray in color. They a neutral off-white when new and later gray as they accumulated exhaust and general grime. These were mounted onto folding frames made of solid, round steel rod stock that had been blacksmith-formed, and collapsed against the cab wall above the windows, although the awnings were almost always folded down night or day.
Kevin Bunker
Reference
Color shot of a loco with a canvas shade http://groups.yahoo.com/group/Espee/files/SP_1749_Clovis_-_Copy.jpg
Modeling Cab Shades
Imitate these with a frame made up of bent (durable) .005" steel piano wire onto which you glue a folded widened "U" of white wrapping tissue paper that is prepainted with an airbrushed coat of light gray mixed with a little tan color, applied very thin to penetrate and stiffen the paper. Use plain white glue to sandwich the paper over the outer frame. The inner edge is folded over to make a narrow "L" and glue that with a little CA cement to the cab wall. They wind up looking better than all metal awnings.
Kevin Bunker
Controls (Backhead)
http://modelrailroading.wordpress.com/2009/09/08/steam-locomotive-controls-the-backhead/
Pages 134-136 of Church's Cab Forward book explains these operations with good photos and numbering of controls on p.136.
Jim Boynton was a WP fireman and engineer, his experiences are related in another book. WP's backheads were all but identical to the majority of SP steam power, so it could give you some comparison. See:
http://www.amazon.com/Love-Affair-Iron-Horse-Boyntons/dp/B0006YKLC2/ref=sr_1_3 s=books&ie=UTF8&qid=1326599304&sr=1-3
http://home.roadrunner.com/~trumpetb/loco/backhead.html
http://www.rrpicturearchives.net/showPicture.aspx?id=535669
http://www.rrpicturearchives.net/showPicture.aspx?id=535667
http://www.rrpicturearchives.net/showPicture.aspx?id=449121
Curtains
There was an ICC requirement for winter protection. There were probably railroad specific criteria.
The curtains were made in fact of a simple cotton canvas in a natural (off white) color. They were heavy and thick like a painter's canvas tarp and in a very short time were grimy, oily, and dirty. They hung on a rod riveted just above the rear cab bulkhead arch within the overhang between the loco and tender. They pulled across on rings, much like a shower curtain on a rod. There were two vertical rods at the center to which the curtains were attached that when pulled to center, dropped into holes in the hinged floor plate between the engine and tender. A slight dip in the rod above allowed this to "lock in place".
Paint
They were natural color modified by acquired grime.
Reference
Research a photo by Don Sims of the 2484 at Bayshore and you will see this in detail.
In the files area is a photo of a cab curtain is attached to a rod with wire hangers much like a show curtain. The shot is of 3207 while it is being scrapped.
Modeling Steam Loco Curtains
A set of curtains made for an O gauge heisler by Cliff Grandt were made by spraying 410M paint of the proper color on a piece of glass. When the paint dried it was carefully scraped off and formed into curtains. They looked very good.
Ernie Fisch
Model these curtains on all steam engines that would have had them. Make them out of tissue paper, the kind they wrap up your gift box with at Macy's. Cut a strip as wide as the curtains are tall and then fold the tissue back and forth to make pleats. Holding this "accordion" tightly closed, drill a .020" hole in the tissue and then thread it, one from each side onto a .015 brass rod, pre-painted, and then solder the ends of the rod into holes drilled in the the rear cab bulkhead.
Paul Chandler
Use the thin lead foil that come from the top of wine bottles. It is easily cut and folded into curtain like shapes. It is then painted and weathered.
Andrew Merriam
Paint
Dry brush the tissue with various dilutions of Floquil "earth" mixed with streaks of very dilute grimy black.
Paul Chandler
Flags (Green)
Measurements 17” x 19” on wooden staff 27” long tapered at end to fit in a mounting bracket.
Heralds
Modeling SP Heralds
Challenger
They have some very nice heralds on their 0-6-0's.
Plano
They sell an etched brass SP herald.
Go to http://www.planomodelproducts.com
Horns
Air Horns
GS, AC and T&NO streamlined P-14s had a Leslie model A-200 horn. Being the SP, there were exceptions to locos fitted with horns. Mt #4360 carried a horn as did 4-6-2 #2484, but these were "odd man out" in their classes as far as horns were concerned.
Reference
(*See S.P. - Locomotive Air Horns)
Lighting
Oscillating Lights
2 competing companies made them: Pyle National & Mars
Steam Loco Headlights & Back-up Light
The manufacturer of the common headlight (and backup light) found on nearly every Pacific lines steam loco until the wholesale replacement of the headlights in the mid '40s with the "modern" Pyle-National were Type GF Golden Glow headlights manufactured by Electric Service Supplies Company. The color in the glass comes from the addition of uranium salts to the glass melt. Headlights on 2-6-0's, 2-8-0's and the like; smaller, older engines were visorless and are not the Pyle type seen on larger more modern engines especially on Pacific Lines locos.
Some engines coming from the T&NO or not having their lights changed out would still carry their old “Golden Glow” ‘barrel
type’ lights without visors.
Jason Hill
References
The Locomotive Cyclopedia of American Practice Sixth Edition - 1922 shows this headlight on page 622, Figure 1407.
Modeling Headlights
There isn’t a good representation of this headlight from any of the brass detail parts manufacturers.
Use the “Sunbeam with Visor” type by Bowser (Cal Scale #201). PSC also makes suitable ones.
Jason Hill
Steam Loco Headlights “Golden Glow”
A very easy way to get the golden glow effect is to take and polish out the inside of your headlight. (Assuming it's a brass casting and also assuming your using a micro led or a 1.5 grain of wheat bulb from the back side of the casting.) In "O" Scale you can use a pencil eraser and probably do the same in HO. Put an MV Lenses' in and there you have it. The effect looks great.
Rich Yoder
Electrical
light packages #5321, thus “barrel” headlights.
SP Stack Lighting
Stack lights were to observe the color of the loco's exhaust at night to aid in proper firing. Stack lights were not restricted to certain classes, but it's possible. More likely, would be restriction to road-service locos only (not as important on switchers or locals).
Tony Thompson
In general, stack lights were applied to cab forwards, and they were behind the stack, positioned so that the fireman could look through the smoke at the light. They were off to the engineer's side of center slightly. This allowed the fireman to check his fire condition at night. Regular cab behind engines had the headlight out front that served the same purpose for the fireman, so they didn't normally get stack lights.
Rivet Detail
Modeling Rivet Detail
Archer Rivets
They look great! As an example on a Westside AC-5 cab it is a bit difficult to keep them straight across the roof, but certainly worth the effort All in all, it took about 5-6 hours with a fair amount of waste, do to the decal "strings" breaking and no way to piece them back together and keep things straight. The real key is make make the cuts in the decal sheet as close to the "rivets" as possible so the decal "strip" is easier for the paint to cover. The size used was .034 in size. You can use multiple sizes as on the prototype, but might not be worth the effort.
Paul Lyons
Skirts
Mid 1950s, GS2 and GS4s run with their skirts. MT3 and an MT4, that are in black, with no skirts.
The GS series engines had their skirting up until 1950-51when all but 12 engines (the last 10 GS-4’s and the two GS-5’s) had them removed and were eventually painted all black. Several operated for a month or two with Daylight colors on the cab and tender, but no skirts or red strip above the running boards. GS-1’s and GS-6’s never had skirting.
Jason Hill
Train Indicators
(*see MM 6/87)
SP Painting & Lettering Guide, pg. 19
Modeling Train Indicators
Peterbuilt Locomotive
They made Southern Pacific steam loco castings years ago. Train Indicators (number boards) were part numbers NB-100.
Wash Out Plugs
Modeling Washout Plugs
Wash out plugs can be bought at Precision scale.
Whistles
Steam Whistle Designs
Road whistle - 6 chime designed and made at Sacramento Shops.livepage.apple.com
Switcher whistle - 5 chime (higher pitch) used in the desert.
Steam Boat whistle - deep toned on the GS’s were Hancock high-pressure whistles.
Modeling Steam Whistles
Dallee Steam Whistle (*see MR 10/93, pg. 42, Review)
Paint
For those painting models, your local printing shop probably has a copy of the Pantone color sample chart that they will let you look at to provide you with an idea of the hues. Pantone was the color standard used in the printing industry in 1990 when SP Steam Pictorial Volume was researched.
For those not familiar with the Pantone system, it is a standard used by printers to match color hues using a known standard of reference. You can go down to your helpful local printer and ask to match color samples you mix against his Pantone swatches of 187C and 174C for the reds. As noted by Bob Pecotich, Pantone 174C may be representative of the color used, but it also may have varied from shop to shop and time period to time period.
Examining several hundred published photos from that era, attempting to interpret from the shades of grey and levels of gloss treatment given to SP steam locomotives, making an inventory by locomotive number, class, and year from 1915 to 1930. Approximately 80% of the locomotives photographed during that time period had red oxide cab roofs.
When examining photos of that era, one thing becomes very clear. The SP was very proud of their equipment, and spent a lot of time (and money) painting and keeping their locomotives bright and clean. The depression seemed to change all that except for their crack passenger equipment, and special occasions (such as the opening of the LA Union Passenger Terminal).
“Dark Red” Paint
Color drift panel 133 of August 1945 was Specification S.P. 148 called "Dark Red". This was a standard color. It was used, among other things, on cab sash, injectors, and boiler checks. Daylight red was also used in these locations.
Color photos of such parts, cab sashes, checks, injectors, etc. show quite a range of color, from a dull boxcar red all the way to a fairly intense red (perhaps fresh no. 133 or Daylight red, no. 28). As with cab interior colors, at least in the late 1940's and 1950's it seems to have been at the whim of the painter or foreman.
Only the Common Standard Number 22 "Cherry Number 214" was a CS hue. If not a Common Standard, it may well have varied in application at the whim of the division backshop paint shop foreman.
Bell
For some unknown reason, the inside of the bell was regularly painted "Daylight" Red!
Boiler Checks & Lifting Injectors
Color photos of checks, injectors, etc. show quite a range of color, from a dull boxcar red all the way to a fairly intense red (no. 133 or Daylight red, no. 28). About half of the SP steam locos had red primer injectors and boiler checks. Post- Seat & Sash Paint, color drift panel 133 of August 1945 was Specification S.P. 148. This was a standard color.
Boiler checks and lifting injectors were sometimes black but most often painted red iron oxide primer (Freight Car Red) but also were painted the same red as the window sash. Injectors and boiler checks were also painted freight car red (red lead primer?).
I don't know whether many different colors were used for checks, injectors, etc. or whether it is just a matter of weathering and fading, but color photos of such parts (and cab sashes) show quite a range of color, from a dull boxcar red all the way to a fairly intense red (perhaps fresh no. 133 or Daylight red, no. 28).
Tony Thompson
Cab Doors
Sometimes front cab doors were painted either "Daylight" Red (CD #28) or Seat & Sash Paint (CD #133).
Sash
Color photos of such parts, cab sashes, checks, injectors, etc. show quite a range of color, from a dull boxcar red all the way to a fairly intense red. Cab sash were often painted either "Daylight" Red (CD #28) or Seat & Sash Paint "Dark Red" (CD #133). The colors are very similar but the #133 is darker. About half of the SP steam locos had red cab sash and red primer injectors and boiler checks. As with cab interior colors, at least in the late 1940's and 1950's it seems to have been at the whim of the painter or foreman.
Post- Seat & Sash Paint, "Dark Red" color drift panel 133 of August 1945 was Specification S.P. 148. This was a standard color. Engines on the Coast, Western and LA divisions were most likely to have the trim. In 1955 & 1956 the trim was less likely to be applied. Otherwise the sash was black. On a model "Daylight Red works well.
Charlie Givens
Valves
The red on valves, etc. was applied around 1950 and later.
Modeling Daylight Red
As a full time custom painter says Floquil colors are a bit on the pastel (light, or white added) side. Not rich enough to match my actual sample of "Daylight Red". A better mix is with Accu-Paint as follows:
50 percent AP-66 SP Scarlet
20 percent AP-15 Warm Orange
20 percent AP-72 Rio Grande Yellow/Orange
10 percent AP-14 New Haven Socony Red
This mix is really rich in color and comes very close to real "Daylight Red" The color is not quite as deep a red which is good on models viewed under artificial light. Of course if you have already painted some models with the Floquil mix, stay with it as my mix won't match or even look close to the Floquil colors.
Another mix formula for Daylight Red is:
2 parts signal red to
1 part caboose red
Lee Yeager's mix for Daylight Red results in an absolutely superb looking model! Lee also uses Accu-Paint. Accu-Paint is a far superior product to Floquil, Scalecoat and the others, the only problem is its availability.
http://www.smp-mlw.com//smp-mlw/indexx.html
Star Brand bottles a paint which is essentially identical to Accu-Paint. This paint is available direct, go to: http://www.p-b-l.com/PBL2002/main-ws-ltm.html
Click on Catalog, then select Paints/Cements from the Categories drop-down menu. There are several Espee colors offered, notably SP Lark Dark Gray, Scarlet Red, and Daylight Orange.
Steam Loco Smokebox Painting
Prior to 1946, smokeboxes were painted a graphite color.
After 1946, smokeboxes were painted silver.
Aluminum smokebox front 1946. With the issuance of the locomotive painting blueprint issued June 2, 1946. The same document called out the aluminum smokebox front as standard, though many Salt Lake Division engines apparently had that feature earlier, per photographs.
Graphite Smokeboxes
Graphite in oil was mixed at each roundhouse more or less "as needed" because the mixture didn't keep very well. Each time you mixed the stuff the color would be a little different so you would get a range from a medium silver gray to almost black color. Some batches of graphite would produce an almost silver color with just a bit of gray but this was rare to show up on the SP. Also remember that the smokebox and all unlagged outside sheets of the firebox (including inside the cab) were also coated with graphite in oil. This stuff has a rather flat finish. After 1946 the smokebox fronts (except AC's) were painted with hi-temp aluminum.
Also, all SP steam locomotives were painted in gloss black every year at the time of their annual inspections. This was true right up to the end, so even though in later years they weren't washed a number of engines would be shiny to lightly weathered.
The smokebox front was flat aluminum. The unlagged portion of the firebox appears to be graphite. Where the firebox is lagged the jacket is black. In general the smokebox is graphite although some occasionally appear to be black. Rarely a smokebox would be flat aluminum.
It is my understanding that the graphite coating was powdered graphite mixed with linseed oil. This was used on unlagged surfaces and was probably more heat resistant than standard paints.
Ernie Fisch
This corresponds to what I know, too. Photos rarely show much of a difference in tint between smoke box and boiler jacket, once the engine is in service for very long. I almost never bother to try and make a "graphite" smokebox color. Steam-era photographs of SP locomotives rarely show any color or darkness difference between boiler jacket and smokebox (referring, of course, to unlagged smokeboxes).
Tony Thompson
AC -12 Graphite Smokeboxes
AC's smokeboxes and fireboxes color on #4294 at CSRM were found in its many layers of service paint finishes. Graphite was there from "day one" until her retirement although there were traces of black overspray in later layers where the shops got a little sloppy repainting boiler jacketing.
Modeling Graphite Smokeboxes
In a real sense, NO locomotives of the SP had "gray" boilers. The "Sacramento Gray" color is a figment of the imagination of a brass importer. That said, the Russia iron, succeeded by American iron, was predominantly dark gray in color (not the light gray that the particular importer admitted he "liked better"). There were a number of SP passenger locomotives delivered with America iron, dark gray with a greenish tint, in the 1920s, including the first 5000s.
In service, these got dirty and/or were repainted. In-service views do NOT support the gray appearance except on quite new or possibly freshly shopped locomotives. There has been a long debate about Russia iron, America iron, and SP's later paint color, a distinctly green color.
Tony Thompson
It's not "builder gray," which is often a flat color, but is definitely the jacket material only (including the cylinder jackets), and does not extend to any other locomotive part. A well-exposed photograph shows that clearly.
Tony Thompson
For a person modeling, say, 1930, I would indeed want smokeboxes to look different from boiler jackets. If I'm modeling 1950, however, I would say it's much less important. Look at any steam loco book and compare on the basis of photo dates and you will see what I mean. Certainly this is an example of the need to model from a photograph of what you want to reproduce.
Tony Thompson
Aluminum - Bronze Color
The 1937 paint scheme used the Dupont color code: 83-0021 for aluminum bronze. The aluminum bronze color was used into the 1946 revision as an option. Once depleted, this color was replaced with Dupont 83-0586 silver-gray.
Blue Green Boiler Jacket
In the period 1886 to 1905, all of the locomotives delivered from both Schenactady and Baldwin came with Russian Iron Boilers. So the boilers tended to be mostly a blue or green tint depending upon the content of the minerals in the boiler. Shining up your locomotive was done regularly to show the pride of the crew in their locomotive.
Tom VanWormer
Photographic evidence simply is not there. And it's usually accepted that the term was "Russia iron" in that period.
Tony Thompson
It is known that as late as 1930 the SP ordered locomotives with "American Iron" jackets (specifically the "Prosperity Special" locos, based on Baldwin order sheets, and an ad in one of the trade papers.
American Iron was a copy of Russia iron. Both are an oxide coating on iron or steel sheet. Both were called planished iron (planishing process, i.e. temperature to which the iron is heated, duration of heating, range of heat, oxygen present during heating, impurities, other trace elements, amount/force of hammering, compounds or oxides present in the iron sheets, etc.). They are rust resistant finishes, but not rust proof… they were kept shinny (and rust free) by wiping with oily waste. Russia iron was hammered when being manufactured (hence "planished") while American iron was rolled.
Detroit White lead offered "Russian Iron" jacket paint and it is dark gray.
American iron was an industrial process, and it was dark gray.
Randy Hees
The blue green hue of the boiler jacket was apparently mixed at the paint shop foremen's whim as they attempted to approximate what to them was the hue that represented that of Russia Iron previously used for boiler jackets or other applications (e.g. air pump and cylinder jackets) that incorporated metal subject to rust induced by heat, water and oxygen in the air. Other exceptions were freight locomotives built at Sacramento Shops which were dressed up with "colors" by shop forces as a reflection of their pride of workmanship.
There is also a photo in the Dunscomb collection of a 4-6-6-2 passenger Mallets in the Sacramento Shops 1930s depression deadline with a green boiler jacket. Also the coke-bottle blue-green of the Oakland Pier switcher in the early 1950s (seen on the front cover of Gene Diemling's SP switcher book), the blue of the San Jose station switcher, just to name a few authenticated variations of Russia Iron and painted replica hues. On #2472, a restoration crew discovered blue-green paint beneath several other layers of black on the feed pipe leading from 2472's right side injector to its boiler check valve, verifying that at one time #2472 had a blue-green painted jacket.
Bob Pecotich
Modeling Blue Green Boiler Jacket
The formula for the green that appeared on green boilered locomotives besides the one in Church's 4-8-2 book is GN Gray Green.
In the Robert Church book the #4300's. there is a paint formula.
The GN bluish-green boiler color is not terribly far off, though there's no necessary reason for it to be the same. The formula Bob Church gave in the Mountain book is limited in that Floquil paint has become notoriously variable from batch to batch, even if their "Gray Green" were still available.
Tony Thompson
There isn’t any definitive "recipes" available for mixing paints in order to duplicate the blue-green boiler jackets found on a limited number of SP locomotives. Moreover, it appears that different shops mixed their own and they did NOT match. This does give you some latitude.
But the more popular means seems to be a base coat of a dark gray or gray green with an airbrushed layer or three of Testor's metalizer "gunmetal" over that and a semi-gloss coat overall. On the SP, both the jacketing and the boiler bands, and on earlier engines roughly after the 1880s, the dome wrappers, too, were all Russia Iron.
Steam Locomotive Cab Interior Color
The proper cab interior colors varied. The display engines that I've helped with restoring paint and lettering the following colors have been found---Drift Panel 24 "Battleship Gray", Drift Panel 151 "Lettering Gray", and Panel 26 "Pale Jade Green".
Charles Givens
Walls Pre-1940 (Harriman Years)
Research shows that during the Harriman years (until about 1940), SP steam cab interiors standard color was Green #15 (CD #9), a dark apple green much like or identical to the Baldwin Green or the later Southern RR green. Baldwin Green is a darker green, close to Pantone 342C or 343, specified for the cab interiors of new steam locomotives and periodically refreshed by the shops. The #15 green was the CS 22 standard in the Harriman era... Color panel #9 (#15 Green) isn't listed in the 1951 Official list.
Here is a link to an on-line Pantone color chart. Look for PMS 342 and 343. Pantone 349C is also a close match.
http://www.greatideasinc.com/pms-pantone-chart.htm
The official color for cab interiors was CS No. 15, "Green Enamel," and there are lotsa copies of this chip around. It was most certainly not "Sea Foam Green," which is Color No. 72, and part of a Daylight interior color scheme.
Tony Thompson
Until sometime into the late 30s or early 40s, Drift Panel 9 "#15 Green" was standard. This was a medium green close to Pantone 349C. The standard color changed to the "Pale Jade Green" after that.
Charles Givens
Walls 1941
As early as 1941, the standard color of cab interior walls and ceiling were changed and painted Pale Jade Green (Color Drift #26). This is a similar color to the Seafoam Green used for years in Diesel cabs. This is a very light gray green and I haven't found a good Pantone match after a quick survey. Drift Panel 33 "Sea Foam" was was a 1937 Daylight interior color and from limited available data was not used on cab interiors. Drift Panel 234 "Interior Jade Green" was a standard for diesel cab interiors.
Charles Givens
Walls 1940’s - 1950’s
Standard cab interior color for steam locos in the 40's and 50"s was a light gray (like "Lettering Gray") was not uncommon. This color was found in the cabs of a couple of preserved locos under the later black, etc. paint. Also used were Battleship Gray (drift panel #24, 1/44), found in the cab of the #2472 during restoration. Lettering & Striping Gray (drift panel #151, 5/47) found in the cab of #1785 and #1700 in Oregon.
Whatever the color, it was applied on roof, front of cab, sides and rear of cab, including many of the fixtures. The underside of the cab roof overhang was not painted to match the cab interior. The overhang was painted to match the outside back wall. The shot in Church's "SP Daylight Locomotives" shows all surfaces painted the same light color.
The GS-4's through -6's came from Lima with light grey cab interiors.
Steve Peery
Gauges
Gauges were pure white.
Steam Loco Cabs Wood Paneling
Only two cab interior pictures show that only the roof of the cab was lined with wood. No other surface was lined. The wood looks beaded. Generally only the roof and floor were of wood (plus windows and doors, of course). 2 x 6 for the center flooring and either 2 x 6 or 1 x 6 for the raised cab floor under the seats. 2 in. wide slates were used for the cab roof. It’s unknown if it is a tongue and groove or just laid side by side with V groove.
Modeling Weathered SP Equipment
Grime over gloss
SP equipment was painted with a glossy finish when new or freshly shopped. There are pictures of SP equipment that still show the gloss paint despite the effects of road service on the equipment.
see http://finance. groups.yahoo. com/group/ Espee/message/ 61691 .
Engine #3662 in the foreground appears to have a glossy boiler under a layer of soot on top and along the running boards.
When using a photo as reference, you should also be aware of both shadow & sun reflection.. both will distort the image you see as either more dull or more light & shiny than it would appear to the eye in person, or under a different lighting condition..The photo you refer is obviously a late afternoon pic so both factors are in effect to some degree. With that said, you may still be seeing a fairly clean boiler, but exactly to what degree you are viewing fresh paint is not really so clear (to me). There were many a steamers in the 50s, but a clean shiny boiler was pretty rare. Name passenger trains being a bit of an exception, had priority at the wash rack, at least for a few years.
Paul (spsmoke)
How you choose to weather your models
Full repaints of locomotives were not as common as we might think. If the locomotive was not in for a full shopping that demanded the boiler jacket and lagging removal, the painters would clean and spray-paint the boiler, cab and sometimes a quick shot on the drivers including the tires walls and the pilot wheels before lettering was reapplied. I have seen numerous roster shot photos attesting to this practice. One of the locomotives shown in Herron's new SP steam DVD -- a 4-8-2, backing down into Third & Townsend station then leaving it with a commute consist shows that same painting method and an un-repainted tender. The tender was probably going to get painted next time the locomotive rested at Bayshore long enough to get the attention, or that the tender would just be swapped out for another freshly shopped-and- repainted one.
Paul (spsmoke)
Modeling References
Photos of Tom Dill's SP steam models
This link will get you there:
http://groups.yahoo.com/group/Espee/photos/album/999926390/pic/list
Larry Castle
Archival Steam Locomotive Info
Book On SP Steam History
SOUTHERN PACIFIC STEAM LOCOMOTIVE COMPENDIUM
Tim Diebert and Joe Strapac
Shade Tree Books, 1988
426 pages, 200 photos, hardcover. Price $125 postpaid or UPS.
The complete roster of all steam locomotives ever used on SP and its predecessors, 1855-1962. Number-by-number detail with specifications and dispositions. This publication has been out of circulation, but I still have a few copies left WITHOUT THE ORIGINAL DUSTJACKET, BUT OTHERWISE NEW. Contact me off-list if you want more info.
Joe Strapac
SP Steam History Book Accuracy
I have been working through four different sources: the SP Steam Locomotive Compendium, the Compendium Companion, the Monte Vista books and a 1951 copy of Espee's Diagrams of Locomotives. In some cases these sources do not agree. I have lost some reliance on the diagram book since it indicates no sport cab when photo evidence shows otherwise.
Ernie Fisch
The idea that there was A diagram book is wrong. Whenever any significant modification was made to a locomotive class, new versions of a particular page would be made. The new page would be called "a" or "b" or whatever, of the same class. Surviving "books" (really, collections of these pages) are not all the same, because they may date from different times or be from divisions which did not update pages for classes they did not have (or no longer had). A true SP "DIagram Book" would have ALL the various pages, original and all subsequent modifications, though I don't know if copies of all such pages survive.
Tony Thompson
A locomotive diagram was drawn not to serve the modeling public, but to provide information to Mechanical Department personnel. SP, especially, took little care in drawing diagrams, leaving us with a rather crudely-drawn set today. The SP draftsmen did not care whether a given locomotive had a sport cab or not! Use SP diagrams for (very) basic dimensions and little else...
Joe Strapac
Late books omit the older engines already gone (and often omit the original, unmodified pages for some classes), while old books omit the later modification pages. Diagram drawings are simplified if not crude (though if you scale them, they do appear to be drawn to scale in most cases). Addition of a feedwater heater, say, would be mechanically significant, while a sport cab may well not have been. The boys in the roundhouse had different needs than the modeler or photographer.
Tony Thompson
SP Locomotives Diagrams
Get the Locomotive Diagram Book. It is a disk file of scans of all known diagrams of SP steam since 1930. This makes for a fat book (3-hole punched for easy binding) and is easy to repro.
For a copy, send a check or money order for $35. Questions, let me know off-list, jstrapac@
Joe Strapac
Post Office Box 1539
Bellflower, CA 90707-1539
The Locomotive Historical Society has a complete list of all SP steam locos and covers SP and all of the railroads that became part of the SP. It also includes first generation diesels. That book, by the R&LHS as its Bulletin 94, has not been reprinted, and it does contain a few errors and omissions.
The much more complete book is the "SP Steam Locomotive Compendium" by Tim Diebert and Joe Strapac.
The Compendium Companion (Arnold Menke) corrects most of the (relatively few) errors in the Compendium. Espee's "Diagram of Steam Locomotives" provides dimensional data.
Archival Quality SP Steam Photos
For those who want archival quality photographs, made with enlarger, photosensitive paper and wet chemistry, of mostly steam, mostly SP, but all North American railroad subjects, they can be had from Arnold Menke. He has over 30,000 negatives, and only charges $5.00 for an 8x10 photographic print made the old fashioned way. Arnold can be reached at asm@theriver.com.
Images from the Otto Perry Collection
There are over 1,000 Southern Pacific photos. The Otto Perry collection alone is over 20,000 images. The catalog keywords include wheel arrangements for steam locomotives, so for example, you can search for Southern Pacific 2-8-2's, or 4-8-2's etc etc.
Anyone can search the Denver Library collections. Use this link:
http://digital.denverlibrary.org/cdm4/search.php
and search on the "The exact phrase" -- Southern Pacific -- and then "Any of the words" -- Lark -- and set "Select specific collections:" -- Western History. You'll see a page of thumbnails including the Lark photo, just click on it to see the catalog information along with the location -- Glendale.
To see the pictures in high resolution, use the links I sent you as a "template" -- just replace the CISOPTR value in the URL -- this is the catalog's internal numbering system for each photo. Just paste the URL into your browser, and change the CISOPTR as desired.
Tim O'Connor
SP Audio Recordings
Two other LP's, this time with SP action are:
STEAM ECHOES - produced by the Southern California Chapter, R&LHS. It has two SP 2-8-0s, three 4-8-4s, a 4-8-8-2, three 4-8-2s and a 4-6-2. It also has CN and UP steam, including 4-12-2 UP #9000 and Big Boy #4005.
RAIL SOUNDS - A FAREWELL TO STEAM
Four SP 4-8-4 runbys on the Coast Line, a cab forward, and a 3-unit set of
F-units. The main focus of the record is Santa Fe's "Last Steam Run" from San
Bernardino to Barstow with 4-8-4 #3759. (A great recording in my opinion.)
California State Railroad Museum Library
Contact Ellen Halteman at the library ahead of time:
library@californiastaterailroadmuseum.org,
and/or go to the library's website: http://www.csrmf.org/doc.asp?id=122
SP Locos Scrapping Locations
According to Diebert & Strapac Steam Loco Compendium, SP locos were scrapped at:
Scrapping Company City
Associated Metals - Sacramento, Ca.
California Metals - Pittsburgh, Ca.
California Metals - South San Francisco, Ca.
City Junk & Supply Co. - Houston, Tx.
Commercial Metals - Pittsburgh, Ca.
Commercial Metals - Houston, Tx.
Alden Steel Products - Portland, Or.
Eastern Iron & Steel - Los Angeles, Ca.
Essee Iron Works - Oakland, Ca.
Finkelstein Metals - Los Angeles, Ca.
Houston Compressed Steel - Houston, Tx.
Hyman-Michaels Corp. - Los Angeles, Ca.
Hyman-Michaels Corp. - South San Francisco, Ca.
Lipsett Steel Corp. - Los Angeles, Ca.
Luria Brothers Steel Co. - Los Angeles, Ca.
Luria Brothers Steel Co. - Oakland, Ca.
Luria Brothers Steel Co. - Richmond, Ca.
Luria Brothers Steel Co. - South San Francisco, Ca.
Luria Brothers Steel Co. - Sacramento, Ca.
National Metal & Steel Corp.- Terminal Island Los Angeles Harbor
National Metals - Ogden, Utah
Oregon Steel Mills - Portland, Or.
Purdy Brothers Co. - Los Angeles, Ca.
Purdy Brothers Co. - South San Francisco, Ca.
Robinson Iron & Metal Co. - Houston, Tx.
W. Silver Company - El Paso, Tx.
Southern Scrap Metals Co. - New Orleans, La.
Proler International - Houston](General_Information_files/shapeimage_5.png)