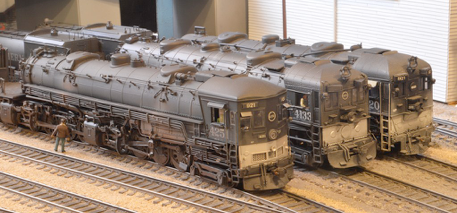
Southern Pacific Lines
Coast Line Division
“The Route of the Octopus”
Southern Pacific Lines
Coast Line Division
“The Route of the Octopus”
Steam Engine Types
2-6-6-2
2-6-6-2 AM-2
#3809
Modeling 2-6-6-2 AM-2
Balboa
Balboa came out with the Master Series AM-2. The last run of Balboa AM-2 locomotives were from Nakamura. ALL were very good as far as runners and detail for the day.
North Bank Line
Made by Boo Rim will feature 3 different versions.
Paint
Come with trim paint.
Lettering & Numbering
#3809 will come in post-war lettering.
PSC
A PSC kit was out of the same run from Nakamura as Dick Truesdale’s AM-2s in 1979/80. The kits were available for a few years and are also listed as being from Nakamura in 1980-82.
Lew
Westside
Westside AM-2 locomotives came equipped with a 15:1 ratio gear head attached to the 16 MM Namiki motor. The NMRA review in 1981 listed the motor as being too weak for the model and it’s 63” drivers. Replace with a Cannon motor with a 60:1 planetary gearbox also attached. This was a larger motor and a better gear ration. They both run much better with these.
Lew
The AM-2 and the AC-1 models suffered from the planned motors becoming unavailable after parts were made. It's a real shame as both models were very well built and detailed for their time.
Charles Givens
Electrical
Look at this document from my web site as it should explain what needs to be done and what i mean by "re-arranging" the gearbox. http://mysprr.comze.com/AM-2_doc.htm
Pete
2-6-6-2
The Compound Mallets were the few"MM" classes along with "MC" locos.
Glenn Joesten
2-6-6-2 MM-2
#4200-4211
Modeling 2-6-6-2 MM-2
PFM
Years ago (early 60's), there was an article in Model Railroader by a fellow who took a PFM Sierra #38 and bashed it into a passable rendition of an MM-2 before the two wheel lead truck was replaced.
Westside
Electrical
The original motor coupled with the gearbox situation made it perform very poorly under any type of load but would appear to run normally when being test run with a load. You’ll need to re-arrange the gearbox and replace the motor with a more powerful unit. Take a look at this document from my web site as it should explain what needs to be done and what i mean by "re-arranging" the gearbox. http://mysprr.comze.com/AM-2_doc.htm
Pete
2-6-6-2 MM-3
#3930 - 3931
SP did have two class MM-3 2-6-6-2 compound engines, numbered 3930 and 3931 acquired from the Verde Tunnel & Smelter Ry in 1943. Built by Schenectidy in 1920. Retired in 1954, 1951 respectively. They worked on the Los Angeles Division. Two documented assignments were Beaumont Hill helpers and the San Pedro Local.
Joe Strapac
Tender
160-C-x
Modeling 2-6-6-2 MM-3
Bachmann Spectrum
Consider modifying a Spectrum USRA 2-6-6-2 into something resembling an MM-3,
Mantua 2-6-6-2
Mantua is making a model of a 2-6-6-2 locomotive painted for SP with road #3932.
Nothing like this ever was owned by the Southern Pacific. SP did have two large Alco 2-6-6-2s, #3930-3931, purchased secondhand during World War II, but they would have towered over this petite critter.
Joe Strapac
Brass MM-3
It defied all my attempts to improve it. New motor, universal drives, flywheel, weight, softer springs, new and better gearboxes, gearbox brackets, bearings in the side rods, etc... All techniques that had helped every other SP model I have been asked to repair or improve. A model that can't be improved; that's truly evil... and much worse than ones that can be fixed.
Ken Clark
2-8-8-2 MC Class
2-8-8-2
The Compound Mallets were "MC" classes along with the few "MM" locos.
Glenn Joesten
Modeling 2-8-8-2
The 1947 "Model Railroader Cyclopedia" has scale drawings and details on making the Berk into a B&M/SP/ATSF Berkshire. Says it uses same boiler and frame as IC model and it shows the positions for the domes to make it correct.
Proto 2000 2-8-8-2
Another DCC ready UP engines is the Proto 2000 2-8-8-2 which was also a USRA engine expect.
References
SP Pax Train Meet(*see MM 11/87)
SP 2937(*see MM 10/88)
2-8-8-2 MC-1
#4000-4001Rebuilt to AC-1,Baldwin built in 1909. Retired 1948-49.
Tender
Semi-cylindrical 120-SC-1 whaleback tender
4-8-8-2 AC-1 Rebuilt
Paint
When looking at photos of early cab-forwards that clearly show the windows, the front-end window sashes are often lighter color. The side windows almost never show a color contrast, and neither do the doors or door windows.
Tony Thompson
References
1938 photo of SP 4001:
Modeling 4-8-8-2 AC-1
Westside
The AM-2 and the AC-1 models suffered from the planned motors becoming unavailable after parts were made. It's a real shame as both models were very well built and detailed for their time.
Charles Givens
Paint
Post-war scheme 1946-49.
Sashes and widows red.
2-8-8-2 MC-2
#4002-4016
Rebuilt to AC-1Baldwin built in 1909. Retired 1935-49.
The engineer's and fireman's controls were shifted to opposite sides of the cab so that when run "backwards" the crew was on the usual side of the track.
Tender
Semi-cylindrical 120-SC-1 whaleback tender
120-SC-2 whaleback tender
Reference
1938 photo of SP 4006:
1940 photo of SP 4016:
2-8-8-2 MC-4
#4017-4028Rebuilt to AC-2, Baldwin built in 1911. Retired 1935-48.
Lettering & Numbering
Raised stainless lettering :#4028
Tender
Semi-cylindrical 120-SC-1 whaleback tender
2-8-8-2 MC-6
#4029-4048 Rebuilt to AC-3, Baldwin built in 1912-13. Retired 1936-49.
There was even at least one AC-3 (a former MC-6 Mallet) that got the new cab.
Lettering & Numbering
Some had raised stainless lettering :#4030, 4034, 4040, 4048
Tender
Semi-cylindrical 120-SC-1 whaleback tender
4-6-6-2 AM Cab-Forward
4-6-6-2 AM-2
#3900-3911
Paint
SP AM-2 #4209
The smoke box and firebox were painted in graphite. The smokebox got very dirty quickly. Remember to show the residue from the leak at the Barco slip expansion joint in the dry pipe on the smokebox. These always leaked eventually and there was a gray streak running from them down the side of the smokebox on both sides of the engine.
Modeling AM-2
Balboa
Repairing a Balboa AM-2
After observing, checking, measuring, there may be something wrong: on both sides the screw that retains the side rods in the front driver sometimes (i.e. when the axle is not perfectly centered in the frame) hits the inside of the crosshead. First since on a Cab Forward the first driver is closest to the pilot, under the cab, it is also farthest from the piston and could not hit the crosshead. We are talking about either the #3 driver or the #6 driver, the two closest to the piston. The #3 driver is wider in gauge than the the #2 driver next to it. The #1 driver is also not in gauge but it can't hit the crosshead. Also the #3 driver has more lateral play than any of the other drivers. A couple of thrust washers on the axle between the bearing and driver on each side would reduce this play and keep the driver centered. The side rod screws should nest down into the side rods and not extend above the side rods, if they do they will hit the crosshead guides. The screws would not hit the crosshead, the side rods would, they extend further from the driver. Sometimes a small thrust washer under the side rod will help keep the driver centered as well, since it reduces the play in the side rod screw side rod I would not file away the hub as this would change the driver spacing slightly and likely cause a bind in the mechanism. The mechanism on this Balboa AM-2 has a spring wire running atop the axles instead on individual coil springs supporting each bearing. These spring wire sprung models seldom run as well as those with individual coil springs. Don’t make changes that could make the mechanism worse. The crosshead guides appear to have adequate spacing away from the drivers on both front and rear engines, they do not appear to be abnormally tight, even accounting for the fact that the drivers may have more than normal side to side movement. Make sure the guides are parallel to the frame, and haven't been pushed in, reducing clearances.
4-8-8-2 AC Cab-Forwards
General
The "AC" classes were by definition single-expansion locos. There ain't no such thing as a "compound Mallet AC".
Glenn Joesten
SP Cab Forward Name
Names that were attached to "CAB-Forwards": Always were refereed to as "Mallies," (sp) never any other name. Never "Decks," "Cab-Forwards," just "Mallies". These machines, they were always referred to as "Mallies" or called the "Backup Malleys", but were not true mallets. In Dunscomb's book they are referred to as either cab-aheads or cab-in-fronts.
The nickname comes from the name of the French inventor of the compound articulated steam locomotive, one Anatole Mallet (pronounced "mal lay). With the exception of reference to the MM2s (early 4200s), MM3s (3930 and 3931, from 1943 to the early 1950s) and the early 4000 series MCs, all of the aforementioned using steam twice and thus being true Mallets, the term is incorrectly, used among SP enginemen. All ACs, AMs and MMs were Malleys to them, and they will not tolerate any dissent or correction.
Articulated refers to a drive wheel configuration with two joined engine trucks, each set of drivers equipped with a set of cylinders. Articulateds may be simple, using steam once (UP Challengers and Big Boys, SP 4-8-8-2 cab-forwards), or compound, using steam twice, most commonly with high pressure cylinders on the rear (rigid) engine truck and much larger diameter low pressure cylinders on the front (or swinging) engine truck (SP 4000s before 1928-9, when the first conversion of them [4010 followed by 4028] to simple operation was made). All Mallets are articulated but all articulateds are not Mallets.
Coast and Western Division employees also refer to them as "Cab-Aheads". They were called Mallies on the Tehachapai too. In the Sacramento shops the draftsmen called them cab forwards. Cab’s were used over Donner Pass early.
In an article in the October Trains magazine, Jack Wheelhan put the hyphen in Cab-Forward which seems to be the norm for these days. After his experience in the second cab of the UP steam double header in Tunnel 41 out of Truckee, you get an idea why SP quickly changed their order for the remaining engines in the 4000 class to be "turned around" before they were delivered in 1910.
Certainly Donner, Siskiyou and Coast crews called them mostly "Mallies," but you would have heard "AC" or "4200" used as much as "cab-ahead" or "cab-forward" by employees. People who had worked at San Luis Obispo in steam days, and looking back at the transcripts from those tapes, it almost always was "Malley." One guy said "4200" all the time, and he also called other types by their number series, e.g. 4300, 2400, though of course we know this had no official standing on SP as a class designation. Bob Church tells me he has heard this usage of number series often from people in the Sacramento area.
That said, I would be surprised if there are not regionalisms in employee usage. Though some boomers moved from division to division, I would think the local lingo would always win out.
Tony Thompson
Details
Driver Centers
As the driver centers of all the late AC's were 56 inch diameter the diameter over the tires in service would vary from new at 63 in. to about 60 in. at the condemning limit with the tires 2 in. thick. So any model in that range is correct.
Fire Boxes
AC-1/2/3 firebox sides were almost universally unlagged.
AC exhaust splitter
The purpose of the splitter to reduce the pressure of the exhaust on wooden snowshed ceilings. The smoke deflectors were removed shortly after delivery of the locomotives and most of the units operated without the smoke deflectors. Some pics all the way back to early 40s show the 2 verticle supports with the top deflector plate removed. Other pics in mid 50s show it all still intact. But it does seem to suggest they were removed and is more common without. AC 12 4294 in the CSRM still has the splitter. When checking photos of AC's to see if they had splitters, look closely, as the splitters were hinged, and could be folded down. A Kistler photo of #4292, freshly shopped with large Southern Pacific lettering, with the stack splitter, obviously 1947 or later.
The Monkey Deck
Occasionally articulateds would spew hot water and mud from their stacks. Smoke boxes were often stained with rust from boiler water and boiler water treatment chemicals. The monkey deck is the platform immediately after the smokebox of a Cab Forward, as shown in the figure on the right. Because of its proximity to the stacks, the monkey deck was often stained with rust from boiler water too. Most railroad employees were aware of this fact. However, many hoboes thought the monkey deck was a good place to ride. After passing through tunnels or snow sheds, hoboes riding the deck were either scalded or asphyxiated depending upon how the locomotive was performing.
Interior Cab Forward Cab Differences
AC-4/6 and an AC-12 cab differences would be in throttle control rodding in the cab crossed over from engineers side to fireman's side of the cab on an AC-4 and AC-5. On the AC-6 and subsequent cab-forward classes, the throttle rod went straight back down the engineers side of the loco, thus no in-cab cross-over rodding.
Church's Cab Forward book has a picture of the engineer's side and a picture of the fireman's side of the cab. The engineer's side picture is fairly dark but some stuff stands out.
Some of the best photos of the flat face cab forward cab interiors are in a Santa Fe book. The two photos, one of each side, are of an AC-4 or AC-5, as the throttle linkage appears to cross over the cab. The reference is "The History of the Atchison, Topeka, and Santa Fe" edited by Pamela Berkman and published by Bonanza Books in 1988, page 56.
The two photos are also on page 96 of "The History of the Southern Pacific," where they are identified as the interior of a "4100 series locomotive cab." Many of the levers, valves, etc. are identified in the SP book.
Cab Forward Crew Seating
The engineer sat alongside the backhead. In photos he can be seen in the side window with a forearm on the armest. There were jumpseats on the forward wall for brakemen, who usually seem to have used the one on the left side. Many action photos in Church's book Cab-Forward show these features. For example, you can see a brakeman at the front on pp. 131, 151, 191, 193, 231, and 237, and you can see the jumpseat itself on p.124.
Tony Thompson
Cab-Forward Classification Lights
The classification lamps have clear/white lenses. There is a pair of green lenses to indicate following section inside, pivot into place when needed. the last section is the "official" train.
The color of the classification lights (the two small lights on the front of the cab-forward.would depend entirely on what class of train the locomotive was pulling. On a TT classed train, they would not be illuminated. On a classed train with sections following, they would be green. On an extra train, they would be white.
Pat LaTorres
They are classification lights and were only lit if needed to indicate an extra train or a train with a following section (white or green). Much of the time they would not be lit.
Tony Thompson
During daylight hours the class lights were not lit, instead white flags were displayed on the cab front. They were for night time running.
Kenneth R. Clark
Quoting the S.P. rule book of Dec. 1, 1951 as revised to May 1, 1955, the green classification lamps were to be illuminated day or night. The white (extra train) lamps were illuminated at night only.
Also noted is that the green lamps were to be used for "All sections except the last..."
Grant Leslie
Smoke Lights
In Church's cab-forward book. After studying them they look like a drop light stuck on a piece of conduit or an industrial grade lamp. The conduit is about a foot long mounted off center towards the right looking from the smokebox to the cab. The lamp and its socket are tilted off vertical about 15 degrees. The conduit is vertical.
Cab forward Tender Steps
A good replacement for rear steps for cab forward Rivarossi tenders is in the PSC HO Steam catalog.
Bill Driscoll
Paint
Front
Most Cab-forwards had black fronts prior to 1946.
Green Boiler Jacket
The blue green hue of the boiler jacket was apparently mixed at the paint shop foremen's whim as they attempted to approximate what to them was the hue that represented that of Russia Iron previously used for boiler jackets or other applications (e.g. air pump and cylinder jackets) that incorporated metal subject to rust induced by heat, water and oxygen in the air. Other exceptions were freight locomotives built at Sacramento Shops which were dressed up with "colors" by shop forces as a reflection of their pride of workmanship. There is also a photograph in the Dunscomb collection of one of the 4-6-6-2 passenger Mallets in the Sacramento Shops 1930s depression deadline with a green boiler jacket.
Door & Sash Colors
Some front window sashes were red. But sash paint was not consistently applied and was likely up to the individual shop. Door color in photos can’t be distinguished as they were very dirty.
Interior
Some cab's interior walls were painted a light gray.
http://www.flickr.com/photos/jacksnell707/3243382053/
Arved Grass
Lettering & Numbering
Absent Southern Pacific lettering on cab-forwards
It was only omitted on those districts where tunnels and snowsheds led to smoke obscuring the lettering soon after application. It was most certainly NOT omitted across the system. Bob Church's book, "Cab-Forward," discusses this and shows examples.
A survey of photographs of unobscured cab- forward tenders from the late 1930s on from Signor's Tehachapi, Western, and Donner books revealed the following.
Tehachapi -- 9 without lettering, 3 with
Western -- 9 without lettering, 5 with
Donner -- 17 without lettering, 1 with
It seems like most modern cab-forwards were without lettering regardless of the above locations, although it is possible some of the locomotives were so dirty none of the lettering showed up. Virtually all of the ones in the Donner area were without the lettering, but NOT WITHOUT EXCEPTION. Locos could be reassigned and they were certainly not repainted just to reflect changes in assignment.
In the Southern Pacific "Common Standard Lettering and Numbering" diagram from the SPH&TS, know that there is a note on it that sates "Lettering "Southern Pacific" to be omitted from the sides of tenders of AC-6 to 12 classes of locomotives assigned to Sacramento, Shasta, Portland and San Joaquin Divisions, and of F class locomotives on Shasta Division". (The note about omitting the lettering on tenders is Revision F to the drawing and is dated 12-30-49).
References
1. Robert Church's fantastic work (the bible of the cab-forward). There is both a 1962 edition and the 1982 revision. With one exception there is little difference in the text; however, the 1982 is preferable. The additions to the 1982 edition are as follows: many more photographs including a section on the construction of the cab-forwards and a section on tenders by Arnold Menke. The additions really fill out the story and for tender fanatics. Arnold's chapters are a must have!
The Monte Vista books (volumes 7, 10, 13 and 15) provide a lot of photos. Tony has expounded on the shortcomings of the Monte Vista series. The one advantage they have is that they cover a lot of engines and allow side by side comparisons. The Church books are far superior in all other respects.
Modeling Cab-Forwards - General
Smoke Lights
As with most -even basic- modeling supplies, no separate fiber optics are to be found out here (not even dropping resistors...), but I have come across one of those horrible ''70s lamps with hundreds of strands fanning out from a central bulb: more smoke lights than SP ever had Cab Forwards. It might not be possible to offset the lamp (how does one put a permanent bend in a fiber optic without damaging it, but the overall impression should be just fine. Heating should work, but used less than you would for glass. The glass fiber used in data transfer is very highly refined, with a very specific makeup More visible than fire box flicker.
Find the smallest metal tube that you can that will hold the fiber. Slip the fiber into the tube and then put a slight bend in the tube. At least it gives you something else to look for.
Another technique used for making free standing lights might work, is to bend the fiber as desired and then paint it with ACC. When the glue dries it might hold the shape. The worst it can do is work.
Intermountain
Photos of engines close in numbers to the IM numbers had the splitters at the end of steam. The 2 IM numbers verified by photos are #4278 & 4285 (no splitters in pics taken 1944 & 1946). None of the 4 models comes with an exhaust splitter. You have to make one. Use brass 1/16 x 1/16 angle stock. Or how about using one of the exhaust splitter from a Rivarossi Cab Forward.
Modeling AC Series Locos
Electrical
Repowering by Kenneth R. Clark
If you want to power a late AC - 7/8/10/11/12 HO tender with Buckeye trucks, consider using a Kato RSC-2 chassis. The wheelbase is very close, any minor differences will be hidden by sideframes. And it is a Kato so the mechanism is top rate. You have to shorten the frame a couple of feet and other mods to fit, but it's cheaper and more powerful than the expensive power trucks.
Kenneth R. Clark
On the KTM cab forwards with PFM sound, place the speaker in the smokebox under the stack. The PFM enclosed speaker fits nicely, and you don't have extra wires to the tender.
As far as mounting the tender on the chassis, expect that this will vary between different models and builders although I would expect KTM to be pretty much the same for their models. The problem with the RSC-2 chassis is that it is too long, basically it has to be shortened by the length of one of the flywheels. Whether you prefer to just shorten the RSC-2 chassis or mount the trucks to a built-up frame, both could work. The existing motor mounts to the frame in a deep well that would extend below the tender frame. About a scale foot could be milled from the bottom if you prefer to modify the existing chassis. The tool box on the tender frame will partially hide this deep well so you may prefer not to mess with reducing the depth and leave it be. On some tenders you may have up to a half inch above the power trucks, depending on the fuel bunker construction. This should be enough to mount a decoder board and at least a small speaker.
Hard wire mechanisms so don’t be concerned with reusing the phosphor bronze power strips from the RSC-2 mechanism or the PC board on top of the motor. The RSC-2 mechanism gives you all the parts need to power these tenders with Buckeye trucks. You have to adapt them to an individual tender. You should be able to repower similar Sunset, Key, or even Intermountain tenders. The KISS approach would be to re-utilize the diecast frame ends with the bolsters mounted to a new brass center frame for the motor, however if you plan to do several, consider making a new frame out of brass and mount the trucks and motor to it. With a brass frame, mount the motor horizontally which would give more space above the motor for a decoder and not require the deep well below the tender floor. Move the flywheels next to the motor to keep both flywheels. Finally, epoxy the motor to a brass plate and then screw the plate to the brass frame allowing easy removal.
Kenneth R. Clark
4-8-8-2 AC-4 "Wampuses"
AC-4 #4100-4109
The AC-4's spoke drivers, cab and tender were noticeably smaller. than AC-6’s. AC-4, many of those classes were rebuilt with inside access number boards, AC-4 were not built with a modern, rounded cab. Even AC-4 #4107 which late in life ran away into a string of flat cars, destroying the flat face cab, got another flat face cab, not a "modern" cab. The Compendium shows no modern cabs on AC-4's and although many of them got AC-8 windows.
The term "Wamp" was applied to the compound-mallet AC's, and to the simple-articulated AC-4's and onwards.
Eric Berman
AC-4/5s were rarely seen on the Shasta but were very common in LA. By 1953, all AC-4s and AC-5s were assigned to the Western Division.
Details
Horns
Horns were not added to earlier AC's, such as any AC-7's or earlier with air horns.
Sound
The sound on the AC-4 did not have the air pumps mounted on the smokebox door with a short exhaust pipe venting to the air, hence they should not have the distinctive air pump sound of the later AC's.
Smoke Light
One hesitates to use the word all on any Espee stuff but the smoke light appears to be quite universal. The early MCs and MMs do not appear to have been delivered with lights but hey were added. There is a delivery photograph of 4101 (AC-4) with the light so it may well be ex-works.
Number Board
The AC-4 has the same number boards as the AC-5. Both with internal access. The number boards over the cab windows do not have the bulky look of the post war number boards that could be changed from inside the cab.
The area below the headlight is painted silver, something that happened after WW2. In that same area are three disks that appear to be circular plates covering what were openings that existed before WW2. Thus this area appears to be done as if the locomotive was post WW2, inconsistent with the circular locomotive number board which was relocated into this area after WW2.
Round Number Plate
The round number plate on the front is mounted between the windows. This feature was lost with shopping around the time of WW2 (the number plate dropped below the headlight to make room for the water cooler, although not all locos got the cooler).
Pilot
The pilot/cowcatcher is spoked, indicative of a prewar version. Some of them had a snowplow pilot and a fire hose box mounted on the front. This was very common on the later AC-6 engines which were mostly assigned to "mountain duty".
Some of them had a snowplow pilot. On page 65 of Church's second cab forward book there is a picture of AC-4 #4106 at Klamath Falls with a snowplow pilot.
Water Cooler
On some photos dated between 1937 and 1949 or so, some locos had a water cooler added. In the thirties it appears to be between the loco number plate (circular one) and the engineer's windows. When the number plate was relocated lower, the water cooler was centered between the windows. There aren’t pictures of AC-4s with the water cooler box on the front, like some of the earlier cab forwards. Some of them had a snowplow pilot and a fire hose box mounted on the front. This was very common on the later AC-6 engines which were mostly assigned to "mountain duty".
Fire Box
The easy spotting different is the large wheel (about the size of a brake wheel) mounted on the side of the fire hose box. On page 65 of Church's second cab forward book there is a picture of AC-4 #4106 at Klamath Falls with a firehose box, the wheel is clearly visible.
Headlights
Pyle National headlight SP used were two common sizes 12" and 14" in the post-war era. The 14” lens cover version was common after WW II.
Whistle
There is a lot of difference between the models (and sometimes also between engines of the same class). For example: on most of the AC-4s, the whistle sat about mid-boiler on the engineer's (=left) side on the superheated steam pipe to the turret. Not on all of them though: over the years some of them seem to have gotten later-model whistles. The same goes for the reach rods: they must all have been routed exactly the same when each class of engines was built, but over the years a lot of variety developed.
Early articulateds had the whistle -with the pops- on top of the rear dome. The pictures in the Church book, all articulateds prior to the AC-7 had whistle rods, not ropes. The rods were preferred because they were not subject to breaking like ropes do and had no play in them.
At the CSRM, #4294’s whistle is located on the fireman's side a few feet forward of the stacks and a few feet left (facing forward) of centerline. The actuator is air powered and located to the left of the engineer just above waist height.
Paint
Front
Most Cab-forwards had black fronts prior to 1946. SP did not use anything like the medium gray material seen on the steam engines of many roads, but did use some sort of (presumably) heat-resistant paint on smokeboxes and on fireboxes. It had a warmer tone, but was basically a black color.
Tony Thompson
The silver face was done for safety reasons, to make the locomotive more visible. Sometimes easier than the headlight in the daytime. The shimmer caused by heat made the light hard to see, but that silver sure did show up.
The AC's had a silver strip on the lower front of the cab, below the windows and above the pilot.
Smoke Box
The smoke box was painted black the same as the rest of the engine. The smoke box is at the rear. It was not graphite, black. As others have pointed out the silver color was for visibility. Not an issue on an AC's smokebox. There are at least two pictures of the smokebox end in Church's Cab Forward. Shots of engines taken before the 30s show a dull finish on the smokebox which could have been graphite. Shots taken from the 30s on show a glossy black smokebox.
As Arved says, a heat resistant paint was needed on smokeboxes and fireboxes. The graphite finish provided that. The graphite finish was linseed oil, plumbago and graphite mixed together. In the 30s they got a heat resistant paint they could use on smokeboxes. They didn't use it on fireboxes because they were always rapping the stay bolts to test them which would play h*ll with a nice paint job. Smoke within tunnels frequently obscured both the silver front of the locomotive and AC tender letters.
Right up to the end of steam photos show that most engines had a finish on the smokebox that was not a glossy black but looked like the graphite of old. I have seen an occasional shot of an engine with a silver smokebox.
The ACs got a glossy black (at least fresh out of the shop) finish on the smokebox.
The silver smoke box front was instituted on the Salt Lake Division as a local option in the late 1930s. Purpose was to provide improved visibility in blowing salt spray across the Lucin cutoff trestle.
Boiler Jacket
None had a gray boiler jacket. The "gray" was most likely a water-soluble wash used by Baldwin to being out the details of the boiler appliances and fittings for builder photographs. It was washed off the locomotive prior to its departure from the Baldwin works. A photograph of #4114 (admittedly an AC-5) in "SP Steam Pictorial Volume II" shows it being ferried across the Mississippi at Avondale during her delivery trip west from Baldwin. The boiler jacket is in standard gloss black. This is the closest photograph to "delivery" that is readily accessible as a reference. Also, more than 60% of the locos photographed had some type of special boiler jacket and cylinder jacket treatment. It appears this was sometimes paint (green or grey), and sometimes highly polished steel.
By closely examining photos of the 1915 -1930 era it can be seen that a number of these locomotives had special boiler jacket and cylinder jacket treatments. Although some are clearly photos taken when the locomotives were fresh from the factory, others were taken after the locomotives had seen several years of service. However, as compared to the other classes the articulated locomotives (according to my survey), far fewer had these special treatments. This was probably because these were designed for and used in snowshed and tunnel operations where they quickly got very dirty with soot, and it was just impractical to maintain colors other than straight black.
But examination of the AC-4 builder photo in question suggests a gray wash, something Baldwin did on some orders. And unlike the Russia Iron possibility, it means that they didn't go into service this way.
Tony Thompson
Fire Boxes
Later firebox sides were lagged. AC9s, because they operated in New Mexico, also had non-lagged fireboxes, since they did not encounter the extreme cold of the Sierra. Most if not all of the AC4-8 and 10-12 cab forwards had lagged fireboxes from below the running boards almost to the mud ring. Since they operated in Sierra winters, it was observed that an excessive amount of heat radiated from the firebox side sheets to open air, with a resulting higher fuel usage, if firebox sides were unlagged.
Since the sheeting covering modern AC firebox sides was applied over lagging, like the boiler jacket, both sheetings could be and were painted with regular engine black paint, since these surfaces were not subjected to the high temperature extremes of unlagged firebox sides and smokeboxes. Check the lack of tonal differences in photographs.
Boiler Check Valves and Injectors
Boiler check valves and injectors were painted with 1914 Common Standard 22 "Cherry #214" (Pantone 187C), also described as "Red" and "Electric Red". From comparison with color photographs made in the early 1950s of other locomotives similarly decorated, it is safe to say that the same hue was used on the cab windows. If you can locate one of the Cox color cards of an SP cab-forward or other SP locomotive with red boiler fittings and cab window sashes and frames, you can use that for a close color match.
Red Window Sash
Cab windows were normally painted wood sash red. There is a specific color for it painted red. There are few color pictures of these engines available. Some ACs in service in the early to mid-1950s with "red" cab windows.
Looking at pp. 42-44 of Dill Overland Route Color Pictorial, the later ACs seem to have black sashes (except for one loco which appears to have a reddish sash on the fireman's side only.)
Reference
See Dunscomb's "A Century of Southern Pacific Steam Locomotives", or "The Southern Pacific in Color" for applicable photos.
The latest picture found was of #4283 taken in September 1951 with a black front. That picture is on page 169 of Church's Cab Forward book revised first edition. The Monte Vista series shows #4222 with a black front in June 1948. There is no question that the front is black and not grimy aluminum. The Monte Vista books show that it would not be unusual to find a black front in 1946. They get rarer from then on.
Lettering & Numbering
According to a note on the SP lettering drawing dated 12/30/49 all AC class eng. assigned to Sacramento, Shasta, Portland, and San Joaquin Divisions shall omit the large SOUTHERN PACIFIC on the tender sides, also F class eng. on Shasta Division. Photo evidence shows that this was often but not always the case.
Under the cab numbers on the left side it should read:
AC-63 24-24 475-SF AC-4 (Type-Driver Dia.- Cyl Dia- Weight on drivers -Super heat Feed water heat Nominal Class}
32 Stroke
On the right side:
AC-4 AC-63 24-24 475-SF
32
Tender
160-C-2
The front end sill on the 160-C-2 tenders was tapered.
Back-Up Light
All of the ACs with 160-Cx tenders should have had external backup lights in later years. The 160-C-2 tenders, according to Arnold Menke's chapter in Church's book, should have had a small backup light on the back, applied by 1945, unless one wants to model the locomotive light on the back deck of the tender that some tenders received after the war.
In the tender section of Churches book, it says that in the early 1930's, the AC4's had backup lights installed, and during 1938-1945, the lights were changed to larger headlight type mounted at the rear of the tender deck.
There was no backup light on the drawings, which appear in Hundman Publishing's Locomotive Cyclopedia Volume 1, and which were drawn by Al Armitage, (not Bob Hundman). That's because the AC-4's were delivered without backup lights; the lights were added later (see text in Cyclopedia). Drawing shows that detail as AC-4 as built. AC-5 units had backup lights installed at the factory. Bob Church was also a consultant.
Tender Lettering
The lettering was almost always applied to the tenders on AC 4s. Lettering was left off the R type tenders used on Donner. Most photos of the AC-4's taken between 1948-55 around the system and found where about half did not have the SP lettering on the tender.
You have some choices in lettering the tender. In later years Espee did not letter the tenders at all since the tenders got so begrimed you couldn't read the lettering anyway. If you want to letter the tender the following holds:
Southern Pacific on side of tender - 20"
Engine number on back of tank - 12"
Capacity on back of tank - 2" (16152 GALS)
At the lower front side of the tank - 3" SP
To the rear of the SP there are two lines of lettering 3" high separated by 1" space. The SP is centered vertically on these two lines. The upper line says 120,200 LBS LT. The lower line says 294,000 LBS LD.
Cab Markings
Meaning of Cab Forward cab markings:
AC-4AC63 24 24 32 475 SF
AC-4Class designation
AC63Articulated Consolidation, 63 inch drivers
24 24Cylinder diameter (front and rear) in inches
32Piston stroke in inches
475Weight on drivers in thousands of pounds
SFSuperheated, Feedwater heater
On the cab, below the number it will say:
24-24
AC-63 ----- 475-SF space AC-4
32
AC Tender Stencils
In photos of some of the later class cab-forwards, there is a stencil of about three lines on the front of some of their tenders.There are two lines of lettering. These are the light weight of the tender and the loaded weight. In front of those are the initials S.P. centered on the space between the two lines specifying the weights. Probably in the earlier days when different corporate entities were involved this was the ID for the owning entity such as C.P. or T&NO. This lettering varied over time and you would have to have a photo of the tender of interest taken during the time period of interest.
Modeling AC-4 Cab-Forwards
Model / Real Loco Comparisons
LocoWidth over eavesHeight Wheelbase
AC-4 Actual 9'-10"16'-1"
BLI AC-4: 9'-11"16'-5"
AC-11 Actual:10'-0"16'-2"67'-3"
* Measuring the outside wall width at mid-window height on the AC drawings in Bob Church's book shows as 120" or 10’.
BLI AC-4 Cab Forwards
The drivers are 61-1/2" in diameter, close enough to 63" as not to be noticeable. As a result the loco is slightly long because of the diameter. The overall wheelbase comes out as about 2-1/2 scale feet too long but the loco wheelbase is about 9 scale inches too long. The height and width are fairly close to scale dimensions.
The BLI AC-4/5 is a nicely-running, sturdily-built engine. It's a bit light on details, but that can be fixed without too much trouble. Sound (generic) is OK, but try to get one without the smoke generator.
Wouter J.K. De Weerdt
Details
Water Cooler
BLI did not add a water cooler. To add the water cooler, is it available as a casting from PSC. PSC had a cast of a fire hose box. PSC also has a couple of versions of the much different water cooler box.
Train Number Board
The train number boards on do not have the heft of the post-war rebuilds that allowed changing train numbers from within the cab.
Round Number Board
It would seem that the round number board should be low, not between the windows. The high round number plate could be a problem to correct.
Ladder
Short boiler ladder on AC-4. This is an AC-5 detail that does not belong on an AC-4. This was a deliberate decision to save money, not a manufacturing error. They wanted to use one boiler casting for both models. The boiler shells used the same tooling, so rather than leave the empty holes for the ladder on the AC-4, they put on the ladder. To fix remove the short ladder from the boiler and make three steps to take it's place.
Lights
The early MCs and MMs do not appear to have been delivered with lights but they were added. There is a delivery photograph of 4101 (AC-4) with the light so it may well be ex-works. I found some in Church's cab-forward book. After studying them they look like a drop light stuck on a piece of conduit or an industrial grade lamp. The conduit is about a foot long mounted off center towards the right looking from the smokebox to the cab. The lamp and its socket are tilted off vertical about 15 degrees. The conduit is vertical.
Whistle
Also change the whistle, and add the reach rod to it. From pictures, both the whistle, pops and bell also look like they were painted black.
Modeling Improvements
1. Beneath the firebox. The drawing shows an extension of the pan downward from the firebox through... assume...the frame. This extends to the rear almost to a point above the middle point of the wheel base of the trailing truck. It looks as if one could even add weight by installing this missing pan.
2. The missing steam pipes to the rear cylinders. Actually quite a bit can be improved in this area.
3. The light to the rear of the stack indicating stack conditions at night.
Missing lines from the generator and other similar missing lines or pipes
Firebox Improvement on the BLI AC-4
Put down a layer of open-cell, self adhesive, foam weather stripping material on top of the frame in this area. Use two layers of 1/2 inch by 1/4 inch thick, but 1/2 x 3/8 would have been thick enough. Darken it with a black sharpie. The foam is think enough to eliminate the gap, and compliant enough to allow the front engine to move without impediment.
You do not need to remove the front engine, although removing, installing foam, and replacing only takes about 45 minutes.
Next, fabricate from styrene the "beam" that runs under and across the firebox, just ahead of the lead drivers, to which you'll attach blow-down mufflers.
Wayne
Electrical
Sound Decoder
Replace the QSI board with a SoundTraxx Tsunami decoder, and build a proper speaker enclosure in the tender.
BLI AC-4 Tender
BLI got the tender right, a 160-C-2. They also got one obscure detail right, the tapered end sill. The models would be built to represent the prototypes in the post 1946 era.
Precision Scale #3085 (brass) #31642 (plastic) headlights are what to use on 160-C-2 tenders, and is the one to use on your AC-4 tender. With the addition of a backup light, the AC-4 should be pretty close to correct.
The 1st run came out in 2004. They ran OK out of the box, but improved considerably after I upgraded the QSI chip (which also improved the sound), and are good pullers. They are a bit light on details, but that can be fixed with a little bit of work, nothing major. The BLI AC-4/5 is a nicely-running, sturdily-built engine. Sound (generic) is OK, but try to get one without the smoke generator.
Wouter J.K. De Weerdt
KTM AC-4
The Japanese models of the AC-4s, produced in large numbers over the years by KTM, were fine running models with a couple of major detailing problems. The Japanese models had scale 63" drivers which add at least a scale foot, most likely more, to the model's wheelbase compared to the BLI's undersized drivers. The boiler length of a KTM engine, appears to be a scale foot too long as a result (compared to dimensions on the drawings in Bob Church's Cab Forward books.
The cab on a KTM AC-4/5 is actually from an AC-6. The cab and frame below is about 2.5 scale feet too long. (KTM produced an AC-6 for WestSide, many years after the Max Gray AC-4). If they make the new cab available separately, there are a few hundred owners of KTM AC-4's in need of the correct size flat face cab for their models. And some sorely needed rivet detail as well. On KTM’s try installing a Sunset AC-4 cab; as a replacement.
The KTM models imported by WestSide had an improved idler gearbox drive that was limited to a 36" radius by the gearbox hitting the steam lines to the rear cylinders (To get the model to go around 30" radius, try opening up the hole in the boiler for the gearbox and filing away the inside half of the inside steam lines where the gearbox will swing and hit while traversing a curve). All KTM 4-8-8-2s have steamlines that are too short and do not line up with the stacks under the smokebox. Line them up with the stacks and extend them with short pieces of K&S tubing of the same diameter. The lagging of the firebox under the cab is different for the KTM AC-4/5s and should be different for the BLI models but don't expect this difference. The KTM AC-4s have the wrong shaped turret dome, round instead of rectangular (fake it by using flat ended pliers to reshape the KTM dome into a rectangular shape, a 70% solution). KTM used the same boiler sheet metal etching for their AC-4/5/6/7/12s (under magnification the Builders Plate says 1940 which doesn't match any of the SP 4-8-8-2s).
Another major error on all KTM cab forwards is that the steam exhaust lines from the cylinders do not line up with the stacks. Fortunately K & S has tubing the right size and you can move the lines on the smokebox and insert an 18" (scale) filler between the cylinders and the steam line casting. Solder yours to the steamlines.
Double motor a few KTM cab forwards, it provides a few benefits in addition to the in - out of sync sound effects. The AC-4 is the easiest because of the gearbox on the 6th axle. Use twin Sagami 2032s with flywheels; the motor for the 2nd axle was single ended with the worm mounted on the motor shaft and a torque arm motor mount. This unit was completely contained in the firebox. The other motor was mounted in the boiler; to accomplish the mounting the rear of the firebox was filled in along with the boiler course above the 3rd and 4th drivers. It adds a nice bit of detail and does change the look of the model.
Sunset
Sunset made early and late versions of AC-4/5/6s. The AC-4 has a cab from a Sunset model that is much shorter so the KTM model is only about a scale foot longer than the BLI.
WSM AC-4
A major problem in this case is the cab is too long, a more noticeable mistake especially when next to a BLI model. Operationally this model was the first KTM cab forward to employ double idler gearboxes, still with an open frame motor. The rear gearbox is on the sixth axle, limiting rear engine swing and minimum radius to something like 40". Modify these models to get around 32" curves easily, but a stock model can't even come close. Most of the detail parts on the AC-4 are older non-PSC parts. The cab is fixed with no interior. The model is virtually the same as the earlier Max Gray/KTM model, except for the gearboxes. Recently these models have been selling in the $400-500 range.
You can graft a Sunset AC-4 cab on a WSM AC-4 engine for a dramatic change in appearance. Most Westside SP Katsumi models need some assistance but are nice models.
Paint
The cab front should be aluminum, not white. Paint the cab ladders and handrails black, and reduce the aluminum painted area on the cab front to the original trapezoid shape as shown in the photo on page 202 of Church's book. From pictures, both the whistle, pops and bell also look like they were painted black.
The cab face is painted partly white, a feature of post war locos. The three round holes in the painted area are plated over, also correct for post war. However, the round number plate that was between the windows as built, was moved down to the white painted area.
The injector on an AC4 was a non-lifting injector under the cab and weren’t painted red. The check valves are by the feedwater heater on the AC-4 and black and white photos don't reveal the color. Since Espee was inconsistent on painting these you probably can't go wrong leaving them black. The same for the sash although photos would indicate that the sash was black in most cases.
Painting Cab Forward During the 1930’s
Paint colors for AC-4, in about 1930 (no Aluminum paint on cab front).
Try Alan Houtz' mix of Loco Black and Graphite and Oil for smokeboxes and unlagged firebox sides, it is a good starting point (my last experience was with Floquil several years ago). Tonal differences in photos between the lagged boiler jacket and the unlagged smokebox on SP engines are often slight, and vary with the time since shopping/repainting, and the type of service the engine had seen. But in most cases, the contrast seems to be nowhere near as great as that which would be represented by a medium grey color on the smokebox compared to the Loco Black jacket, as Tony Thompson's email pointed out.
The smokebox should be a slightly different shade than the rest of the boiler, but definitely still black, a very weathered, burned-looking black, like the outside of a fifty-five gallon drum which is used for burning trash.
Weathering (Water Leaks)
Some photos show grey/white streaks from water etc leakages.
These would appear fairly quickly because of the hard water and hot climate. Pictures are your best guide here. Study photos of AC-4s in Bob Church's excellent book "Cab-Forward". The chapter on AC-4s begins on pg. 61 in the Second Revised Edition and you'll find plenty of images devoted to these distinctive Espee locos. Don't have your painter go heavy with weathering for your period. Most photos from the 1930s show locos well kept and in pretty good condition.
In the Monte Vista book on AC-4 to 6 locos for photos taken prior to late 1941. The condition of the locos is a mixed bag. How streaked the boilers were is quite variable; however, they all seem to have lost their gloss. The paint, even if dark, is dull. In general the running gear seems quite streaked and dirty.
A freshly shopped AC would have a glossy black boiler and no lime streaks. A loco within a few months of shopping would have a dull black boiler with a few lime streaks and fairly dirty running gear. Photos are the best guide here. Smoke within tunnels frequently obscured both the silver front of the locomotive and AC tender letters.
Rob Sarberenyi's advice is good: in those years engines were taken care of. They were NOT gray. Lighten a black just a little for indoor lighting. Streaking from water leaks obviously was far less a problem when engines were newer, so minimize this. But dirt of a lighter gray/brown on the running gear is fine, as photos do show that.
Tony Thompson
Reference
Century by Dunscomb, SP Steam Pictorial Vol 1, Compendium etc.
See "Southern Pacific Steam Pictorial, Volume 2" by Guy Dunscomb, Donald Dunscomb, and Bob Pecotich. Highly recommended this pair of books; photo reproduction quality is absolutely first rate! The images are printed nice and large, as they should be for viewing Espee steam locos.
SP Steam Pictorial Vol. 2 features four photos of AC-4s all printed quite large:
AC-4 #4100, at Sacramento in October 1928, David L. Joslyn photo
AC-4 #4100, at Roseville circa 1940, David L. Joslyn photo
AC-4 #4100, at Lathrop in June 1952, Fred Stindt photo
AC-4 #4105, at Truckee circa 1935, photographer unknown
Reference
The Monte Vista books covers the AC-4, 5 and 6. The title is:
"Southern Pacific AC Class Cab Forward 4-8-8-2 Pictorial" Volume 7
Lettering & Numbering
The lettered AC-4 in the ads (4100) is lettered in the post war lettering scheme, with the letters ought to have been gray.
If the lettering was the correct shade go for a lettered version, and San Juan Decals are the best way to go for the right shade and correct style. If you prefer the "Southern Pacific Lines" lettering style, it may be appropriate to use this lettering for the way the loco is detailed. Or is it so updated with details as to only be appropriately lettered "Southern Pacific"? Depends on what period you decide to correct the loco to.
San Juan Decals
Charlie Givens designed the most accurate SP Steam decals that have been produced for the HO modeler. They were originally printed by Foothill Model Works and are currently produced by San Juan Decals.
They can be acquired here: http://www.sanjuandecals.com/sp-decal-sets.html
Scott Inman
Modeling AC-4 Tenders
Use a 160-C-2 tender.
Lights
Precision Scale #3085 (brass) #31642 (plastic) headlights are what to use on 160-C-2 tenders, and is the one to use on your AC-4 tender. With the addition of a backup light, the AC-4 should be pretty close to correct.
Tender Lettering
You need to look on your decal sheet for this callout. There is no way you can piece this. BLI did a nice job on the lettering except for the color. This is the post-46 lettering which matches the way the engine is set up.
4-8-8-2 AC-5
AC-5 #4110-4125
AC-5 spoked drivers.
AC-4/5s were rarely seen on the Shasta but were very common in LA. By 1953, all AC-4s and AC-5s were assigned to the Western Division.
Details
Photos of the AC-5's taken after WWII and found where the #4122, #4123 and #4125 all still had boiler tube pilots and old style indicators in 1949. All had the lower oval number plate below the headlight, blowdowns and no external ice box at this time.
The AC-5 has the dry pipe and throttle rod on opposite sides from the AC-6.
Ernie Fisch
Sound
The sound on the AC-5 did not have the air pumps mounted on the smokebox door with a short exhaust pipe venting to the air, hence they should not have the distinctive air pump sound of the later AC's.
Number Board
The AC-5 has the same number boards as the AC-4. Both with internal access.
Pilot
The pilot/cowcatcher is spoked, indicative of a prewar version.
Whistle
There is a lot of difference between the models (and sometimes also between engines of the same class). For example: on most of the AC-5s, the whistle sat about mid-boiler on the engineer's (=left) side on the superheated steam pipe to the turret. Not on all of them though: over the years some of them seem to have gotten later-model whistles. The same goes for the reach rods: they must all have been routed exactly the same when each class of engines was built, but over the years a lot of variety developed.
The pictures in the Church book, all articulateds prior to the AC-7 had whistle rods, not ropes. The rods were preferred because they were not subject to breaking like ropes do and had no play in them.
Paint
Boiler Jacket
None had a gray boiler jacket. The "gray" was most likely a water-soluble wash used by Baldwin to being out the details of the boiler appliances and fittings for builder photographs. It was washed off the locomotive prior to its departure from the Baldwin works. A photograph of #4114 (admittedly an AC-5) in "SP Steam Pictorial Volume II" shows it being ferried across the Mississippi at Avondale during her delivery trip west from Baldwin. The boiler jacket is in standard gloss black. This is the closest photograph to "delivery" that is readily accessible as a reference.
Window Sash
Red window sash on an AC-5 can be well seen in the Pentrex video, "Daylights, Cab Forwards & Early Diesels." Included is a close-up view (as Bob Church noted in his book, AC-4s and AC-5s were nearly identical).
Tender
160-C-2
The front end sill on the 160-C-2 tenders was tapered.
Tender Lettering
The lettering was almost always applied to the tenders on AC-5s. Lettering was left off the R type tenders used on Donner.
You have some choices in lettering the tender. In later years Espee did not letter the tenders at all since the tenders got so begrimed you couldn't read the lettering anyway. Most photos of the AC-5's taken between 1948-55 around the system and found where about half did not have the SP lettering on the tender. If you want to letter the tender the following holds:
Southern Pacific on side of tender - 20"
Engine number on back of tank - 12"
Capacity on back of tank - 2" (16152 GALS)
At the lower front side of the tank - 3" SP
Reference
The Monte Vista books covers the AC-4, 5 and 6. The title is:
"Southern Pacific AC Class Cab Forward 4-8-8-2 Pictorial" Volume 7
Modeling AC-5 Cab-forward
BLI AC-5 Cab Forwards
BLI has released several batches of this model since 2004. Mechanically they're all the same - the difference is in the decoder.
As for those details, the AC-5 is more correct as a post-1946 era loco, like the AC-4, as opposed to 1930-1945 era. It's less work to remove and correct the details that are incorrect for post war locos, but it isn't exactly right for any one era. It appears that BLI took the approach of a closer to scale length boiler at the sacrifice of correct diameter drivers.
The drivers are 61-1/2" in diameter, close enough to 63" as not to be noticeable. As a result the loco is slightly long because of the diameter. The overall wheelbase comes out as about 2-1/2 scale feet too long but the loco wheelbase is about 9 scale inches too long. The height and width are fairly close to scale dimensions.
Aside for the sound chip (and no decoder), there are a few details that have been improved, and the paint scheme. You do not have to paint the cab steps anymore. And for whatever reason, it looks they used a different paint, as it seems to be less flat than the original black.
Leo Pesce
The 1st run came out in 2004. They ran OK out of the box, but improved considerably after I upgraded the QSI chip (which also improved the sound), and are good pullers. They are a bit light on details, but that can be fixed with a little bit of work, nothing major. The BLI AC-4/5 is a nicely-running, sturdily-built engine. Sound (generic) is OK, but try to get one without the smoke generator.
Wouter J.K. De Weerdt
Ladder
Short boiler ladder on AC-5.
BLI AC-5 Tender
BLI got the tender right, a 160-C-2. They also got one obscure detail right. The front end sill on the 160-C2 tenders was tapered. The BLI tender has the tapered end sill.
Electrical
DCC
The no-sound version will require a decoder, referred to it as their stealth series. Get a decoder with only two functions; they are also cheaper.
BLI Decoder
Upgrade the QSI chip.
The latest releases come equipped with the BLI Paragon DCC/sound decoder (and a toy train smoke generator...).
QSI
Would recommend the QSI upgrade chip for these locomotives. It enhances both operating performance and sound.
Specifically, the locomotive cylinder valves are open when the locomotive begins to move, and the sound of condensate being blown out is remarkable. The locomotive moves slowly on opening the throttle, and the sound is very well synchronized with driver rotation. Further, the locomotive sounds are coordinated with throttle settings: reducing the setting produces "drifting", and increasing it gives a more intense sound.
Last, the speed does not vary much with the new chip when the whistle is blown. With the original chip, There’s a noticable reduction in speed when blowing the whistle at lower throttle settings.
Digitrax
Get the Digitrax DH123P or PS (S for short wires between the decoder and NMRA plug) series for a case with a few functions. [Note, the P in the code name means they come with the 8 NMRA plug installed].
Lenz
Or the Lenz decoders, like the LE 1014MP or the cheaper 1 function (for lights on/off) LE 1000.
Or use a Lenz gold decoder for this locomotive you will get better operation from the back EMF than you will get from a NCE D13SR.
NCE
Some prefer NCE #N12SRP. You should be fine with an NCE D13SRJ and an 8-pin NMRA harness. Empire Northern Models has a D12IP (made by NCE) that might work, it is fairly inexpensive ($16) and has the plug built in.
The NCE decoders use CSV's 116 and 117 to control the slow starting speed and the back EMF will better serve you. Use an NCE D13sr decoders in all you diesels but it is harder to start a steam engine. The problem with Stealth BLI Diesels is the headlight control FO turns on all the lights, headlight, mars light, and marker lights. You have a big job getting them separated so you have a mars light and headlight and markers on different circuits. FO, FR and F3. The NCE D13sr is the best for that.
Soundtraxx
If you want to put sound, the Tsunami from Soundtraxx would be the one to put in.
KTM AC-5
AC-5's on the other hand have been produced in large numbers over the years by KTM, however the KTM model uses a cab from an AC-6. It was a long time before KTM finally produced an AC-6 for WestSide, many years after the Max Gray AC-4.
The AC-5s spoke drivers, cab and tender were noticeably smaller. than AC-6’s. AC-5, many of those classes were rebuilt with inside access number boards. AC-5 were not built with a modern, rounded cab. The Compendium shows no modern cabs on AC-5s although many of them got AC-8 windows.
The KTM AC-5s have the wrong shaped turret dome, round instead of rectangular (fake it by using flat ended pliers to reshape the KTM dome into a rectangular shape, a 70% solution). KTM used the same boiler sheet metal etching for their AC-4/5/6/7/12s (under magnification the Builders Plate says 1940 which doesn't match any of the SP 4-8-8-2s).
Another major error on all KTM cab forwards is that the steam exhaust lines from the cylinders do not line up with the stacks. Fortunately K & S has tubing the right size and you can move the lines on the smokebox and insert an 18" (scale) filler between the cylinders and the steam line casting (Solder yours to the steam lines).
Sunset
Sunset made early and late versions of AC-5s.
4-8-8-2 AC-6
#4126-4150
AC-6 class was as large as the AC-4's and AC-5's combined. It would have the same sound as the later Cab-forwards since it was the first class with the air pumps on the smokebox front. The AC-6 is basically the same as the later ACs except for spoke drivers, cab and tender. Dimensionally it is the same as the later ACs (excluding AC-9's) and has similar appliances. It differs in having a flat cab face. Many of the AC-6's got new cabs that were similar to those of the AC 7/8s.
The pathway of the air lines and steam pipes back across the rear engine is pretty much like the later classes. Nothing in Church's cab ahead book says to the contrary.
AC-6s were in a transition period with spotting features like boiler top steam lines and whistle positions being a combination of pre WWII and late steam configurations. There was several AC-6's that got new cabs. #4126 and #4149 are a couple.
AC-6s were the most common mallet class on the Shasta Division after WWII. 1n 1953, AC-6s were still a fixture of the Shasta and Portland Divisions, with the exception of #4133 and #4149, which were both assigned to the LA Division.
Details
Spoked drivers, flat face cab, Worthington SA FWH, air pumps on smokebox front.
On the AC-6, the throttle rod went straight back down the engineers side of the loco, thus no in-cab cross-over rodding.
The AC-6 has the dry pipe and throttle rod on opposite sides from the AC-5.
The AC-6 has no external dry pipe and its throttle rod is on the same side as the AC-12.
Ernie Fisch
Some AC-6s got bow-front cabs.
During heavy overhauls, a few AC-6 got the AC-7 to AC-12 style cab with the beveled front panels and enclosed undercab. The SP #4138 is an example.
Their flat face AC-6 #4126 is one of the few AC-6s that received a modernized cab, while both of their modernized cab engines, #4144 and #4150 never received modernized cabs. Of the last seven engines in the class, #4144-4150, three received modernized cabs.
Horns
Horns were not added to earlier AC's, such as any AC-7's or earlier with air horns. The AC-8s were the first ACs with horns.
Whistle
Early articulateds had the whistle -with the pops- on top of the rear dome. On later-model ACs (AC-6 through -12) it sat on the right side (except the AC-9) near the smokebox, and it was steam (or air?)-operated. The pictures in the Church book, all articulateds prior to the AC-7 had whistle rods, not ropes. The rods were preferred because they were not subject to breaking like ropes do and had no play in them.
Pilot
Some of them had a snowplow pilot.
Corrugated Pilots
The earliest year that corrugated pilots were applied to the above class of SP AC-6 Cab Forwards is 1946. There are published photos of #4131 and #4150 with corrugated pilots in 1946. Corrugated versions are seen in late Forties photos.
Snowplow Pilots
Photos as late as 1938 showed some Flat Faced AC-6's had snowplow pilots applied for Mountain service. This was very common on the later AC-6 engines which were mostly assigned to "mountain duty".
Fire Hose Boxes
Had a fire hose box mounted on the front.
On the early versions of the AC-6 locos one can see a large square box on the lower front of the cab which contained a water hose for fire fighting. Later photos show the box missing.
The following conclusions from some photo collections:
1. All fire hoses were removed by the time the engine received the post WWII (1947) large SP lettering and silver front paint scheme.
2. Originally the fire hose box application seems coupled with a snowplow pilot indicating planned assignment to a mountain division.
3. Some engines kept the snowplow pilot after the fire hose box was removed.
4. All the engines that received the modern cab originally had the firehose box and snowplow pilot before modernization.
5. Most pictures are from the late 1930's showing the fire hose box with the snowplow pilot.
6. Some engines appear to have lost the fire hose box before the post WWII repainting (4141).
7. At least one engine may have gotten the fire hose box before the snowplow pilot. #4149 has the fire box and a boiler tube pilot in a Wil Whittaker photo (undated). This engine had the modernized cab in 1947. Church's book has a photo of #4149 in 1938 with the fire hose box and a snowplow pilot.
8. Over the half the class got this treatment, based on the Roseville photo thirteen AC-6s with firehose boxes and snowplow pilots in the AC-6 section of Church's book.
Paint
All engines with firehose boxes were painted in the all black paint scheme (pre WWII), some did not have tender lettering, but there is no silver in the photos.
Lettering & Numbering
The "Southern Pacific" vs. "Southern Pacific Lines" on the tender and the silver front or smokebox front were mandated in the painting and lettering blueprint dated June 2, 1946. Before that, some Salt Lake Division locomotives had a silver smokebox front for greater visibility, but its use was optional even on the Salt Lake Division. Either on the 6/2/1946 painting and lettering print or on a later revision, there is a note stating that for Northern District cab-forward locomotives operating in snowshed and tunnel country, the tender letters "Southern Pacific" were not required, as they would be quickly obliterated by smoke from the cab-forward's stack that was so close to the tender.
Tender
160-C tender.
Reference
AC-6 info, including drawings; articles by Bob Church and Al Armitage.
Mainline Modeler June 1985July 1985
The Monte Vista books covers the AC-4, 5 and 6. The title is:
"Southern Pacific AC Class Cab Forward 4-8-8-2 Pictorial" Volume 7
AC-6 SP 4146 with the newer style cab, too: http://spcascades.railfan.net/photos/DILL/tdOAKRIDGECF4146eastES.jpg
AC-6 SP 4138 with the later style cab: Page 279 of Dunscomb's "A Century of SP Steam Locomotives."
Modeling AC-6 Cab-Forward
Companies like Cal-Scale and PSC are still in business. get yourself a Precision Scale Catalog. PSC has a lot of goodies you can use, including part # HO-3449, dual cross-compound compressors to mount on your AC's smokebox front. Here's PSC's homepage URL Go to:http://www.precisionscaleco.com/
If you use the PSC air pumps, buy the individual compound air pumps; the casting quality of the double air pumps isn't nearly as good, even though designed for mounting on a smokebox front.
Model / Real Loco Comparisons
LocoWidth over eavesHeight Wheelbase
KTM AC-6 (modern cab):10'-10"16'-2.6"69'-5"
WSM AC-6 (modern cab) 9'-11.5"
Sunset AC-6 9'-11"
Measuring the outside wall width at mid-window height on the AC drawings in Bob Church's book shows as 120" or 10’.
The wheelbase of the AC-6 is too long as a result of making the drivers the correct diameter, something has to give. The undersize drivers of the Rivarossi are much more obvious and disturbing than the overlong AC-6 wheelbase. When set side by side both engines are the same overall length, as they should be. The AC-6 boiler is about 1 scale foot longer than the Rivarossi with the monkey deck compensating. The AC-6 boiler seems to be just scaled a bit differently from the Rivarossi since the length gain seems to be uniform along the boiler.
BLI
BLI has released several batches of this model since 2004. Mechanically they're all the same - the difference is in the decoder.
In converting a BLI AC-5 into an AC-6 with the "Sport Cab" later style cab fronts on the AC's use a Rivarossi AC shell for the cab face. A good source for the other details; air pumps, blow downs, tender back-up light's. etc. Mid 50's is the only period.
SP #4149 and the other rebuilt AC-6s were generally rebuilt with cabs and appliances similar to those of the AC-8s (and rebuilt AC-7s). A lot more has to be stripped from an AC-5 and then placed elsewhere (running boards, pumps, steam lines, steps, whistle, throttle, air lines...). Note also that the AC-6 and later classes were a couple of feet longer than the AC-4/5s due to their larger cabs. That means you have to extend the frame. SP #4149 was not as often in the camera' eye as other AC-6 rebuilds. In Church's Cab Forward book, it’s not one listed as modernized.
Electrical
BLI Decoder
Upgrade the QSI chip.
The latest releases come equipped with the BLI Paragon DCC/sound decoder (and a toy train smoke generator...).
KTM
The modeler could remove the unwanted details for his era. The flat face ACs had a considerable amount of detail variations, the AC-6s especially, and a photo is your best guide. Just start with a KTM model and custom detailed it.
To model a specific engine in the AC-6 class, you will probably need to make detail changes for your specific time period; even a model that is right-on for a specific engine number will be wrong for the rest of the class or for a different era. It is easier to buy a PSC/KTM AC-6 kit and place the details where you need them than change a built-up model.
Ken Clark
The KTM modernized cab for the AC-6 and the cabs for the AC-7/8 and AC-12 are too wide (about a scale foot). Other brass cab forwards like PFM, have more slender cabs than the KTM models.
When KTM built their models of the AC/4/5/6s they used the same cab on all three, but it was really an AC-6 cab. Swap a cab from a Sunset AC-4 and shorten the frame on a KTM AC-4 2’ feet to mount the cab.
Another major error on all KTM cab forwards is that the steam exhaust lines from the cylinders do not line up with the stacks. Fortunately K & S has tubing the right size and you can move the lines on the smokebox and insert an 18" (scale) filler between the cylinders and the steam line casting. Solder yours to the steamlines.
Double motor a few KTM cab forwards, it provides a few benefits in addition to the in - out of sync sound effects. The AC-6 has a much tighter fit because of cab detail and gearboxes on the 2nd and 5th axle. Use twin Sagami 2032s with flywheels; the motor for the 2nd axle was single ended with the worm mounted on the motor shaft and a torque arm motor mount. This unit was completely contained in the firebox. The other motor was mounted in the boiler; to accomplish the mounting the rear of the firebox was filled in along with the boiler course above the 3rd and 4th drivers. It adds a nice bit of detail and does change the look of the model.
MTH AC-6
The detailing is better than BLI's AC-4/5, but not as detailed as the Intermountains AC-12, but ahead of the BLI, especially under the cab. The engines have a DCC decoder in them, as well a the DCS system. You can consist and speed match the AC-6s with all your engines.
Jan Podganski Jr
They will be my first, last and only MTHs. Fine runners, but average pullers notwitstanding their weight (metal body). Unless they now come with a fully DCC-compatible decoder, you can only change a few basic CVs if you don't have access to MTH's proprietary DCS system. They are not overly detailed either and a bit toylike. Added details and some paint would considerably improve their looks.
Wouter J.K. De Weerdt
Looks are OK, but by far not as good as the Intermountain AC-12.
Detail parts like the rough air pumps and "gold"-plated bell, whistle and safety valves are disappointing.
Lots of piping and details are lacking, (unlike on a BLI AC-4/5), the engine looks barren.
Wheel centers and tires are unpainted
Cab side windows are lacking frames (very visible, and something both BLI and IM got right on their models)
It runs very nicely, but has surprisingly little pulling power for such a heavy engine, even with the traction tires.
Wouter J.K. De Weerd
The AC-6s came with both flat face and modernized cabs. The models do appear to be missing part of the Worthington Feedwater pump mounted on the smokebox below the air pumps. There is a PSC part for ACs that could be easily installed.
Ken Clark
The handrails on the porch did not look the same as the other two. Another detail was different was the steam pipe along the boiler, and on the opposite end, the throttle rod, were opposite than on the IM and BLI.
The MTH AC-6 pulling power is somewhat disappointing for such a heavy locomotive, and it looks a bit toylike. It runs very well, but unless it's a new release with an updated decoder, compatibility with DCC is limited.
Wouter J.K. De Weerdt
Tender
It comes with a 16,000 gallon semi-Vandy tender. Tender lacks detail.
MTH Paint
The finish is too shiny.
MTH Lettering & Numbering
The MTH comes as an AC-6 painted "Southern Pacific". Their choice of road numbers for these units is highly suspect.
MTH Electrical
Lighting looks too yellowish, cab lighting cannot be turned off separately.
Many CVs cannot be adjusted unless one has a DCS system. Apart from preventing one from fine-tuning the engine's performance, this is really annoying as you cannot set each sound at a different level or switch it off.
Wouter J.K. De Weerd
PSC
Build a PSC AC-6 kit equipped with the snowplow pilot and scratchbuilt a fire hose box (master for casting by PSC) for the flat face.
The PFM brass cab forwards is more slender cabs than the KTM models.
Sunset
Sunset made early and late versions of AC-6s.
West Side AC-6 cab forward
The WSM/KTM AC-6s run well, but generally suffer from many detail placement errors, the boiler steps are a prime example , a couple are mounted just above the running board, when they should be a couple of feet above the running board. The running boards do not have enough taper, compared to other builders, but this is a much harder fix.
Because these engines got their final rebuild around 1947, WSM decided to model them during a brief period (a few months) when they had both the injector plumbing and the top mounted steam line on the fireman's side. Photos taken in LA in the early 50's, show the engine still has a snowplow, but not a firehose box. Pictures of #4133 taken after 1946 because of the large SP on the tender, are a left and right set by Stan Kistler. Unfortunately #4294 did not have the small platform behind the cab on the engineer's side. Top down shots of cab forwards seem rare.
The WSM/KTM AC-6 would have full cab detail, a large KTM can motor, twin idler gearboxes, and under the front cab windows no air horn and just two screen openings versus three on AC-12s. The original cab may have been replaced with a new, narrower cab, KTM modern AC cabs are about a foot two wide, only noticeable when viewed from the front next to Key, PFM, IM AC-12 models. Also look at the sanding valves, only AC-12 classes have four on each side of the sand domes, earlier ACs had just three.
Kenneth R. Clark
4-8-8-2 AC-7
#4151-4176
AC-7 Boxpoks drivers
Of the late ACs with large rectangular tenders, the AC-7s had the most changes pre and post WWII.
Details
Horns
Horns were not added to earlier AC's, such as any AC-7's or earlier with air horns.
Modeling AC-7 Cab Forward
Model / Real Loco Comparisons
LocoWidth over eavesHeight Wheelbase
WSM AC-7 (with rebuilt cab) 9'-11.5"
Measuring the outside wall width at mid-window height on the AC drawings in Bob Church's book shows as 120" or 10’.
KTM
The main detail problem with the KTM AC-7/12 cab forwards is that the width of the cab is about 12 scale inches too wide. The details on the model are mostly superb PSC parts and like most KTM models the mechanism is solid.
Another major error on all KTM cab forwards is that the steam exhaust lines from the cylinders do not line up with the stacks. Fortunately K & S has tubing the right size and you can move the lines on the smokebox and insert an 18" (scale) filler between the cylinders and the steam line casting. Solder yours to the steam lines. KTMs "modern" AC cabs are too wide, so a new modern cab would be useful for owners of KTM AC-7's.
Westside
A WestSide KTM AC-7 has had the cab narrowed.
4-8-8-2 AC-8
#4177-4204
AC-8’s had Boxpoks drivers.
Out of the AC-8 order for 28 engines, Nos. 4177-4204 delivered in 1939, some 16 were assigned to the Coast Line."
Used on reefer blocks. From Aug. 1942 thru July 1943, cab-forwards were almost the exclusive power on through freights passing through Santa Barbara between Los Angeles and points north.
Details
Horns
The AC-8s were the first ACs with horns.
The grill is shorter on the AC-8.
Reference
Cab-Forward, Church
Trainline Fall 1997
Modeling AC-8 Cab Forward
Model / Real Loco Comparisons
LocoWidth over eavesHeight Wheelbase
AC-8 Actual:10'-0"16'-2"67'-3"
Measuring the outside wall width at mid-window height on the AC drawings in Bob Church's book shows as 120" or 10’.
Intermountain
The IM AC is by far the best looking engine of compared to MTH & BLI. With detail that rivals brass from only a few years ago. The first release had serious drive and wheel issues. The Tsunami compressor exhaust sound is great.
Wouter J.K. De Weerdt
Intermountain (2nd run)
Electrical
The second run was much improved but still suffered from a weak motor.
Modifications - Rebuilt all engines with 1833 motors.
Lightened wiper spring tension on driving wheels about 30%, should lighten it more but requires more
disassembly of engine drive.
Engines not really able to reliably pull full rating of 17-18 cars up hill.
Mike Madonna
Intermountain (3rd run)
If you decide on an Intermountain, get the third release, which have all issues fixed. Moreover, you'll have the choice between AC-8,-10 and -12 (with different grilles beneath the cab front windows).
Wouter J.K. De Weerdt
Key (Samhongsa) models
KTM
Another major error on all KTM cab forwards is that the steam exhaust lines from the cylinders do not line up with the stacks. Fortunately K & S has tubing the right size and you can move the lines on the smokebox and insert an 18" (scale) filler between the cylinders and the steam line casting. Solder yours to the steam lines. KTMs "modern" AC cabs are too wide, so a new modern cab would be useful for a possible convert of an AC-12 into a credible AC-8, even a Rivarossi.
AC-9 (*see 2-8-8-2 AC-9)
#3800-3811
Last steam locomotives with coal tenders were the Lima built #3800-3811 in 1939.
AC-9 Boxpoks drivers
Details
Fire Boxes
Later firebox sides were lagged. AC9s, because they operated in New Mexico, also had non-lagged fireboxes, since they did not encounter the extreme cold of the Sierra.
AC-9 Feedwater
The feedwater system on the AC-9s as built (coal version) as in R. Church's book
Cab-Forward states that these were equipped with a "Hancock turbo feedwater heater, size TA-2" on the left side. The "turbo" part of this refers to the cold water pump similar to the Worthington type SA.
The 1947 Locomotive Cyclopedia has a two page spread about the Hancock Turbo FWH. Basically it was an open type heater like the Worthington SA but the spray chamber (called the "condenser" by Hancock) was located under the boiler. From photos you can't tell where this is located on the 3800s. A steam turbine drove two centrifugal pumps on the same shaft--a single stage cold water pump and a three stage hot water pump. This was probably under the cab on the 3800s. It's hard to tell locations because the visible piping and parts don't give a clue.
The 3900s lost the Hancock units in about 1950 when they were converted to coal. The FWH system was evidently replaced with a simple non-lifting injector and the piping on the left side of the engine was radically different as a result.
One photo in the Cab-Forward book by R. Church you can just make out the turbo pump. There are some cylindrical objects plainly visible under the boiler just in front of the firebox that are part of the system.
Modeling AC-9 Cab Forward
Key Imports
This is from the Custom Series #110 set, 1994 Run. Limited to 150 locos.
- Coasting Drive
- Excellent Back-Head Detail
- Opening Tender Hatches
- Superb overall detail
Paint
It is factory painted.
Lettering & Numbering
#3800 with 'Lines' on the tender.
Sunset
Sunset's AC-9 had roller bearing trucks (which were wrong and Sunset caught grief over the mistake) that some modelers removed.
Ken Clark
4-8-8-2 AC-10
#4205-4244
By comparison the AC 10/11/12s saw little appearance change other than paint and lettering.
Donner Pass was home to more of the AC-10/11/12s although one or two might be found on other mountain divisions like the Shasta. There are steam locomotive rosters for the Espee presented on-line. They were updated every few months, most locomotives stayed on the same division for years. Check the roster for your era and division and you can see which cab forwards were regulars there.
Kenneth R. Clark
Details
Cold Water Pump
The cold water pump for the SA superheater is located by the only place you can figure that it would have been, under the platform very close to the tender. This would be the natural location. The pipes and ribbed hose located on the engineers side are the delivery pipe from the pump to the heater unit. (The hose sits prominently above the 5th driver from the front) However, you cannot find any conclusive evidence showing the location of the cold water pump.
The Worthington cold water pump is mounted very low on the frame on the right side. It is so low, it is kind of behind the trailing truck, just clearing the rear of the trailing truck. The hose from the tender goes directly into the pump.
Blowoff System
The configuration of the blowoff system when the spreaders were added with Builder photos all show the cylindrical muffler mounted just behind the turret with a single pipe running to near ground level, but the muffler was evidently removed when the distinctive SP spreaders were added. You can see blowoff valves mounted on each corner of the fireboxes but cannot detect any piping that would have connected these to the spreaders.
The pipe that comes from the blowdown valve goes along the bottom edge of the firebox almost to the cab, then crosses under the firebox to the blowdown spreader on the other side. In other words, the right side blowdown valve exhausts through the left side spreader and vice versa. That's why you don't see a direct connection on one side. The ribbed hose being the connection from the cold pump to the heater.
Oil Piping
Oil piping to the burner seen at least one photo that seems to show the SP style oil heater similar to those used on 4-8-2s and 4-8-4s, but on most, you cannot detect any piping at all in the area where you would expect to see the burner.
Drivers
AC-10 had Boxpoks drivers.
Modeling AC-10 Cab Forward
Intermountain
The photos only show two sanders (at each dome), instead of three or four as built on the AC-10/11/12s. Details on top are more apparent than undercarriage or tender details. The IM prototype photo shows four sanders at each dome.
Hopefully the cabs will be available separately, so that modelers can change the front grills for the AC-7/8 classes. Since this driver size was fairly common. With spoked drivers, could a modernized AC-6 be far off?
More of the "quality" plastic/die cast manufacturers are equipping steam locomotive models with flywheels, as has been the standard for diesels for many years.
The IM AC is by far the best looking engine of compared to MTH & BLI. With detail that rivals brass from only a few years ago. The first release had serious drive and wheel issues. The second run was much improved but still suffered from a weak motor. If you decide on an Intermountain, wait for the upcoming third release (in a few months), which will have all issues fixed. Moreover, you'll have the choice between AC-8,-10 and -12 (with different grilles beneath the cab front windows). The Tsunami compressor exhaust sound is great.
Wouter J.K. De Weerdt
IM Smoke Splitter
Photos of engines close in numbers to the IM numbers had the splitters at the end of steam. The 2 IM numbers verified by photos are #4278 & 4285 (no splitters in pics taken 1944 & 1946). None of the 4 models comes with an exhaust splitter. You have to make one. Use brass 1/16 x 1/16 angle stock. Or how about using one of the exhaust splitter from a Rivarossi Cab Forward.
Tender
The tender should be reasonably close for the AC-8s as well. The hardest part might be finding a 16,000 gallon tender for the conversion.
Paint
Blackened hand rails, all aluminum front.
Photos of AC-10/11/12s with light colored smokeboxes, but none with black smokeboxes.
Lettering & Numbering
But not with SP Lines lettering on the tender a mixture of pre and post ‘46 paint.
Decals
Many decal sets do not use the right size numbers and letters for SP cab data. They SHOULD be 2" except for the fractions, which are 1-1/8". Larger sizes make correct lettering difficult and compromises necessary.
The locomotive class (AC-10 in this case) should always go to the rear of the cab side, regardless of which side is being viewed. That means it should never be next to the door, BUT, as you have observed, not all SP shopmen could read and follow instructions. Generally, the data was roughly half way between the cab side number and the bottom of the cab. However, no one was very interested in trying to paint it on over rivets, so the presence of a row of rivets could shift it considerably.
It also appears that the intent was to keep the data line within the length of the cab side number. If you stop and think about it, though, those numbers were painted on one at a time, so it required some judgement on the painter's part to make the data line come out equal to the number line. From observation of photos, They missed slightly more often than they got it exactly right. Sometimes it's longer, sometimes shorter. Larger data characters on the decal sheet will almost certainly force you to make it longer.
For the location of locomotive classification and specifications on the fireman's side of #4218, circa early 1950's, there are variations in the cab forwards which include the classification, AC-10, at the cab door corner as well as the other corner of the cab. Additionally, the classification and specification letters are sometime immediately below the numbers versus at the bottom of the cab side.
4-8-8-2 AC-11
#4245-4274
By comparison the AC 10/11/12s saw little appearance change other than paint and lettering.
Donner Pass was home to more of the AC-10/11/12s although one or two might be found on other mountain divisions like the Shasta. There are steam locomotive rosters for the Espee presented on-line. They were updated every few months, most locomotives stayed on the same division for years. Check the roster for your era and division and you can see which cab forwards were regulars there.
Kenneth R. Clark
Details
Cold Water Pump
The cold water pump for the SA superheater is located by the only place you can figure that it would have been, under the platform very close to the tender. This would be the natural location. The pipes and ribbed hose located on the engineers side are the delivery pipe from the pump to the heater unit. (The hose sits prominently above the 5th driver from the front) However, you cannot find any conclusive evidence showing the location of the cold water pump.
The Worthington cold water pump is mounted very low on the frame on the right side. It is so low, it is kind of behind the trailing truck, just clearing the rear of the trailing truck. The hose from the tender goes directly into the pump.
Blowoff System
The configuration of the blowoff system when the spreaders were added with Builder photos all show the cylindrical muffler mounted just behind the turret with a single pipe running to near ground level, but the muffler was evidently removed when the distinctive SP spreaders were added. You can see blowoff valves mounted on each corner of the fireboxes but cannot detect any piping that would have connected these to the spreaders.
The pipe that comes from the blowdown valve goes along the bottom edge of the firebox almost to the cab, then crosses under the firebox to the blowdown spreader on the other side. In other words, the right side blowdown valve exhausts through the left side spreader and vice versa. That's why you don't see a direct connection on one side.The ribbed hose being the connection from the cold pump to the heater.
Oil Piping
Oil piping to the burner seen at least one photo that seems to show the SP style oil heater similar to those used on 4-8-2s and 4-8-4s, but on most, you cannot detect any piping at all in the area where you would expect to see the burner.
Drivers
AC-11 Boxpoks drivers
Smoke Light
The smoke light appears to be quite universal.
AC-11 Tenders
220-R-5
Concerning the electrical connection to the back up light and rear markers. On pg. 302, there are good pictures of the rear of 220-R5 #9357 for #4294, and 220-R4(?) for AC-10 #4229. #9357 has externally mounted conduit supplying power to the lights, with the feed coming from the bottom of the tender by means of a vertical conduit run. The tender for #4229, has the supply from a conduit routed around the top edge of the tender. The routing used on 9357 is a modification after delivery, as it still has the same marker light connector mounting blocks in place as does #4229's tender.
Reference
Use Arnold Menke’s excellent tender section in Church's Cab Forward book.
Tender Lettering
Proper lettering for the tender water capacity. The 220-R4, R5, and R6 tenders had a 21,900 gal capacity according to the text. The picture of #9357 shows it lettered for 21,900 gal. The CSRM, when they refurbished it, lettered it for 22,000 gal. (which proves nothing.) On page 300, the builder's photo for 4211's tender, an R4, shows 22,000 gal. Arnold's drawing of the R6, on page 303, calls out 22,000.
Modeling AC-11 Cab-forward
KTM
A major error on all KTM cab forwards is that the steam exhaust lines from the cylinders do not line up with the stacks. Fortunately K & S has tubing the right size and you can move the lines on the smokebox and insert an 18" (scale) filler between the cylinders and the steam line casting (Solder yours to the steam lines).
Double motor a few KTM cab forwards, it provides a few benefits in addition to the in - out of sync sound effects. Use twin Sagami 2032s with flywheels; the motor for the 2nd axle was single ended with the worm mounted on the motor shaft and a torque arm motor mount. This unit was completely contained in the firebox. The other motor was mounted in the boiler; to accomplish the mounting the rear of the firebox was filled in along with the boiler course above the 3rd and 4th drivers. It adds a nice bit of detail and does change the look of the model.
The two motors are wired together and each mechanism has it's own PFM sound cam. When running the two engines drift in and out of sync, just like the prototype; due to the great difference in weight on drivers. It's not necessary for obtaining the in-out of sync effect.
Model / Real Loco Comparisons
LocoWidth over eavesHeight Wheelbase
Rivarossi AC-11: 9'-11"16'-5"
AC-11 Actual:10'-0"16'-2"67'-3"
Measuring the outside wall width at mid-window height on the AC drawings in Bob Church's book shows as 120" or 10’.
Rivarossi AC-11
The only major visual flaw with this model is the grossly undersized drivers. This sticks out like a sore thumb when it is sitting next to one with drivers of the correct size. The undersize drivers of the Rivarossi are much more obvious and disturbing than the overlong AC-6 wheelbase. The wheelbase of the AC-6 is too long as a result of making the drivers the correct diameter, something has to give. The AC-6 boiler is about 1 scale foot longer than the Rivarossi with the monkey deck compensating. The AC-6 boiler seems to be just scaled a bit differently from the Rivarossi since the length gain seems to be uniform along the boiler.
Detailing parts for old Rivarossi cab-forward
On a HO Rivarossi cab-forward (old version), some parts are missing such as the compressors, water pump and mark lights. By adding some piping and modifying some details along with doing some weathering these can be very good looking models. PSC Precision Scale Company, Montant, USA offers all the lost wax parts, you'll need to upgrade your Rivarossi AC class cab-forward, The AC-8, AC-10, AC-11 & AC-12 are almost identical.
Rivarrossi Smoke Splitter
The splitter on the Rivarossi is a solid triangle which is not the same as the prototype angle stock. The triangular exhaust splitter is one of the trademarks of an AC, just like the smoke light and the wheezing airpumps on the AC-7 - 12.
The smoke deflectors were removed shortly after delivery of the locomotives and most of the units operated without the smoke deflectors so IM opted not to include them on the model. However it seems like was probably not a big priority as pics can be found both with and without at various dates.
Rivarossi Cab-forward versions
It is possible to identify on E-bay, a recent version of a Rivarossi Cab-forward, with RP25 wheels and can motor inside the boiler. #4202 to #4294 AC 10 to 12, all look the same almost.
Older Rivarossi
-The old "pizza cutter" came in a long skinny box.
-The old "pizza cutter" version came numbered #4274 and #4294.
-The old "pizza cutter" RP25 wheels are silver shiny.
-The old "pizza cutter" has a three poll "pancake" motor located in the cab and is not a very good runner. If you repower the older version, the problem there is space! The way that system is designed the motor goes in the cab and space is a bit tight. You can get a fairly large motor with a flywheel in but had to do a short coupling using flexible tubing to connect to the drive line. Also, if you are going to run on anything less than code 100 track you might want to trim down those long flanges. As far a traction tires, replacement tires can make run really rough. Stewart Products traction tires that looked like they might work (Calumet Trains # 510. All the right size. Used to be Stewart Products). Adding weight in the boiler engine pulled quite well.
Newer Rivarossi
-The newer version came in a larger flat box.
-The newer version used the numbers #4274 & #4294 and added a couple more. #4257 may be one that was added.
-The newer version with the RP25 wheels are darker in color.
-The newer version has a Buhler can motor mounted in the boiler. It is a fair runner but quite noisy. It was quite easy to install a typical motor replacement. Attach it with some viscous adhesive "Goop". Attach the drive line with a universal joint or some flexible tubing.
-The newer version also came with add-on brake hangers and shoes (to be added by the modeler, only for display on static models though)
PSC Exhaust Splitter
PSC did make the splitter at one time. PSC catalog #3 lists it as #32453 but you can't find it at either Caboose Hobbies or Walthers. From the number this is an old Kemtron casting. The WSM/KTM models made in Japan had them as well as the PSC AC- Kits. They look better in the catalog.
Big Boy & refurbishing locos
The power pickup depends on just how old the loco actually is. Check the drawbar. If is has a wire spring across or near the hole it has loco pickup on the right rail and tender pickup on the left rail. If there is no wire spring it has power pickup on the right rail front drivers and left rail rear driver.
The power pickup and transfer is one of the week points in the older Rivarossi locos. You may "loose" connections between the rail and the motor. It takes a little work and lots of time but if you put wipers on the wheel and then feed the power by fine wire directly to the motor you can eliminate a lot of problems.
If it has the spring on the drawbar it has tender pickup. Eliminate that completely and solder a short (3/16") piece of rail to the wire and install a rail joiners to the tender with power feed to it. This again eliminates about 3 loose connections.
Regrease it once you get the parts you need for it. It runs pretty good, have to get to the pickups (They're in the front driver assy) and clean them and it should run much better.
IF the tender is a power pickup tender it will have a wiper on the leading and trailing axle of each truck, near the center. The power is transferred through the tender frame to the drawbar pin on the front center bottom side. This pin goes through the hole in the drawbar on the locomotive. This is where the straight wire spring is partially over the hole to make constant contact with the tender pin.
There are no wipers on the loco drivers. Power is picked up by the wheels, transfer through the truck frame, then to the main frame or by wire to the other side of the motor. Minor changes have taken place of the years but this is basically how it works.
The wiper was a suggestion for one to add to remove the weak, loose transfer points between rail and motor.
The first units out were loco only pickup. Then they changed to loco and tender pickup to bridge the turnout gaps. Now they are back to the loco only pickup. Some of the real old Rivarossi steam locos did pick up power from both rails at the loco and did not use the tender for power pickup. Later models went to tender pickup off one rail to reduce the chance of os stalling going through turnouts, etc.
Rivarossi Big Boy is a 1980's model bought new. If you turn it upside down and look at the inside of the drivers you will see the pin point power pick ups that Rivarossi used back then. These pick ups ride on the inside of the divers and pick up the power that way.
If your running DCC then a motor change is mandatory. If you plan anything like constant lighting or sound, you have got to switch that motor out with a good can motor. The factory motors are PURE JUNK as they are the old open frame motors and use a lot of amps to get going. Change yours to Sagami's and it will run like a champ.
Several different motors that will work in them, depending on if they want a faster motor for speed and not concerned about slow speed operation (the old lionel effect) or if the want the more prototypical type speed operation. Either way they are not very reliable.
The newer units have the can motor inside the boiler. Apparently they went back to the loco only power pick up system. They use all drivers to get rail power. But that could depend on the loco. Articulated could use right front right rail left rear left rail system.
Boiler Disassembly
When upside down swing the back pilot to the side. You should see a slotted screw next to the inside edge of the truck sideframe. That is #1. On the top of the boiler there is the sand done. It come out straight up, snug fit. Under that is another screw. Up front right at the very front of the boiler is the operating mechanism for the stem operated bell. It too lifts straight up. Under that is another screw. When these three screws are removed the boiler should come off.
They may have made changes in how the boiler is attached when they made the engine only pickup change. The last one I had apart was put together this way but it did not have the can motor either. That's the missing screw the front has a long bolt holding the bell assy.
Repairing an original Rivarossi AC-12
Disassembly involves removing several screws in the boiler and under the cab. Even with all the screws removed you cannot get the cab from the chassis. The boiler end is free but there is something binding inside the cab.
Remove the handrails that connect the cab to the frame. They are in holes at the top of the cab but are hooked under the steps that come down from the cab. This also holds the front of the cab to the frame. Removing the handrails was the key. The steps do not come off with the cab. Look at the coupler release lever that is also in front of the cab. Sometimes this binds and won't release the cab without a little help. Oil the engine per the instructions on the sheet included with the locomotive and make sure you have a good connection at the drawbar.
The whistle section on top of the shell that pops straight up and there is a screw inside the hole....just check which one comes out easily and you will find the final screw to remove the shell from the drive train.
If you've got that done, check the motor. Trace the electrical problem to one of the motor brushes. Replacement brushes may be available for that motor. Those older AHM three pole motors were awful. They'd run for awhile, but the brushes gave up the ghost pretty quickly. One was carbon, the other some kind of rolled copper mesh. Re-motor with a can motor.
Rivarossi Cab Forwards - Modifications
The new version does not have enough wheels picking up rail power. Only two drivers on the front engine pick up right rail power, and three drivers on the rear engine pick up from the left rail. This lack of pick up causes problems at some turnouts. On double slip switches the new version stalls. The older version goes right through these switches with no problem, even at slow speed. The older version had all eight drivers picking up the right rail, and four tender wheels for the left rail power. If the speed is high enough, about 30 MPH, the flywheel will take the new version though with a noticeable hitch. With sound, the momentary loss of power is very noticeable. Sound make a momentary loss of power at turnouts on the mainline noticeable, even though the loco does not stall.
As a fix, try modifying the tender to give rail pickup the same as the older version. Forward truck for right rail, rear truck for left rail. This will solve the problem. The modified new version will crawl through the slip switches at it's slowest speed. Do no use the forward truck for sound cams for exhaust synchronization, instead use throttle setting synchronization. A small price to pay for much better operation.
The new version has a change in the air piping that runs on the right side under the walkway. They are .020" in diameter, and are wire on the older version, and plastic on the new. It is almost impossible to handle the loco without breaking those plastic pipes. Make a new assembly out of wire and brass supports.
Change the whistle, change the air horn, change all handrails and grab irons to wire and add illuminated number boards.
Rivarrosssi Flanges, Drivers & Wheel Tread
The latest Rivarossi Cab Forwards do have RP25 flanges, not the extra large ones of the older models. The outside of the tire scales 57". The wheel center scales 52". The prototype dimensions are 63" and 56". Grossly undersized.
Remember, because a model must have oversize flanges, it cannot have scale size drivers and scale spacing on the drivers, one or both have to be off scale. Rivarrossi drivers are spaced at 0.833 inches vs the correct scale distance of 0.778. The Rivarossi drivers scale out at about 57" rather than 63".
The wheel tread width also is an issue - a standard .110 tread pushes the rods (and the cylinders) out .110-.063 or .047" on each side. That's 4 scale inches too wide per side.
Rivarossi Traction Tires
For replacing traction tires, to look at European makers like Roco, Marklin, Liliput, Fleischmann, to name a few. They all use traction tires and have a wide variety of sizes. Another alternative is Stewart, they make replacement traction tires and yet a cheaper alternative is "dental bands" (those rubber bands used on braces.
It’s best to unbolt one wheel at a time and not the whole rod. Use some of the web stores that deal in European trains.
They should be able to find a size match to what you looking for. (give them the tire or wheel diameter). As a side note, do not try to get Rivarossi replacement, cause their parts are hard to find, anywhere (even in Italy).
Rivarrossi Cab Forward Woes
Sometimes there is a lot of play in the side-to-side movement of the drivers. Not uncommon in our models, allows tighter radius curves to be negotiated. You can put a thin fiber washer behind the drivers to minimize the play but be forewarned it may hinder it's ability to take sharper curves. You don't need to take the drivers off you can just split the washer and twist it to make it fit over the axle.
Use a shorter screw in that driver or file it down just to the point so that you can still use a screwdriver to remove it. Round the edges of the screws a bit so the they won't catch the crosshead as easily. Or bend the crosshead arms out slightly to minimize it's contact with the side rods.
Other things to check are: check to see if the crosshead square in it slot, is it off-center, are the drivers gauged properly (not too wide).
Rivarossi & coreless motors and DCC
Replace both motors with Sagamis and they became excellent quiet runners.
MicroLocoMotion makes a special kit to re-motor Rivarossi Cab Forwards. The remotor/regear set for the the Riv Cab-Forward (and other HO articulated locos features installing TWO can motors, one to power each of the "engines".
Aa far as MicroLocoMotion, some of their motors are quite pricey and there are cheaper alternatives. It's one thing to put a $100 motor in a $1000 brass model, another in an older plastic model that may not sell for $100 on eBay.
Kenneth R. Clark
Coreless motors draw so little that a pair should run off one decoder just fine from a current rating point of view, but there may be another nasty lurking in here. There were cautions against running them on a pulse width modulated throttle. The way that DCC controls motors has a lot in common with PWM throttles and it mat be an issue.
There are some cautions about coreless motors in the Digitrax literature. The latest Digitrax Decoder Manual has no mention of coreless motors. But it does say that their Super-Sonic operation for quiet running is a PWM system. So, beware. Not if you use any of the current decoders out there with high frequency drive.
Repowering a Rivarossi / AHM
On the repowering issue, consider joining the Repower and Regear yahoo group. Originally I posted an Excel file in the Repower and Regear file section; but my intent was to create a web page that could be easily accessed. The Table is incorporated in my newest Repowering Guide at http://shastasprings.com/repower/Motor_RPM_Table-2013.htm
Soon it will also be linked to my main web page, until then use this link.
Kenneth R. Clark
Rivarossi Engine Parts
Walther's Parts Dept. have been a great help in the past. Deal with is Mike.
email: mikef@walthers.com
At the present time my best recommendation for Rivarossi parts is:
Golf Manor Hobbies of Cincinnati, Ohio. (513) 351-3849
Ed Rosbac, the proprietor, has accumulated a good selection of parts from this manufacturer.
Rivarossi Tender
Rivarossi Cab Forwards - Tender Modifications
With the older version of the Rivarossi Cab Forwards and the current version you can upgrade the appearance. Change the tender water hatches from round blobs to SP type rectangular, add the hand brake to the tender deck, change all handrails and grab irons to wire, reletter and renumber to correct size white letters.
Paint
Aluminum painted smokebox and fire box wrong, if freshly shopped this is oil-graphite color.
Blackened hand rails, all aluminum front.
There are photos of AC-10/11/12s with light colored smokeboxes, but none with black smokeboxes.
4-8-8-2 AC-12
#4275-4294
By comparison the AC 10/11/12s saw little appearance change other than paint and lettering.
Donner Pass was home to more of the AC-10/11/12s although one or two might be found on other mountain divisions like the Shasta. There are steam locomotive rosters for the Espee presented on-line. They were updated every few months, most locomotives stayed on the same division for years. Check the roster for your era and division and you can see which cab forwards were regulars there.
Kenneth R. Clark
Details
The AC-12 has no external dry pipe and its throttle rod is on the same side as the AC-6.
Ernie Fisch
Cold Water Pump
The cold water pump for the SA superheater is located by the only place you can figure that it would have been, under the platform very close to the tender. This would be the natural location. The pipes and ribbed hose located on the engineers side are the delivery pipe from the pump to the heater unit. (The hose sits prominently above the 5th driver from the front) However, you cannot find any conclusive evidence showing the location of the cold water pump.
The Worthington cold water pump is mounted very low on the frame on the right side. It is so low, it is kind of behind the trailing truck, just clearing the rear of the trailing truck. The hose from the tender goes directly into the pump.
Blowoff System
The configuration of the blowoff system when the spreaders were added with Builder photos all show the cylindrical muffler mounted just behind the turret with a single pipe running to near ground level, but the muffler was evidently removed when the distinctive SP spreaders were added. You can see blowoff valves mounted on each corner of the fireboxes but cannot detect any piping that would have connected these to the spreaders.
The pipe that comes from the blowdown valve goes along the bottom edge of the firebox almost to the cab, then crosses under the firebox to the blowdown spreader on the other side. In other words, the right side blowdown valve exhausts through the left side spreader and vice versa. That's why you don't see a direct connection on one side.The ribbed hose being the connection from the cold pump to the heater.
Oil Piping
Oil piping to the burner seen at least one photo that seems to show the SP style oil heater similar to those used on 4-8-2s and 4-8-4s, but on most, you cannot detect any piping at all in the area where you would expect to see the burner.
Drivers
AC-12 Boxpoks drivers
Stack / Exhaust Splitter
In a photo of AC-12 #4294, there is some sort of appliance over the smoke stacks. It looks like two vertical rods on each end with a horizontal rod between them. It's a smoke splitter. Exhaust splitter is a better term. The power of the exhaust was damaging the wood snow sheds and wood tunnel linings so they split the smoke to cushion it. The exhaust steam from the cylinders came through the exhaust nozzle, the smokebox and out the stack. This created the draft for the fire.
The #4294 is an AC-12. Cab differences between an AC-4/6 and an AC-12, in the cab comes to mind. Throttle control rodding in the cab crossed over from engineers side to fireman's side of the cab on an AC-4 and AC-5. On the AC-6 and subsequent cab-forward classes, the throttle rod went straight back down the engineers side of the loco, thus no in-cab cross-over rodding.
Church's cab forward book has a picture of the engineer's side and a picture of the fireman's side of the cab. The engineer's side picture is fairly dark but some stuff stands out.
Concerning the electrical connection to the back up light and rear markers. On page 302, there are good pictures of the rear of 220-R5 #9357 for #4294, and 220-R4(?) for AC-10 #4229. #9357 has externally mounted conduit supplying power to the lights, with the feed coming from the bottom of the tender by means of a vertical conduit run. The tender for #4229, has the supply from a conduit routed around the top edge of the tender. The routing used on 9357 is a modification after delivery, as it still has the same marker light connector mounting blocks in place as does #4229's tender. If this was a modification, does it apply to 9357 only, or were other tenders so modified?
One hesitates to use the word all on any Espee stuff but the smoke light appears to be quite universal.
The early MCs and MMs do not appear to have been delivered with lights but they were added. There is a delivery photograph of 4101 (AC-4) with the light so it may well be ex-works. I found some in Church's cab-forward book. After studying them they look like a drop light stuck on a piece of conduit or an industrial grade lamp. The conduit is about a foot long mounted off center towards the right looking from the smokebox to the cab. The lamp and its socket are tilted off vertical about 15 degrees. The conduit is vertical.
Paint
AC -12 Graphite Smokeboxes
AC's smokeboxes and fireboxes color on #4294 at CSRM were found in its many layers of service paint finishes. Graphite was there from "day one" until her retirement although there were traces of black overspray in later layers where the shops got a little sloppy repainting boiler jacketing.
Kevin Bunker
AC-12s didn't have a jacketed smoke box. Look at AC-12 #4294 in the CSRM in Sacramento. Graphite smokebox, equipment on smokebox door black, all lettering gray, not white. A photo of #4274 taken in November 1957 just after shopping (minimal road grime) where the smokebox is either black or the darkest graphite. Smokeboxes may have looked black and some that were almost silver and everything in between. One problem with the photos is that the smokebox is painted boiler plate while the rest of the boiler is black painted sheet metal. There is a major difference between the reflectivity of the two surfaces. It could also be a case of Espee's NTA (No Two Alike) policy.
The only silver on them was the front/lower portion of the cab face; the smokebox is definitely dark graphite. Photos of AC-10/11/12s with light colored smokeboxes, but none with black smokeboxes.
AC -12 Handrails
Blackened hand rails, all aluminum front.
AC -12 Red Painted Appliances
SP had two different appliances trim colors based on which shops were doing the paint trimming. LAGS used mineral/freight car red for boiler check valves, cab sash, sometimes injectors and some (but not all) valve grab knobs and handles while Sacramento General Shops favored red (as did Bayshore Shops). However, the red or mineral color as used on cab sash was generally restricted to those engines with wooden sash. Latter-day ACs and other more modern engines with metal sash either got their sash cleaned to burnished natural metal or painted, and black paint was as common as the red or metallic color.
Kevin Bunker
References
http://www.rrpicturearchives.net/showPicture.aspx?id=2632944
http://www.rrpicturearchives.net/showPicture.aspx?id=2632926
http://www.livesteamlocomotives.com/drawings/sp_ac-12_4-8-8-2.htm
AC-12 Tender
220-R-x Tender
The 220-R4, R5, and R6 tenders had a 21,900 gal capacity according to the text. The picture of #9357 shows it lettered for 21,900 gal. The CSRM, when they refurbished it, lettered it for 22,000 gal. (which proves nothing.) On page 300, the builder's photo for 4211's tender, an R4, shows 22,000 gal. Arnold's drawing of the R6, on page 303, calls out 22,000.
AC-12 Tender Klaxon Horn Detail
There is a fixture on the top rear of SP 4294's tender. The "thing" in question is a steel-hooded Klaxon horn...the sort used on circa 1920s automobiles and that made the sound "ahhh-ROOOH-gah! These were added by Espee to a large number of the ACs' tenders to help warn people and drivers inside railroad yards, engine terminals and wherever that the engine was backing up. It was found that the steam whistle was sometimes not heard well (especially in engine terminals) and that the air horn under the cab floor was too far forward to warn adequately, especially because it was more or less directional.
According to Amandus Drewes, an SP Roseville Roundhouse machinist from the 1940s through the early '70s, the Klaxon additions came about after one of the Cab Forwards while backing between Roseville and Antelope yards to pick up its train ran into and over a passenger automobile. The engineer had used the steam whistle and had the bell ringing (again, the bell is under the cab floor) and yet the car driver must not have heard.
There’s an uploaded a photo showing several views of it as a casting off an O Scale AC-12. It is in the folder "4294 Details" and is entitled "4294 THING". Several of the AC's had it on their tender, so it may have been some kind of experiment that was not worth repeating on all AC's. 4294 kept it to the end, and it is still on the tender at the museum. The retrofits began sometime in the very late '40s at Roseville.
Gary Schrader
It's a hollow box with a visor on it mounted at the top rear of the tender. The Klaxons were electrically powered and seemed to do the job once installed. The electrical conduit back there goes down to the big rear light, left and right for the class lights and looks like up to that fixture.
PV
A search of photos of SP 2570-2599 shows that 2571 and 2591 both used 90-R-7s. 2588 and 2596 both used 70-C-10s. 70-C-9s were more commonly applied based on photographs. 90-R-7s and 70-C-10s were apparently uncommon on these engines.
Bob Pecotich
References
Use Arnold Menke’s excellent tender section in Church's Cab Forward book.
Drawings
There is a fold-out copy of the erection drawing for Class AC-12 in the back of Church's Cab-Forward book. That would be cheaper than a $250 drawing, and would have the advantage of providing numerous photos of details to assist with model making.
Tony Thompson
http://steamcad.railfan.net/sp4294.htm>http://steamcad.railfan.net/sp4294.htm
Modeling AC-12 Cab-forward
AC-12 Marker Lights
Small clear MV lenses insert into the marker lights. An easy way to get clear (as opposed to "white" lenses is to remove the foil backing from the MV lenses. This way you end up with a clear piece of "glass", which would look much more like an unlit class lamp.
An easier way is to fill the class lamps with either epoxy or Microscale's Kristal Klear. With a black background on the inside, it looks like a clear lens.
Model / Real Loco Comparisons
LocoWidth over eavesHeight Wheelbase
AC-11 Actual:10'-0"16'-2"67'-3"
PFM AC-12 9'-11.5"
* Measuring the outside wall width at mid-window height on the AC drawings in Bob Church's book shows as 120" or 10’.
References
(*see MM 11/99, pg. 20)
(*see MM 12/99, pg. 37)
Akane
Akane Tender
The Akane brass SP AC-12 Cab Forward has a tender with the loco number embossed on it's sides. The Akane round water hatches are WRONG! Cab forwards had square hatches (nearly square).
Broadway Ltd. AC-12
Paint
Broadway Ltd. AC-12
They got it right on the silver on the front and the graphite right on the smokebox and firebox; but they blew it by applying white lettering instead of silver.
Intermountain (1st run)
The first release had serious drive and wheel issues.
Modifications: Add new Faulhaber motor with high RPM to increase speed.
Regauge drivers.
Add rear engine coil spring to screw stud retaining devise to increase downforce on front engine, due to No.1 axle
derailing on 48in curves regularly.
Mike Madonna
Intermountain (2nd run)
Electrical
AC-12 Motor
The second run was much improved but still suffered from a weak motor. The second run has been repowered with a NWSL can motor (#2032D9).
AC-12 DCC Decoder
Engine has factory Tsunami sound. The Tsunami compressor exhaust sound is great. It really runs well, but doesn't run fast.
Intermountain (3rd run)
Modelers can change the front grills for the AC-7/8 classes.
Their looks haven't changed from the previous releases, and they look great, with lots of details. Pictures on IM's website show that the new run comes with a smoke deflector over the stack. This new run comes with ESU/Loksound decoders; It sounded a lot better than the Soundtraxx decoder that came in the previous runs. ESU decoders are also known for their superior motor control.
Wouter J.K. De Weerdt
The IM AC is by far the best looking engine of compared to MTH & BLI. With detail that rivals brass from only a few years ago. If you decide on an Intermountain, get the third release which has all issues fixed. Moreover, you'll have the choice between AC-8,-10 and -12 (with different grilles beneath the cab front windows).
Wouter J.K. De Weerdt
Paint
Intermountain SP AC-12 Paint Pre-production Model
A prototype photo of #4285 on the website it shows a light colored smoke box or a graphite color.
Lose that silver smoke box! Accept a dark graphite smokebox, never silver.
Electrical
AC-12 DCC Decoder
The 3rd production run decoder is the ESU Loksound. Much better sound than the Tsunami, superior motor control and synchronizing the drive with the exhaust sound is a lot easier and better.
Wouter J.K. De Weerdt
The new sound unit has a fantastic whistle but you can program the Soundtraxx as a playable whistle. There is a delay in processing the Upgraded Sound decoder locos as they are working out some technical issues with ESU. If you want to stay with the Soundtraxx, they should be able to get your unit through the upgrade process.
Walt Schedler
Benefits of the decoder swap are much improved sound (with the possibility to download your own specific sounds if you feel like), and considerably better motor control.
Wouter J.K. De Weerdt
Intermountain Lubrication
Intermountain does not lube the engine. Labelle #107 (plastic compatible) will work nicely.
Ed Hall
With the N scale version of the AC-12, the instruction sheet recommends Labelle #108.
Gordon Searle
KTM
All the later KTM cab forwards used the same sheet metal etching. There are different appliances (details) hung on the boilers for each class, but dimensionally, the AC-6 thru AC-12 cab forward boilers were almost identical. Since our models do not generate steam, as long as the proportions are appropriate, the details are fairly easy to change.
The main detail problem with the KTM AC-12 cab forwards is that the width of the cab is about 12 scale inches too wide. The details on the model are mostly superb PSC parts and like most KTM models the mechanism is solid.
Another major error on all KTM cab forwards is that the steam exhaust lines from the cylinders do not line up with the stacks. Fortunately K & S has tubing the right size and you can move the lines on the smokebox and insert an 18" (scale) filler between the cylinders and the steam line casting (Solder yours to the steam lines).
PFM
A PFM AC-12, #4278, from 1974 seems to have good detail in this area which you can copy.
Rivarossi
Detailing parts for Rivarossi old cab-forward
On a HO Rivarossi cab-forward (old version), some parts are missing such as the compressors, water pump and mark lights. PSC Precision Scale Company, Montant, USA offers all the lost wax parts, you'll need to upgrade your Rivarossi AC class cab-forward, The AC-8, AC-10, AC-11 & AC-12 are almost identical.
Electrical
AC-12 Motor Conversion
To convert a Rivarossi AC-12 drivetrain with can motors and gearheads. The shop owner is recommending dual motors and gearheads.
Repowering a Rivarossi / AHM
On the repowering issue, consider joining the Repower and Regear yahoo group. Originally I posted an Excel file in the Repower and Regear file section; but my intent was to create a web page that could be easily accessed. The Table is incorporated in my newest Repowering Guide at http://shastasprings.com/repower/Motor_RPM_Table-2013.htm
Soon it will also be linked to my main web page, until then use this link.
Kenneth R. Clark
Here is a source for another DUAL MOTOR CONVERSION of the Rivarossi cab-forward. The company is called Micro Loco Motion:Go to: http://www.micro-loco-motion.com
Aa far as MicroLocoMotion, some of their motors are quite pricey and there are cheaper alternatives. It's one thing to put a $100 motor in a $1000 brass model, another in an older plastic model that may not sell for $100 on eBay.
Kenneth R. Clark
Westside
These were built by KTM for Westside and imported in 1981.
http://www.flickr.com/photos/29427440@N00/sets/72157637003150565/
Detailing
WSM Boilers
Many people have mentioned that the WSM AC-7 and AC-12 had the same boilers and as such, one was wrong. The AC-7 and AC-12 boilers were the same. There will be detail differences in appliances but you better have sharp eyes and good pictures to tell. The most obvious difference is in the cab where the 7 had smaller front windows.
Lettering & Numbering
It is numbered for #4283.
Electrical
AC-12 Motor Conversion
Change the open motor with a Cannon can motor and the AC-12's becomes a great runner.
AC-12 Tenders
Lettering & Numbering
Decals
Tender Water Capacity - 21,900 gals. on rear of tender.
Change cab and tender lettering with decals of correct size.
Electrical
Fiber-Optic Back up light and rear markers
The glass fiber used in data transfer is very highly refined, with a very specific makeup. To put a permanent bend in a fiber optic without damaging it is by heating. Heating will allow a bend to work. The kind used in hobbies is light-transmitting plastic.
Find the smallest metal tube that you can that will hold the fiber. Slip the fiber into the tube and then put a slight bend in the tube. At least it gives you something else to look for.
Another technique for making free standing lights might work. Bend the fiber as desired and then paint it with ACC. When the glue dries it might hold the shape.
Modeling Klaxon Horn
SoundTraxx was contacted about adding a Klaxon to the Cab Forward decoders and may be possible. Put that sound on your DigiTrax (or other) locomotive sound system and see if anyone notices! A sound sample of the "Aahooga Horn" from the Ro Grande Goose can be found on the Soundtraxx website under Tsunami 1000, Diesel air horn samples.
Pete
Pick-up Wipers
To improve performance, add more pickup wipers. Make them from .003” thick phosphor-bronze sheet metal (Clover House sells 4” x 6” sheets, part no. 990) P.O. Box 62 Sebastapol, CA. 95473. Make new shoes like the old ones. Mount them to frame with 00-90 screws.
On the second-run AC's have their motors replaced with a Mashima 1833 can motor.
Brian Moore
Tsunami Chuffs
An AC class be 8 chuffs per revolution. To be correct, it would be 4 chuffs plus 4 chuffs, not 8 chuffs always synchronized the same way.
GP
If you installed the Tsunami chip, then there is a setting for articulateds, which gives you the "8" chuffs, but also the 4+4 are not
synchronized, (i.e. they go in and out of phase), which is more realistic.
Leo
ESU LokSound Select Micro
It comes with the SP AC-12 specific sound file loaded. It seems like the chuff rate is based on the sound file loaded and BEMF.
Mike Madonna
2-8-8-4
2-8-8-4 AC-9“Yellowstones”
#3800-3811
Last steam locomotives with coal tenders were the Lima built #3800-3811 in 1939. Retired 1953-1956.
Class AC-9 were Yellowstones (not Cab Forwards). Not all Southern Pacific articulateds were Cab Forwards. Class AC-9 was made up of 12 Lima built Superpower, coal burning Yellowstones (2-8-8-4). They had the same tractive effort of the Cab Forwards.
They were used in the Southwest from El Paso to Tucumcari, N.M route.
Details
AC-9 Boxpoks drivers
Fire Boxes
Later firebox sides were lagged. AC9s, because they operated in New Mexico, also had non-lagged fireboxes, since they did not encounter the extreme cold of the Sierra.
4-wheel firebox trucks
Purpose for the 4-wheel trailing truck on the AC-9 was to reduce axel loading due to large fire-box. Its all about balancing the load.
Weight distribution and better trackability are combined reasons for the four-wheel lead truck.
Bob Church
The exterior appearance of the firebox truck was completely different between the AC-9 and the other ACs (different side frame, wheel spacing, and wheel diameter.
AC-9 Tender
#3800, #3805 use 222-R-1 tender
#3801, #3808 use 224-R-1 tender
#3806, #3809 use 252-R-1 tender
Modeling AC-9 Cab Forward

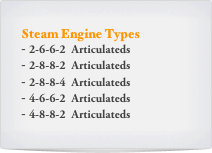


Photo courtesy of Brian Moore
